Saturday, January 20, 2018

Android Intent

Today, I'm going to discuss some small snippet of Intent. An Intent is basically a message that is passed between components (such as Activities, Services, Broadcast Receivers, and Content Providers). One component that wants to invoke another has to only express its intent to do a job. And any other component that exists and has claimed that it can do such a job through intent-filters, is invoked by the Android platform to accomplish the job. This means, neither components are aware of each other's existence but can still work together to give the desired result for the end-user.


An intent is an abstract description of an operation to be performed. It can be used with startActivity to launch an Activity, broadcastIntent to send it to any interested BroadcastReceiver components, and startService(Intent) or bindService(Intent, ServiceConnection, int) to communicate with a Background Service.


Intent perform late runtime binding between the code in different applications.

Action: The general action to be performed, such as ACTION_VIEW, ACTION_EDIT, ACTION_MAIN, etc.

Data: The data to operate on, such as a personal record in the contacts database, expressed as a Uri.


Now let's see some code snippet.

1. Open camera.

 public Intent openCamera(Uri mCameraOutput) {
        Intent cameraIntent = new Intent(MediaStore.ACTION_IMAGE_CAPTURE);
        cameraIntent.putExtra(MediaStore.EXTRA_OUTPUT, mCameraOutput);
        if (Build.VERSION.SDK_INT >= Build.VERSION_CODES.LOLLIPOP_MR1) {
            cameraIntent.putExtra("android.intent.extras.LENS_FACING_FRONT", 1);
        } else {
            cameraIntent.putExtra("android.intent.extras.CAMERA_FACING", 1);
        }
        return cameraIntent;
    }

2. Open Gallery.

    public Intent getGallery() {
        Intent galleryIntent = new Intent(Intent.ACTION_PICK, MediaStore.Images.Media.EXTERNAL_CONTENT_URI);
        String[] mimeTypes = {"image/jpeg", "image/jpg", "image/png"};
        galleryIntent.putExtra(Intent.EXTRA_MIME_TYPES, mimeTypes);
        return galleryIntent;
    }


3. Open dialer screen.


@Override
    public void call(String mobile) {
        Intent intent = new Intent(Intent.ACTION_DIAL);
        intent.setData(Uri.parse("tel:" + mobile));
        startActivity(intent);
    }

4. Move to google play store.

@Override
    public void moveToGooglePlayStore() {
        if (fragmentBaseActivity != null) {
            startActivity(new Intent(Intent.ACTION_VIEW, Uri.parse("market://details?id=" + fragmentBaseActivity.getPackageName())));
        }
    }

5. Send a mail.

/**
     * Send invitation email.
     */
    private void onShareClick() {

            Intent email = new Intent(Intent.ACTION_SEND);
            email.putExtra(Intent.EXTRA_SUBJECT, fragmentBaseActivity.getString(R.string.share_referral_code));
            email.putExtra(Intent.EXTRA_TEXT, Html.fromHtml(new StringBuilder()
                    .append("<html>")
                    .append("<p>" + fragmentBaseActivity.getString(R.string.hi) + "</p>")
                    .append("<p>" + fragmentBaseActivity.getString(R.string.refer_content) + "</p>")
                    .append("<p><h2>" + mReferCode + "</h2></p>")
                    .append("<p>" + fragmentBaseActivity.getString(R.string.app_google_play_store_content) + "</p>")
                    .append("<p>" + fragmentBaseActivity.getString(R.string.app_link)+" "+ "<a href=>" + "http://play.google.com/store/apps/details?id=" + fragmentBaseActivity.getPackageName() + "</a></p><br>")
                    .append("<p>" + fragmentBaseActivity.getString(R.string.regards) + "</p>")
                    .append("<p>" + mPresenter.getLoginUserName() + "</p>")
                    .append("</html>")
                    .toString()));

            email.setType("text/html");
            startActivity(Intent.createChooser(email, "Choose an Email client :"));
     
    }

Share:

Mobile number verification with Nexmo

Introduction: Nowadays, A small and big application using the user mobile number for registration on their application.
For verifying valid mobile number we have to depend on 3rd party application like Nexmo. Nexmo provides mobile number verification service with a voice call or SMS OTP.

I'm going to explain mobile number verification feature with Android SDK. We have to add a dependency to the application Gradle file.


implementation 'com.nexmo:verify:4.0.0'


Create an account on nexmo.com. After that register their app by using the following steps.

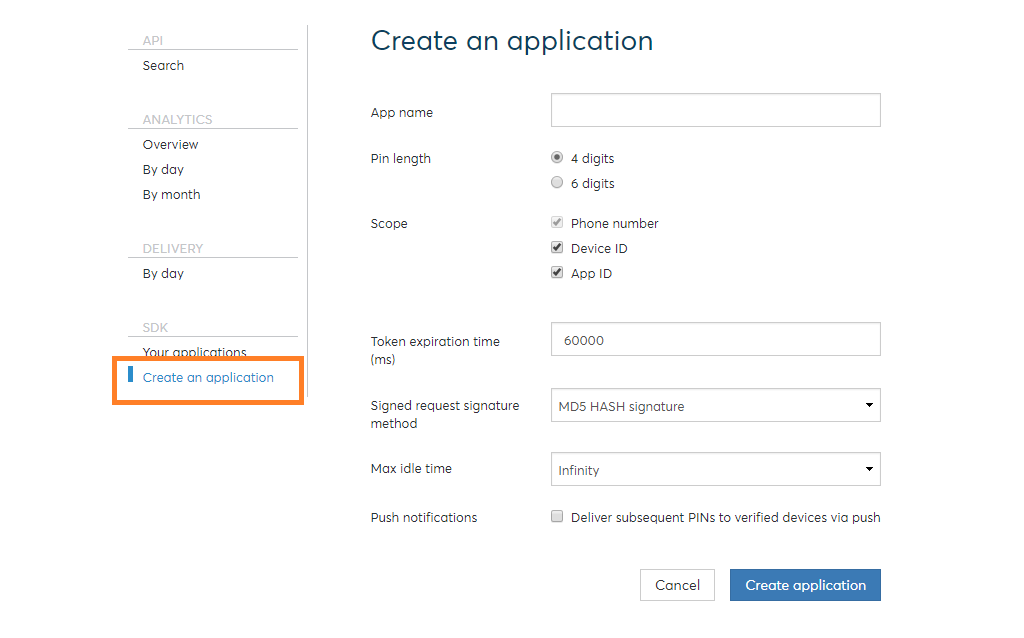
1. Go to Nexmo and click on verify tab.


2. Create an application.


Once you create an application. You can find your application credentials and use it in below snippet.

1. Get an instance of NexmoUtil class and use setListener(this) for the callback.

 public static NexmoUtil getInstance(Context context) {
        if (verifyClient == null) {
            mInstance = new NexmoUtil();
            try {
                NexmoClient nexmoClient = new NexmoClient.NexmoClientBuilder()
                        .context(context)
                        .applicationId(context.getString(R.string.nexmo_application_id))
                        .sharedSecretKey(context.getString(R.string.nexmo_shared_secret_key))
                        .build();
                verifyClient = new VerifyClient(nexmoClient);
            } catch (ClientBuilderException e) {
                Crashlytics.logException(e);
            }
        }
        return mInstance;
    }


2. To get OTP, call sendOtp("IN","mobile number") method of following utility with country code(INDIA-IN) and valid mobile number.

 private void sendOtp(String countryCode, String mobileNumber) {
        if (verifyClient != null && countryCode != null && mobileNumber != null) {
            verifyClient.getVerifiedUser(countryCode, mobileNumber);
        }
    }

3. After some time onVerifyInProgress() will notify you about the progress.

 @Override
    public void onVerifyInProgress(VerifyClient verifyClient, UserObject userObject) {
        if (mNexmoListener != null) {
            mNexmoListener.onMobileVerificationInProgress(verifyClient, userObject);
        }
    }

4. At the end, if you got OTP, verify it by using the checkPinCode("----") method.

 public void checkPinCode(String otp) {
        if (verifyClient != null && otp != null) {
            verifyClient.checkPinCode(otp);
        }
    }


5. If Nexmo find valid OTP onUserVerified() will invoke.


 @Override
    public void onUserVerified(VerifyClient verifyClient, UserObject userObject) {
        if (mNexmoListener != null) {
            mNexmoListener.onMobileNumberVerified(verifyClient, userObject);
        }
    }


View complete utility.


import com.nexmo.sdk.NexmoClient;
import com.nexmo.sdk.core.client.ClientBuilderException;
import com.nexmo.sdk.verify.client.VerifyClient;
import com.nexmo.sdk.verify.event.Command;
import com.nexmo.sdk.verify.event.CommandListener;
import com.nexmo.sdk.verify.event.SearchListener;
import com.nexmo.sdk.verify.event.UserObject;
import com.nexmo.sdk.verify.event.UserStatus;
import com.nexmo.sdk.verify.event.VerifyClientListener;
import com.nexmo.sdk.verify.event.VerifyError;

import java.io.IOException;

/**
 * Handle mobile number verification feature of app.
 */
public class NexmoUtil implements VerifyClientListener, SearchListener {

    private static VerifyClient verifyClient;
    private static NexmoUtil mInstance;
    private NexmoListener mNexmoListener;
    private String mCountryCode;
    private String mMobileNumber;

    public static NexmoUtil getInstance(Context context) {
        if (verifyClient == null) {
            mInstance = new NexmoUtil();
            try {
                NexmoClient nexmoClient = new NexmoClient.NexmoClientBuilder()
                        .context(context)
                        .applicationId(context.getString(R.string.nexmo_application_id))
                        .sharedSecretKey(context.getString(R.string.nexmo_shared_secret_key))
                        .build();
                verifyClient = new VerifyClient(nexmoClient);
            } catch (ClientBuilderException e) {
                Crashlytics.logException(e);
            }
        }
        return mInstance;
    }

    /**
     * Set Callback listener.
     *
     * @param listener instance.
     */
    public void setListener(NexmoListener listener) {
        mNexmoListener = listener;
        if (verifyClient != null) {
            verifyClient.removeVerifyListeners();
            verifyClient.addVerifyListener(this);
        }
    }

    @Override
    public void onException(IOException e) {
        Crashlytics.logException(e);
        if (mNexmoListener != null) {
            mNexmoListener.onMobileVerificationError(null);
        }
    }

    @Override
    public void onVerifyInProgress(VerifyClient verifyClient, UserObject userObject) {
        if (mNexmoListener != null) {
            mNexmoListener.onMobileVerificationInProgress(verifyClient, userObject);
        }
    }

    @Override
    public void onUserVerified(VerifyClient verifyClient, UserObject userObject) {
        if (mNexmoListener != null) {
            mNexmoListener.onMobileNumberVerified(verifyClient, userObject);
        }
    }

    @Override
    public void onError(VerifyClient verifyClient, VerifyError errorCode, UserObject user) {
        if (mNexmoListener != null) {
            mNexmoListener.onMobileVerificationError(errorCode);
        }
    }

    /**
     * Send number for get OTP.
     *
     * @param countryCode  country code.
     * @param mobileNumber mobile number.
     */
    public void getVerifiedUser(final String countryCode, final String mobileNumber) {
        mCountryCode = countryCode;
//        mCountryCode = "IN"
        mMobileNumber = mobileNumber;
        verifyClient.getUserStatus(mCountryCode, mobileNumber, NexmoUtil.this);
    }

    /**
     * Cancel verified number.
     *
     * @param countryCode  country code.
     * @param mobileNumber mobile number.
     */
    private void cancelVerification(final String countryCode, final String mobileNumber) {
        verifyClient.command(countryCode, mobileNumber, Command.LOGOUT, new CommandListener() {
            @Override
            public void onSuccess(Command command) {
                sendOtp(countryCode, mobileNumber);
            }

            @Override
            public void onError(Command command, VerifyError verifyError, String s) {
                if (mNexmoListener != null) {
                    mNexmoListener.onMobileVerificationError(verifyError);
                }
            }

            @Override
            public void onException(IOException e) {
                Crashlytics.logException(e);
                if (mNexmoListener != null) {
                    mNexmoListener.onMobileVerificationError(null);
                }
            }
        });
    }

    /**
     * Get OPT
     *
     * @param countryCode  country code.
     * @param mobileNumber mobile number.
     */
    private void sendOtp(String countryCode, String mobileNumber) {
        if (verifyClient != null && countryCode != null && mobileNumber != null) {
            verifyClient.getVerifiedUser(countryCode, mobileNumber);
//          verifyClient.getVerifiedUser("IN", mobileNumber)
        }
    }

    /**
     * Verify OTP.
     *
     * @param otp value.
     */
    public void checkPinCode(String otp) {
        if (verifyClient != null && otp != null) {
            verifyClient.checkPinCode(otp);
        }
    }

    @Override
    public void onUserStatus(UserStatus userStatus) {
        if (userStatus == UserStatus.USER_VERIFIED) {
            cancelVerification(mCountryCode, mMobileNumber);
        } else {
            sendOtp(mCountryCode, mMobileNumber);
        }
    }

    @Override
    public void onError(VerifyError verifyError, String s) {
        if (mNexmoListener != null) {
            mNexmoListener.onMobileVerificationError(verifyError);
        }
    }

    public interface NexmoListener {

        /**
         * Number verification under progress.
         *
         * @param verifyClient instance.
         * @param userObject   instance.
         */
        void onMobileVerificationInProgress(VerifyClient verifyClient, UserObject userObject);

        /**
         * Enter OTP verified.
         *
         * @param verifyClient instance.
         * @param userObject   instance.
         */
        void onMobileNumberVerified(VerifyClient verifyClient, UserObject userObject);

        /**
         * Nexmo API's error.
         *
         * @param verifyError instance.
         */
        void onMobileVerificationError(VerifyError verifyError);
    }
}
Share:

Saturday, August 12, 2017

Kotlin - Introduction

Kotlin is a statically-typed programming language ( A programming language is said to use static typing when type checking is performed during compile-time as opposed to run-time) that runs on the Java Virtual Machine and also can be compiled to JavaScript source code or uses the LLVM compiler infrastructure. Its primary development is from a team of JetBrains programmers based in Saint Petersburg, Russia.


Before start learning Kotlin, Let's take a look at Kotlin feature that makes it smart.

Share:

Sunday, April 30, 2017

Android - Moving an object on a circular path


Overview: -  Android provides powerful API libraries which support custom 2D and 3D graphics. We can move an object on the circular path by using canvas and doing some mathematics calculation.


You can use the parametric equation of a circle. Considering the circle is drawn with the center on the origin (O) as shown in the diagram below


If we take a point "p" on the circumference of the circle, having a radius r.

Let the angle made by OP (Origin to p) be θ. Let the distance of p from x-axis be y Let the distance of p from y-axis be x

Using the above assumptions we get the triangle as shown below:

Now we know that cos θ = base/hypotenuse and sin θ = perpendicular/hypotenuse

which gives us cos θ = x/r and sin θ = y/r

If the circle is not at the origin and rather at (a,b) then we can say that the center of the circle is shifted

a unit in the x-axis
b unit in the y-axis 

So for such a circle, we can change the parametric equation accordingly by adding the shift on the x and y-axis giving us the following equations:

x=a+r*cosθ
y=b+r*sinθ 

Where a & b are the x,y coordinates of the center of the circle.

Hence we found x and y the coordinates of the point on the circumference of the circle with radius r

By using the above calculation, We can move an object by using the above method. As we can see:


Now, Let's implement it in Android.

To implement it, we going to use SurfaceView.

import android.content.Context;
import android.graphics.Canvas;
import android.view.SurfaceHolder;
import android.view.SurfaceView;

public class CircularView extends SurfaceView implements SurfaceHolder.Callback2 {

    private SurfaceHolder mHolder;

    private int mViewWidth;
    private int mViewHeight;
    private Circle mBigCircle;

    private AnimationThread galleryThread = null;

    public CircularView(Context context) {
        super(context);

        mHolder = getHolder();

        mHolder.addCallback(this);
    }

    @Override
    public void surfaceRedrawNeeded(SurfaceHolder holder) {
        drawViewOnSystemCall(holder);
    }

    @Override
    public void surfaceCreated(SurfaceHolder holder) {
        mViewWidth = getWidth();
        mViewHeight = getHeight();

        mBigCircle = new Circle(mViewWidth / 2, mViewHeight / 2, (Math.round((mViewWidth * 80)          / 100)) / 2);

        drawViewOnSystemCall(holder);

        galleryThread = new AnimationThread(getHolder());
        galleryThread.setRunning(true);
        galleryThread.start();
    }

    private void drawViewOnSystemCall(SurfaceHolder holder) {
        synchronized (holder) {
            refreshScreen();
        }
    }

    private void refreshScreen() {
        Canvas lockCanvas = mHolder.lockCanvas();
        drawSurfaceView(lockCanvas);
        mHolder.unlockCanvasAndPost(lockCanvas);
    }

    @Override
    public void surfaceChanged(SurfaceHolder holder, int format, int width, int height) {
        drawViewOnSystemCall(holder);
    }

    private void drawSurfaceView(Canvas canvas) {
        if (canvas == null) {
            return;
        }
        canvas.drawRGB(255, 255, 255);
        if (mBigCircle != null) {
            mBigCircle.render(canvas);
        }
    }

    @Override
    public void surfaceDestroyed(SurfaceHolder holder) {

    }

    class AnimationThread extends Thread {
        private boolean isRunning;
        private SurfaceHolder mHolder;

        public AnimationThread(SurfaceHolder holder) {
            mHolder = holder;
        }

        public void setRunning(boolean running) {
            isRunning = running;
        }

        @Override
        public void run() {
            while (isRunning) {
                mBigCircle.move();
                drawViewOnSystemCall(mHolder);
            }
        }
    }
}

Create a circle object that shows a circle border and moving object.

import android.graphics.Canvas;
import android.graphics.Color;
import android.graphics.Paint;

public class Circle {

    private float mUserPicCenterX;
    private float mUserPicCenterY;

    private float mUserPicBorderCenterX;
    private float mUserPicBorderCenterY;
    private int mBorderRadius;
    private Paint mVisiblePaint;
    private Paint mVisibleMessageCountPaint;
    private double angle = 230;
    private int mVisibleMessageCountRadius;

    public Circle(float centerX, float centerY, int radius) {
        mUserPicCenterX = centerX;
        mUserPicCenterY = centerY;
        mBorderRadius = radius;
        createVisiblePaint();
        updatePosition(angle);
    }


    private void updatePosition(double angle) {
        angle = Math.toRadians(angle);
        mUserPicBorderCenterX = (float) (mUserPicCenterX + Math.cos(angle) * mBorderRadius);
        mUserPicBorderCenterY = (float) (mUserPicCenterY + Math.sin(angle) * mBorderRadius);
    }

    private void createVisiblePaint() {
        mVisiblePaint = new Paint();
        mVisiblePaint.setAntiAlias(true);
        mVisiblePaint.setFilterBitmap(true);
        mVisiblePaint.setDither(true);
        mVisiblePaint.setColor(Color.parseColor("#F85A74"));
        mVisiblePaint.setStyle(Paint.Style.STROKE);
        mVisiblePaint.setStrokeWidth(14f);

        mVisibleMessageCountPaint = new Paint();
        mVisibleMessageCountPaint.setAntiAlias(true);
        mVisibleMessageCountPaint.setFilterBitmap(true);
        mVisibleMessageCountPaint.setDither(true);
        mVisibleMessageCountPaint.setColor(Color.parseColor("#F85A74"));

        mVisibleMessageCountRadius = mBorderRadius / 6;

    }

    public void render(Canvas canvas) {
        canvas.drawCircle(mUserPicCenterX, mUserPicCenterY, mBorderRadius, mVisiblePaint);
        canvas.drawCircle(mUserPicBorderCenterX, mUserPicBorderCenterY, mVisibleMessageCountRadius, mVisibleMessageCountPaint);
    }


    public void move() {
        if (angle > 360) {
            angle = 0;
        }
        angle++;
        updatePosition(angle);
    }
}

Share:

Saturday, March 18, 2017

Android - App Shortcuts, Android Nougat 7.1 Feature.

Android Nougat 7.1, the newest version of Android has come with several new features. Here I'm going to explain App Shortcuts. App Shortcuts allows the user to move on a specific screen from the app launcher. The feature is available on any launcher that supports them, such as YouTube app launchers, Android Nougat 7.1.


App Shortcuts, YouTube in Android Nougat 7.1


To reveal the shortcuts of an app, simply long-press the launcher icon of that app. Then tap on a shortcut to jump to the associated action. These shortcuts are a great way to engage users and provide some menu options of your app even before users launch your app.

Each shortcut references an intent, each of which launches a specific action or task, and you can create a shortcut for any action that you can express as an intent. For example, you can create intents for sending a new text message, making a reservation, playing a video, continuing a game, loading a map location, and much more.

Implement it we have two ways

 A) Statically  (by declaring all the shortcuts in a resource file, also known as manifest shortcuts).

 B) Dynamically (by adding the shortcuts at runtime).

Let's talk about the static approach.

1. Create a shortcuts.xml file and keep it on following location in the project.

 res/xml/shortcuts.xml
 res/xml-v25/shortcuts.xml
 <shortcuts xmlns:android="http://schemas.android.com/apk/res/android">
            <shortcut
               android:enabled="true"
               android:icon="@drawable/ic_launcher"
               android:shortcutDisabledMessage="@string/shortcut_label_disabled"
               android:shortcutId="new_task"
               android:shortcutLongLabel="@string/shortcut_label_create_new_task"
               android:shortcutShortLabel="@string/shortcut_label_new_task">
                  <intent
                     android:action="android.intent.action.VIEW"
                     android:targetClass="com.test.launchershortcut.DetailActivity"
                     android:targetPackage="com.test.launchershortcut"/>
            </shortcut>

            <shortcut
               android:enabled="true"
               android:icon="@drawable/ic_launcher
               android:shortcutDisabledMessage="@string/shortcut_label_disabled"
               android:shortcutId="opened_tasks"
               android:shortcutLongLabel="@string/shortcut_label_view_opened_tasks"
               android:shortcutShortLabel="@string/shortcut_label_opened_tasks">
                  <intent
                    android:action="android.intent.action.VIEW"
                    android:targetClass="com.test.launchershortcut.ReportActivity
                    android:targetPackage="com.test.launchershortcut"/>
             </shortcut>

  </shortcuts>  

As we can see each shortcut tag defines a series of attributes, like the icon and labels, and also references an intent which is set to launch a specific activity when triggered. Attributes android:shortcutId is a mandatory attribute. If it is not declared it will cause the respective shortcut not to appear in the shortcuts list. The recommended maximum number of shortcuts is 4, although it is possible to publish up to 5.


2. Reference shortcuts.xml file in the AndroidManifest.xml as metadata to the App’s launcher activity.
<activity android:name=".MainActivity">
     <intent-filter>
          <action android:name="android.intent.action.MAIN" />
          <category android:name="android.intent.category.LAUNCHER" />
     </intent-filter>
     <meta-data
           android:name="android.app.shortcuts"
           android:resource="@xml/shortcuts" />
</activity>

Any activity that has the intent-filter action set to android.intent.action.MAIN and the category to android.intent.category.LAUNCHER can display app shortcuts.

Now run the project, the result might look something like this


Implementation of Dynamically Approach. 

For handle Static and Dynamic App shortcuts Nougat 7.1 provides us ShortcutManager. ShortcutManager is the entry point for manipulating (adding, updating, removing) shortcuts at runtime. 
private void createDynamicAppShortCut() {
       ShortcutManager shortcutManager = getSystemService(ShortcutManager.class);
        Intent intent = new Intent(this, DetailActivity.class);
        intent.setAction(Intent.ACTION_VIEW);
        ShortcutInfo shortcut = new ShortcutInfo.Builder(this,                    getString(R.string.shortcut_label_new_task_dy))
                .setShortLabel(getString(R.string.shortcut_label_new_task_dy))
                .setLongLabel(getString(R.string.shortcut_label_new_task_dy))
                .setIcon(Icon.createWithResource(this, R.drawable.ic_launcher))
                .setIntent(intent)
                .build();
        shortcutManager.setDynamicShortcuts(Arrays.asList(shortcut));
}

Trigger the above method at a runtime and move to App Launcher, You will see, we have one more shortcut.


ShortcutManager provides us with some interesting methods.

updateShortcuts (List ids) – update all existing shortcuts by ID.

removeDynamicShortcuts (List ids) – delete dynamic shortcuts by ID.

disableShortcuts (List ids) – disable dynamic shortcuts by ID.

reportShortcutUsed (String shortcutId) – You want to call this method whenever the user selects the shortcut containing the given ID or when the user completes an action in the application that is equivalent to selecting the shortcut. 


Something more

If you tap and drag a shortcut then it will be pinned to the device’s launcher:


When App Shortcuts disable or updated as used, Icon color will be changed. Something like this


Share:

Monday, March 13, 2017

Android - Read Files, Apps, photos & media from Android phone

In this blog, i'm going to write a small code snippet that fetches some useful content from Android Phone.

Below is the snippet


1. Set up Application permissions.


<uses-permission android:name="android.permission.WRITE_EXTERNAL_STORAGE"/>


2. Get install Application info (APK).      


 In your Activity/Fragment call following method that returns a list of install Application.

      public List<AppInfo> getInstalledApps(Context mContext) {

            List<PackageInfo> apps = mContext.getPackageManager().getInstalledPackages(0);
            ArrayList<AppInfo> mInstalledApps = new ArrayList();

            for (PackageInfo p : apps) {
                if (!isSystemPackage(p)) {
                    AppInfo newInfo = new AppInfo();
                    newInfo.setAppName(p.applicationInfo.loadLabel(mContext.getPackageManager()).toString());
                    newInfo.setPackageName(p.packageName);
                    newInfo.setAapVersion(p.versionName);
                    newInfo.setAppVersionCode(p.versionCode);
                    newInfo.setAppAPKUrl(p.applicationInfo.publicSourceDir);
                    newInfo.setAppIcon(p.applicationInfo.loadIcon(mContext.getPackageManager()));

                    mInstalledApps.add(newInfo);
                }
            }
        }
        return mInstalledApps;
    }

private boolean isSystemPackage(PackageInfo packageInfo) {
        return (packageInfo.applicationInfo.flags & ApplicationInfo.FLAG_SYSTEM) != 0;
    }

2. Get Video.


In this snippet, We fetch all video in Android Phone.

 public List<MediaModel> getVideos(Context mContext){
   
            ArrayList<MediaModel> mVideos = new ArrayList<>();
            String[] videoProjection = {MediaStore.Video.Media._ID,
                    MediaStore.Video.Media.DATA,
                    MediaStore.Video.Media.DISPLAY_NAME,
                    MediaStore.Video.Media.SIZE,
                    MediaStore.Video.Media.SIZE};

            makeList(mContext.getContentResolver().query(MediaStore.Video.Media.EXTERNAL_CONTENT_URI, videoProjection, null, null, null), mVideos);
        return mVideos;
    }


3. Get Audio.


In this snippet, We fetch mp3 and wav Audio files from Android Phone.

public List<MediaModel> getAudios(Context mContext) {

            ArrayList<MediaModel> mAudios = new ArrayList<>();

            String[] videoProjection = {MediaStore.Audio.Media._ID,
                    MediaStore.Audio.Media.DATA,
                    MediaStore.Audio.Media.DISPLAY_NAME,
                    MediaStore.Audio.Media.SIZE, MediaStore.Audio.Media.ALBUM_ID};

            makeList(mContext.getContentResolver().query(MediaStore.Audio.Media.EXTERNAL_CONTENT_URI, videoProjection,
MediaStore.Files.FileColumns.MIME_TYPE + "=?",
                    new String[]{MimeTypeMap.getSingleton().getMimeTypeFromExtension(mContext.getResources().getString(R.string.wav))}, null), mAudios);

            makeList(mContext.getContentResolver().query(MediaStore.Audio.Media.EXTERNAL_CONTENT_URI, videoProjection, MediaStore.Files.FileColumns.MIME_TYPE + "=?",
                    new String[]{MimeTypeMap.getSingleton().getMimeTypeFromExtension(mContext.getResources().getString(R.string.mp3))}, null), mAudios);
   

        return mAudios;
    }

4. Get Image.


In this snippet, We fetch all images from Android Phone.

public List<MediaModel> getImages() {
        if (mImages == null || mImages.isEmpty()) {
            mImages = new ArrayList<>();
            String[] videoProjection = {MediaStore.Images.Media._ID,
                    MediaStore.Images.Media.DATA,
                    MediaStore.Images.Media.DISPLAY_NAME,
                    MediaStore.Images.Media.SIZE,
                    MediaStore.Images.Media.SIZE};

            makeList(mContext.getContentResolver().query(MediaStore.Images.Media.EXTERNAL_CONTENT_URI, videoProjection, null, null, null), mImages);
        }
        return mImages;
    }


5. Text Files.


In this snippet, We fetch only PDF files from Android Phone. You can get all files by changes just extension in below snippet.

public List<MediaModel> getFiles() {

        if (mFiles == null || mFiles.isEmpty()) {
            mFiles = new ArrayList();

            String[] videoProjection = {MediaStore.Files.FileColumns._ID,
                    MediaStore.Files.FileColumns.DATA,
                    MediaStore.Files.FileColumns.DISPLAY_NAME,
                    MediaStore.Files.FileColumns.SIZE};

            makeList(mContext.getContentResolver().query(MediaStore.Files.getContentUri(mContext.getResources().getString(R.string.external)), videoProjection, MediaStore.Files.FileColumns.MIME_TYPE + "=?",
                    new String[]{MimeTypeMap.getSingleton().getMimeTypeFromExtension("pdf")}, null), mFiles);

        return mFiles;
    }


Method and Model classes that are used in the above snippets.


A). makeList(@NonNull Cursor audioFilesCursor, ArrayList<MediaModel> arrayList) 

private void makeList(@NonNull Cursor audioFilesCursor, ArrayList<MediaModel> arrayList) {
        audioFilesCursor.moveToFirst();
        while (!audioFilesCursor.isAfterLast()) {
            MediaModel mediaModel = new MediaModel(audioFilesCursor.getString(1), new File(audioFilesCursor.getString(1)).getName());
            if (mHomeContract.isSelected(audioFilesCursor.getString(1))) {
                mediaModel.setIsSelected(true);
            }
            arrayList.add(mediaModel);
            audioFilesCursor.moveToNext();
        }
        audioFilesCursor.close();
    }

B). MediaModel

public class MediaModel {
    private String url;
    private String name;
    private boolean isSelected;

    /**
     * Instantiates a new Audio model.
     *
     * @param fileUrl  the audio url
     * @param fileName the audio name
     */
    public MediaModel(String fileUrl, String fileName) {
        url = fileUrl;
        name = fileName;
    }

    /**
     * Gets url.
     *
     * @return the url
     */
    public String getUrl() {
        return url;
    }

    /**
     * Gets name.
     *
     * @return the name
     */
    public String getName() {

        return name;
    }

    /**
     * Is selected boolean.
     *
     * @return the boolean
     */
    public boolean isSelected() {
        return isSelected;
    }

    /**
     * Sets is selected.
     *
     * @param isSelected the is selected
     */
    public void setIsSelected(boolean isSelected) {
        this.isSelected = isSelected;
    }
}


C). Create a model that keep information of install Application in your device. 


 public class AppInfo {
              private String appAPKUrl;
              private String appName;
              private String appPackage;
              private String aapVersion;
              private int appVersionCode;
              private Drawable appIcon;
              private boolean isSelected;

              public String getAppAPKUrl() {
                 return appAPKUrl;
              }

             public String getAppName() {
                 return appName;
             }

             public String getPackageName() {
                 return appPackage;
             }

             public String getAapVersion() {
                return aapVersion;
             }

             public int getAppVersionCode() {
                return appVersionCode;
             }

             public Drawable getAppIcon() {
                 return appIcon;
             }


            public boolean isSelected() {
                 return isSelected;
            }

           public void setIsSelected(boolean isSelected) {
               this.isSelected = isSelected;
           }

          public void setAppAPKUrl(String appAPKUrl) {
              this.appAPKUrl = appAPKUrl;
          }

          public void setAppName(String appName) {
               this.appName = appName;
          }

         public void setPackageName(String packageName) {
                this.appPackage = packageName;
         }

        public void setAapVersion(String aapVersion) {
             this.aapVersion = aapVersion;
        }

       public void setAppVersionCode(int appVersionCode) {
         this.appVersionCode = appVersionCode;
       }

       public void setAppIcon(Drawable appIcon) {
         this.appIcon = appIcon;
      }
  }
Share:

Android - Load more and Empty view in RecycleView

If you already read my previous blog that is related to this. Almost same thing i'm going implement here except empty text view. it will visible if list has no items. I'm going to create a custom RecylceView for track load more event.


AppRecyclerView is a customized class of RecyclerView that track load more event on list scroll. 

1. Here is your screen layout file that contains custom recyclerView, progressBar and Textview that shows the empty message "Record not found".


<FrameLayout
        android:layout_width="match_parent"
        android:layout_height="match_parent"
       >

        <com.demo.AppRecyclerView
            android:id="@+id/list_rv"
            android:layout_width="match_parent"
            android:layout_height="match_parent"
            android:scrollbars="none"
            />

        <ProgressBar
            android:id="@+id/list_pb_loader"
            android:layout_width="20dp"
            android:layout_height="20dp"
            android:layout_gravity="bottom|center"
            android:layout_marginBottom="10dp"
            android:background="@color/colorTransparent"
            android:indeterminateTint="@color/colorPrimaryDark"
            android:indeterminateTintMode="src_atop"
            android:visibility="gone"
            />

        <TextView
            android:id="@+id/list_tv_list_msg"
            style="@style/AppBigTextViewStyleLabel"
            android:layout_width="match_parent"
            android:layout_gravity="center"
            android:gravity="center"
            android:text="Record not found"
            android:textColor="@color/colorLightGrey"
            android:visibility="gone"
            />
    </FrameLayout>


2.  In your Activity/Fragment setup the following views.


        ProgressBar progressBar = (ProgressBar) rootView.findViewById(R.id.fragment_product_list_pb_loader);
        progressBar.getIndeterminateDrawable().setColorFilter(ContextCompat.getColor(getContext(), R.color.colorPrimaryDark), PorterDuff.Mode.SRC_IN);

        rvProductList = (AppRecyclerView) rootView.findViewById(R.id.fragment_product_list_rv);

       // Provide load more view that will visible when last item come on screen.
        rvProductList.setLoadMoreProgress(progressBar); 

       //Set listener that invoke when laod more event invoke from custom AppRecyclerView
        rvProductList.setLoadMoreListener(presenter);
           rvProductList.setEmptyView(rootView.findViewById(R.id.fragment_product_list_tv_list_msg));

3. Customize AppRecyclerView


public class AppRecyclerView extends RecyclerView {
    private ProgressBar progressBar;
    private View emptyView;
    private boolean loading;
    private OnLoadMoreListener onLoadMoreListener; 


   //It will observe item of list and show empty view if list not contains any item.
    private AdapterDataObserver emptyObserver = new AdapterDataObserver() {
        @Override
        public void onChanged() {
            Adapter<?> adapter = getAdapter();
            if (adapter != null && emptyView != null) {
                if (adapter.getItemCount() == 0) {
                    emptyView.setVisibility(View.VISIBLE);
                    AppRecyclerView.this.setVisibility(View.GONE);
                } else {
                    emptyView.setVisibility(View.GONE);
                    AppRecyclerView.this.setVisibility(View.VISIBLE);
                }
            }
        }
    };


    public AppRecyclerView(Context context) {
        super(context);
    }


    public AppRecyclerView(Context context, AttributeSet attrs) {
        super(context, attrs);
    }


    public AppRecyclerView(Context context, AttributeSet attrs, int defStyle) {
        super(context, attrs, defStyle);
    }

    @Override
    public void setAdapter(Adapter adapter) {
        super.setAdapter(adapter);
        if (adapter != null && !adapter.hasObservers()) {
            adapter.registerAdapterDataObserver(emptyObserver);
        }

        emptyObserver.onChanged();
    }


    public void setEmptyView(View emptyView) {
        this.emptyView = emptyView;
    }

    @Override
    public void stopScroll()
    {
        try {
            super.stopScroll();
        } catch (NullPointerException exception) {
            Crashlytics.logException(exception);
            /**
             *  The mLayout has been disposed of before the
             *  RecyclerView and this stops the application
             *  from crashing.
             */
        }
    }


    public void setLoadMoreListener(OnLoadMoreListener loadMoreListener) {

        this.onLoadMoreListener = loadMoreListener;

        addOnScrollListener(new RecyclerView.OnScrollListener() {
            @Override
            public void onScrolled(RecyclerView recyclerView,
                                   int dx, int dy)
            {
                super.onScrolled(recyclerView, dx, dy);
                if (getLayoutManager() instanceof LinearLayoutManager) {
                    validateListScroll(dy, (LinearLayoutManager) getLayoutManager());
                } else {
                    validateGridListScroll(dy, (GridLayoutManager) getLayoutManager());
                }
            }
        });
    }


    private void validateGridListScroll(int dy, GridLayoutManager gridLayoutManager) {
        if (dy > 0 && (gridLayoutManager.getChildCount() + gridLayoutManager.findFirstVisibleItemPosition() + 1) >= gridLayoutManager.getItemCount() && !loading) {
            setLoading(true);
            if (onLoadMoreListener != null) {
                onLoadMoreListener.onLoadMore();
            }
        }
    }


    private void validateListScroll(int dy, LinearLayoutManager linearLayoutManager) {
        if (dy > 0 && (linearLayoutManager.getChildCount() + linearLayoutManager.findFirstVisibleItemPosition() + 1) >= linearLayoutManager.getItemCount() && !loading) {
            setLoading(true);
            if (onLoadMoreListener != null) {
                onLoadMoreListener.onLoadMore();
            }
        }
    }

    public void setLoading(boolean loading) {
        this.loading = loading;
        if (progressBar != null) {
            if (loading) {
                progressBar.setVisibility(View.VISIBLE);
            } else {
                progressBar.setVisibility(View.GONE);
            }
        }
    }


    public void setLoadMoreProgress(ProgressBar progressBar) {
        this.progressBar = progressBar;
    }

    public interface OnLoadMoreListener {
    
        void onLoadMore();
    }
}
Share:

Get it on Google Play

React Native - Start Development with Typescript

React Native is a popular framework for building mobile apps for both Android and iOS. It allows developers to write JavaScript code that ca...