Sunday, May 27, 2018

Flutter - Application branding and loading splash screen.

If you have worked on mobile application development. You definitely know about splash screen. The splash screen is normally used to show the user some progress before the app loads completely. Some people use the splash screen just to showcase their app/company logo for a couple of seconds.

Before start it, you should read Flutter - Introduction, and setup.

I assuming, you have basic knowledge of Flutter and Dart and you have IntelliJ IDE or Android Studio, Android SDK and Xcode configured.


In this tutorial, we are going to learn how to implement a splash screen with Flutter. Let's start it.

1. Create a new Flutter project and open main.dart file from lib package. You can rename it as i did (splash.dart)here.

2. Create assets folder on project root and add an image that will be displayed on the splash screen.

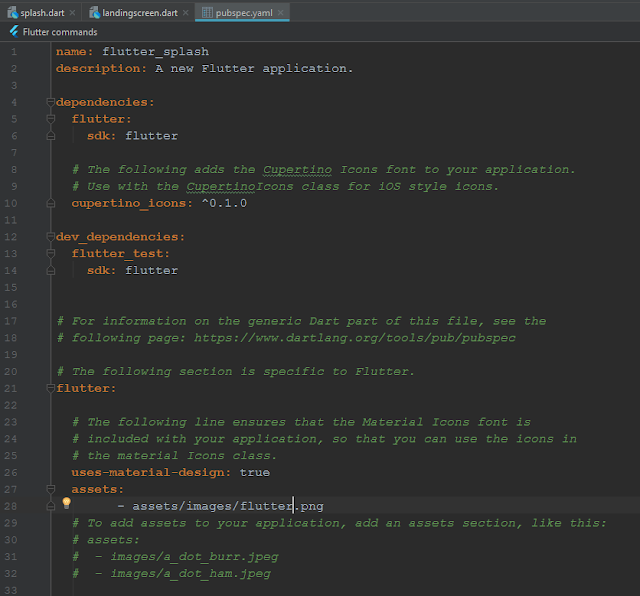
3. Open pubspec.ymal file and declare image path here.

4. As we know, in Flutter everything is a widget. So, we going to create the SplashScreen widget that extends StatefulWidget. Stateful widget is useful when the part of the user interface you are describing can change dynamically.
splash.dart
class SplashScreen extends StatefulWidget {
@override _SplashScreenState createState() => new _SplashScreenState(); }
here, our motive is move to another screen after some time. To achieve it Flutter has given us Route and Navigator classes for managing multiple screens navigation.

Route: A Route is an abstraction for a “screen” or “page” of an app.
Navigator: Navigator is a widget that manages routes. It can push and pop routes to help a user move from screen to screen.

Mobile apps typically display full-screen elements called “screens” or “pages”. In Flutter, these elements are called routes and they’re managed by a Navigator widget. The navigator manages a stack of Route objects and provides methods for managing the stack, like Navigator.push and Navigator.pop.


5. Let's define the route of the splash screen. I have used a tag and another widget (LandingScreen) where we will navigate after some time.

splash.dart
void main() => runApp(new MaterialApp home: new SplashScreen(), routes: <String, WidgetBuilder>{ '/LandingScreen': (BuildContext context) => new LandingScreen() }, ));

6. After that, create SplashScreen State. This class extends to SplashScreen class. Where the current configuration of a [State] is hosted.
splash.dart
class _SplashScreenState extends State<SplashScreen> { return null }
7. Create startTimer() with async and give some time, like i have given 5 sec.
splash.dart
startTime() async { var _duration = new Duration(seconds: 5); return new Timer(_duration, navigationPage); }
8. Create navigationPage callback method that is declared above.
splash.dart
void navigationPage() { Navigator.of(context).pushReplacementNamed('/HomeScreen'); }
9. Update initState() method and call startTime() method.
splash.dart
@override void initState() { super.initState(); startTime(); }
initState(): The framework will call this method exactly once for each [State] object it creates. If you override this, make sure your method starts with a call to super.initState().

10. At the end, create the user interface of a splash screen. As you can see,  i have added an image in the center of the widget with its path.
splash.dart
@override Widget build(BuildContext context) { return new Scaffold( body: new Center( child: new Image.asset('assets/images/flutter.png'), ), ); }

Now,  before running this project, verify all classes and resources.

1. Resource:- assets>image>flutter.png.
2. Dart files:- splash and landing screen.


3. Declare the image path in pubspec.yaml file.


4. Final splash.dart file.
splash.dart
import 'package:flutter/material.dart'; import 'dart:async'; import 'package:flutter_splash/landingscreen.dart'; void main() => runApp(new MaterialApp(
home: new SplashScreen(), routes: <String, WidgetBuilder>{ '/LandingScreen': (BuildContext context) => new LandingScreen() }, )); class SplashScreen extends StatefulWidget { @override _SplashScreenState createState() => new _SplashScreenState(); } class _SplashScreenState extends State<SplashScreen> { startTime() async { var _duration = new Duration(seconds: 5); return new Timer(_duration, navigationPage); } void navigationPage() { Navigator.of(context).pushReplacementNamed('/LandingScreen'); } @override void initState() { super.initState(); startTime(); } @override Widget build(BuildContext context) { return new Scaffold( body: new Center( child: new Image.asset('assets/images/flutter.png'), ), ); } }
5. Another widget (landingscreen.dart), where the app will navigate.
landingscreen.dart
import 'package:flutter/material.dart'; class LandingScreen extends StatefulWidget { @override LandingScreenState createState() => new LandingScreenState(); } class LandingScreenState extends State<LandingScreen> { @override Widget build(BuildContext context) { return new Scaffold( appBar: new AppBar( title: new Text('HomeScreen'), ), body: new Center( child: new Text('Welcome to Home.!'), ), ); } }

Now, run it and you will see action after 5 sec.


I hope it will work, but if still, you have any doubt or not work. Please feel free to clarify that in the comment section below. Your comments and suggestions are welcome.


Share:

Saturday, May 26, 2018

Android - Room persistance

Android OS provides us inbuilt SQLite core library for store raw data in local database. It handle CRUD (Create, Read, Update and Delete) operations that require for a database. SQLite maintains an effective database management system.


But, Google has introduced Room persistence library which allows fluent database access while harnessing the full power of SQLite. Room is a new way to create a database in your android apps, it is much similar OrmLite. Let's start with a most obvious question about Room.

Why should I use another library to manage my database when I am already well equipped with SQLite usage?

Let's review problem with SQLite usage.

1. There is no compile-time verification of raw SQL queries.

Example:- If you write a SQL query with a wrong column name that does not exist in real database then SQLite will give exception during run time and you can not capture this issue during compile time.
2. If you want change or update the database with the help of SQL queries. This process may be time consuming and produce error.
3. We have to use lots of boilerplate code to convert between SQL queries and Java data objects.

To overcome this, Google has introduced Room Persistence Library. It has an abstraction layer for the existing SQLite APIs. All the required packages, parameters, methods, and variables are imported into an Android project by using simple following annotations.
Room Persistence Annotations
@Entity: Creates a SQLite table in the database using a data model class. @Dao: Create a Data Access Object in the database using an interface class. @Database: A class with this annotation will create an abstraction for the Data Access Object. @PrimaryKey: A variable with this annotation will set a primary key for the table. @Insert: Inserts parameters into the table. @Update: Updates parameters of an existing table. @Delete: Deletes parameters of an existing table. @Query: Running SQL query method within the table. @Ignore: Ignores the parameter form the Room database.
Room have three major components that we need create and handle database quarries.

1. Database: By using database annotation you can create data holder class. Here, we have to declare entities and version of database. The annotated class should be an abstract class that extends RoomDatabase. At runtime, you can acquire an instance of it by calling Room.databaseBuilder() or Room.inMemoryDatabaseBuilder().

Database
@Database(entities = {User.class}, version = 1) public abstract class AppDatabase extends RoomDatabase { public abstract UserDao userDao(); }

2. DAO:  DAOs are the main component of Room. It will handle all the queries and define methods that access the database. As you can see, each query define own action.
DAO
@Dao public interface UserDao {
@Query("SELECT * FROM user") List<User> getAll();
@Query("SELECT * FROM user WHERE uid IN (:userIds)") List<User> loadAllByIds(int[] userIds);
@Query("SELECT * FROM user WHERE first_name LIKE :first AND " + "last_name LIKE :last LIMIT 1") User findByName(String first, String last);
@Insert void insertAll(User... users);
@Delete void delete(User user); }

3. Entity : This component represents a database row of table. Each field of the entity is represent a column in the database.
Entity
@Entity class User {
@PrimaryKey public int id; public String firstName; public String lastName;
}

We have seen all the basic components and annotations of Room. Let's dive into implementation and understand it. We going to create a simple database that will store user information like: first name, last name, age.

1. Create a new project in Android Studio with empty activity and add following dependencies in module build.gradle.
Room Gradle  dependencies 
def room_version = "2.0.0-alpha1" implementation "androidx.room:room-runtime:$room_version" annotationProcessor "androidx.room:room-compiler:$room_version"

2. Now, lets create an entity called User. It defines a attributes of your table and here i'm going to declare one field as primary key. It has property to auto generate values. Class is annotated with @Entity and name of the table. To make field primary key, you need to annotate a field with @PrimaryKey and property autoGenerate which assign automatic IDs. Room will create a user table with defined attributes.
User Table (Entity) 
@Entity(tableName = "user") public class User { @PrimaryKey(autoGenerate = true) private int uid; @ColumnInfo(name = "first_name") private String firstName; @ColumnInfo(name = "last_name") private String lastName; @ColumnInfo(name = "age") private int age; public int getUid() { return uid; } public void setUid(int uid) { this.uid = uid; } public String getFirstName() { return firstName; } public void setFirstName(String firstName) { this.firstName = firstName; } public String getLastName() { return lastName; } public void setLastName(String lastName) { this.lastName = lastName; } public int getAge() { return age; } public void setAge(int age) { this.age = age; } }

3. Now create a data access object using an interface as define above. This class is annotated with @Dao annotation. Room will generate an implementation of defined methods. There are three annotations @Query, @Insert, @Delete to perform CRD operations. @Query annotation is used to perform read operation on database.
Dao interface 
@Dao public interface UserDao { @Query("SELECT * FROM user") List<User> getAll(); @Query("SELECT * FROM user where first_name LIKE :firstName AND last_name LIKE :lastName") User findByName(String firstName, String lastName); @Query("SELECT COUNT(*) from user") int countUsers(); @Insert void insertAll(User... users); @Delete void delete(User user); }

4. After that, create a database holder class that extends RoomDatabase. Here, i'm going to define user entity and database version. You can declare all the entities if you have. Class is annotated with @Database annotation. It is good practice to use singleton approach for the database, so you need to create an static method which will return instance of AppDatabase.
Database 
@Database(entities = {User.class}, version = 1) public abstract class AppDatabase extends RoomDatabase { private static AppDatabase INSTANCE; public abstract UserDao userDao(); public static AppDatabase getAppDatabase(Context context) { if (INSTANCE == null) { INSTANCE = Room.databaseBuilder(context.getApplicationContext(), AppDatabase.class, "user-database") // allow queries on the main thread. // Don't do this on a real app! See PersistenceBasicSample for an example. .allowMainThreadQueries() .build(); } return INSTANCE; } public static void destroyInstance() { INSTANCE = null; }

private static User addUser(final AppDatabase db, User user) { db.userDao().insertAll(user); return user; } }

You are done!. We have setup database with a data holder user class that represent a row and an interface that we will use for perform CURD operations.

Now,  you can add users in the user table of the database. You must perform queries on worker thread, otherwise your application will crash.
Add a row.
//Always use a Thread, AsyncTask, or any worker threads to perform database operations.
public void populateWithTestData(AppDatabase db) {
new Thread(new Runnable() { @Override
public void run() { User user = new User(); user.setFirstName("sun"); user.setLastName("kum") user.setAge(25); AppDatabase.addUser(db, user);
}
} }) .start();

At the end, I found various thing about Room.

1. I found it easier than using SQLite directly.

2. It makes you verify your database code during compile time.
3. It makes your code more modular and readable as you divide your database code in three components like Entity , DAO and Database.

If still you have any doubt, please feel free to clarify that in the comment section below. Your Comments and suggestions are welcome.


Share:

Tuesday, May 22, 2018

Kotlin - Null Safety

If you have used Java for web or mobile application development. You might have definitely face  NPE (NullPointerException).


NPE is runtime exceptions which are thrown by the program at runtime causing application failure and system crashes. It is not a good thing if your app crashes and face NPE exception errors.

Null Safety in Kotlin is eliminating the risk of occurrence of NPE in real time.  Kotlin can detect NPE exception errors at compile time itself and guard against them.

Kotlin could never throw a NullPointerException unless you ask for it.

Kotlin has two types of references that are interpreted by the compiler that gives information to the programmer about the correctness of a program at compile time.

1. Nullable Reference.
2. Non-Nullable Reference.

Kotlin supports nullability as part of its type System. It means you have the ability to declare whether a variable can hold a null value or not. By supporting nullability in the type system, the compiler can detect possible NullPointerException errors at compile time and reduce the possibility of having them thrown at runtime.


Let’s understand how it works!

Share:

Saturday, May 19, 2018

Android - What is Android Jetpack?

Google has introduced Android Jetpack for enhancing mobile development. Jetpack is a set of components, tools, and guidance to make great Android apps. It's components bring together the existing Support Library and Architecture Components and arranges them into four categories as you can see below.


Jetpack combines the existing Android support libraries and components and wraps them into a new set of components, like:

1. Background tasks.
2. Navigation.
3. Paging.
4. Life-cycle management.
5. UI features like emoji and layout control for various platforms( Android Wear, Auto, and TV).


Android Jetpack components are provided as unbundled libraries that are not part of the Android platform. It means, you can use each component at your own speed.  You can run the app on various versions of the platform because Android Jetpack components are built to provide their functionality independent of any specific version. This makes it far easier for you to build robust, high-quality apps with less code.

Android Jetpack has included five new components:

1. WorkManager alpha release.
2. Navigation alpha release.
3. Paging stable release.
4. Slices alpha release.
5. Android KTX (Kotlin Extensions) alpha release.

WorkManager:- It is a powerful new library that provides a solution for constraint-based background tasks that need guaranteed execution. It is replacing the need to use things like jobs or SyncAdapters. WorkManager provides a simplified, modern API, the ability to work on devices with or without Google Play Services. These APIs let you create a task and hand it off to WorkManager to run immediately or at an appropriate time.

Example:- Let' assume, we need to download new resources from the network from time to time. You can set up a task and choose the appropriate constraint for it to run, like only while the device is charging and online. WorkManager will run it when the conditions are met. The task is guaranteed to run, even if your app is force-quit or the device is rebooted.

Navigation:- Activity is the system provided entry points into the application and it can share data between each other and transitions has made them a less than ideal architecture for constructing your in-app navigation.

In Android Studio 3.2, we have Navigation component that can structure your in-app UI, with a focus on making a single-Activity app the preferred architecture. You can get all of the Architecture components benefits such as Lifecycle and ViewModel while allowing Navigation to handle the complexity of FragmentTransactions for you.

It will allow you to declare transitions and automatically builds the correct Up and Back behavior, includes full support for deep links, and provides helpers for connecting Navigation into the appropriate UI widgets, like the navigation drawer and bottom navigation.

Paging:- Pagination (Endless Scrolling or Infinite Scrolling) is a feature common in content-heavy apps. It breaks down a list of content into equal smaller pieces, loaded one at a time. 

Now, we have paging component version 1.0.0 that makes pagination easy to load and present large data sets with fast, infinite scrolling in your RecyclerView. It can load paged data from local storage, the network, or both, and lets you define how your content gets loaded.

Slices:- It is the great way to promote app on Google Assistant. With the help of Slices component, you can share small part(UI) with the google search. Slices are UI templates that can display rich, dynamic, and interactive content from your app from within the Google Search app and later in other places like the Google Assistant.


Android KTX:-  Android Jetpack takes advantage of Kotlin language features that make you more productive. The purpose of Android KTX is to make Android development with Kotlin more concise, pleasant, and idiomatic by leveraging Kotlin language.

Android KTX lets you transform Kotlin code like this:
view.viewTreeObserver.addOnPreDrawListener(
object : ViewTreeObserver.OnPreDrawListener { override fun onPreDraw(): Boolean { viewTreeObserver.removeOnPreDrawListener(this) actionToBeTriggered() return true } });
Android KTX transform above code into more concise Kotlin code like the following.
view.doOnPreDraw { actionToBeTriggered() }


So, here all that i found about Android Jetpack. If anything missed you can share below.

Share:

Thursday, May 17, 2018

Flutter - How to install flutter in android studio.

If you’re a mobile developer, you may have heard about Flutter. This toolkit can speed up and enhance cross-platform app development.

Flutter is Google’s mobile UI open source framework to build high-quality native (super fast) interfaces for iOS and Android apps with the unified codebase.

Flutter has its own UI components, along with an engine to render them on both the Android and iOS platforms. Most of those UI components, right out of the box, conform to the guidelines of Material Design.

Flutter framework uses Dart language which was also developed by Google. Dart is a fast, object-oriented language with several useful features such as mixins, generics, isolates, and optional static types.


Google has also highlighted the major benefits of using Flutter for your mobile app development.

1. The main aim of flutter is to target the development with multi-platform UI toolkits.
2. Flutter has a feature called Hot Reload that allows developers to experiment with their code. Developers can make changes to the code or fix bugs and see the impact of it immediately.
3. There is an additional feature in Flutter that allows developers to localize their applications so that they can be used internationally.
4. It has an expressive and flexible user interface that focuses on enhancing the user experience. The layered architecture allows customization of UI with flexible designs.

So developers, you don't have to stick only to Android development, as Flutter offers a unified solution for apps supporting multiple platforms. It also has the ability to transform the experience from one platform to another by changing the behavior of the scroll, buttons, sliders, dialog boxes, and switches, among others, from the Android Material Design standards to the Cupertino iOS.

Install Flutter Plugin in Android Studio.


1. Preferences -> Plugins -> Browser Repositories


2. Restart Android Studio.

After everything installed, restart your IDE and  Flutter app development.


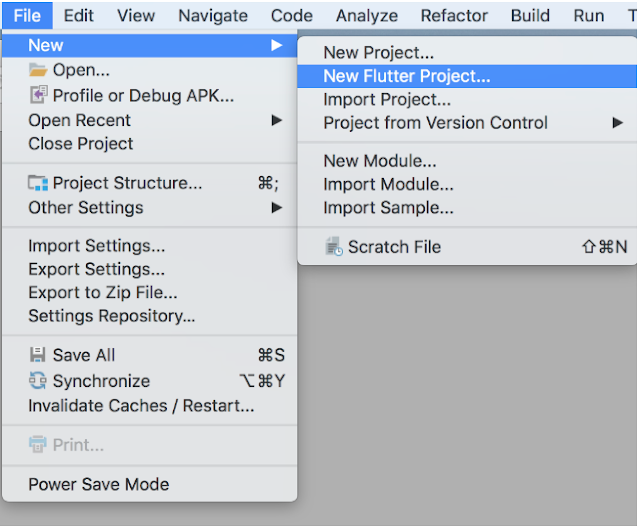
The new dialogue shows us three options, let’s select the Flutter Application and click next.


Now we have the screen below. Fill out the information in this screen as described:


1. Pick a project name with lower-case letters and underscore between words.
2. Give the location of Flutter SDK Path. You can download it as above shown.
3. The project location is the folder that you want to add your project in.
4. The description is only a small description of your application and click next.

In the next page, you will be expected to add a company domain for the package name and you can add Kotlin and Swift support to write the OS-specific part with those languages but that won’t be necessary for now. Let’s click finish afterward.

Add Flutter to Windows Environment variable Path

1. Navigate in to Flutter SDK folder.
2. Go inside to bin folder and copy  the directory path (in your case C:\Flutter\bin)
3. Go to “Control Panel > User Accounts > User Accounts > Change my environment variables”
4. Under “User variables” select path variable and click edit.
5. Put C:\Flutter\bin and apply.

Same as Flutter Environment,  we have to set the Android SDK path if it is on custom location.

1. Navigate into the Android SDK folder.
2. Copy  the directory path (in your case ..AndroidStudioSDK\sdk)
3. Go to “Control Panel > User Accounts > User Accounts > Change my environment variables”
4. Under “User variables” select path variable and click edit.
5. Put ..AndroidStudioSDK\sdk with ANDROID_HOME and apply.


Tips:

If you facing the following issue,

1.[✗] Android toolchain - develop for Android devices
     ✗ Unable to locate Android SDK.
      Install Android Studio from https://developer.android.com/studio/index.html
      On the first launch, it will assist you in installing the Android SDK components.
      (or visit https://flutter.io/setup/#android-setup for detailed instructions).

If Android SDK has been installed to a custom location, set $ANDROID_HOME to that location.

You can resolve it with the following command.

flutter config --android-sdk <android-sdk-location>
           OR
flutter config --android-sdk "android-sdk-location"

2. Error: Unknown argument --licenses

You can resolve it with Following Command.


flutter -v doctor --android-licenses

Now, Pick the emulator you want to use and click the green arrow to run the project. So, here default screen that is already designed.


Let’s get to the code part of flutter.

In the project hierarchy, flutter creates a lib folder that contains the core part of cross-platform development.  Here, we have a main.dart file


main.dart
import 'package:flutter/material.dart'; void main() => runApp(new MyApp()); class MyApp extends StatelessWidget { // This widget is the root of your application. @override Widget build(BuildContext context) { return new MaterialApp( title: 'Flutter Demo', theme: new ThemeData( primarySwatch: Colors.blue, ), home: new MyHomePage(title: 'Flutter Demo Home Page'), ); } } class MyHomePage extends StatefulWidget { MyHomePage({Key key, this.title}) : super(key: key); final String title; @override _MyHomePageState createState() => new _MyHomePageState(); } class _MyHomePageState extends State<MyHomePage> { int _counter = 0; void _incrementCounter() { setState(() { _counter++; }); } @override Widget build(BuildContext context) { return new Scaffold( appBar: new AppBar( title: new Text(widget.title), ), body: new Center( child: new Column( mainAxisAlignment: MainAxisAlignment.center, children: <Widget>[ new Text( 'You have pushed the button this many times:', ), new Text( '$_counter', style: Theme.of(context).textTheme.display1, ), ], ), ), floatingActionButton: new FloatingActionButton( onPressed: _incrementCounter, tooltip: 'Increment', child: new Icon(Icons.add), ), ); } }

As you can see void main() => runApp(new MyApp());. This is the entry point to our Flutter Application. The runApp() method which seems to play the role of setContentView() and displays the specified widget on the screen.

In Flutter, every UI component is a Widget, you compose your whole application UI with Widgets that contain other Widgets, even your application class is also a Widget.  Inside MyApp, we have overridden the build() method which is responsible for describing how to display that particular widget.

You can see some familiar names here like the title and the theme which again affect the label of our Application and the ActionBar’s look and feel.

myClass.helloWorld()

Learn more about Flutter widget Flutter - Introduction with Flutter widgets. 

So, Here all that we need for start Flutter development. But if you still have any doubt, please feel free to clarify that in the comment section below.


Share:

Tuesday, May 15, 2018

Android - Set-up Firebase Cloud Functions.

Web and mobile application often require back-end code to execute tasks like send push notifications, mail and update user information.
Firebase has a functionality which is called Cloud Functions. Firebase offers a scalable solution for running back-end code in the cloud. Running code in the cloud has various advantages:

1. You don't need to run and maintain your own server.

2. You do have an isolated code base for back-end code.
3. You only get billed for the actual executing time of your code,
4. The cloud infrastructure is highly scalable.
  
 Introduction of Cloud Functions.

In the following tutorial, I'm going to install all the tools that are we need for Cloud Functions development. Let's start it.

1. Download Node.js and install it.


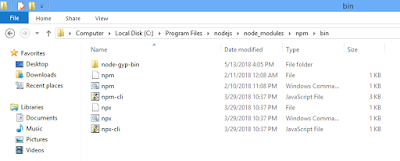
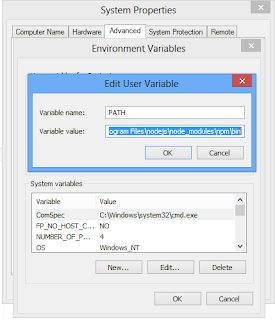
2. Set environment variable of Node.js installed location.


2. Install Firebase CLI (Command Line Interface)

Open run->cmd and hit npm install -g firebase-tools


3. Now login with your google account: run->cmd->firebase login. Maybe it will redirect on default browser for login on google account. So, do it carefully.

If you facing firebase login issue, you can try these.


firebase login --no-localhost
firebase login:ci --interactive
firebase login --interactive
firebase login:ci --no-localhost

If you successfully log in it. you will move here.


4. Create a project directory folder where you will find the cloud function of the project. like i have created AndroidStudioProjects folder.
5. Now, open cmd and run firebase init functions command.


It will show all project that you have created on firebase console or you can create new project on firebase
console from here.


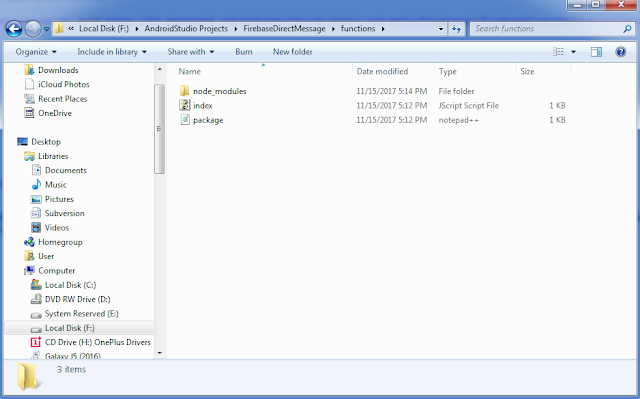
6. When it's done you'll find three new things in your project directory:

1. "functions" folder
2. .firebaserc file
3.  firebase.json file


Building the Firebase Cloud Function

Now, Let's do some code for the cloud that will execute. For it, i'm going to install Visual Studio code and open index.js. 


You can build the Cloud Functions in a file name index.js. The index.js file is located inside the "functions" folder that you just created by initializing Cloud Functions.

Here's the Cloud Function: that will work on the firebase server.


Deploying the Cloud Function.

Once you created cloud function, deploy it with firebase deploy --only functions command to Firebase. Be patient this can take a while.


So, Here all that we need to start cloud function development. But if you still have any doubt, please feel free to clarify that in the comment section below.


Share:

Sunday, May 13, 2018

Kotlin-Properties and Fields

Before discussing Fields and Properties in Kotlin let's recall Java and try to understand it.
Java Class
public class User {                                                                        
    private String id;
    private String name;
    public User (String id, String name) {
        this.id = id;
        this.name = name;
    }
    public String getId() {
        return id;
    }
    public void setId(String id) {
        this.id = id;
    }
    public String getName() {
        return name;
    }
    public void setName(String name) {
        this.name = name;
    }
}

As you can see User class which has user id and name. They are private to the class and they are considered as fields in Java, so fields are basically the state. But, when you generate getter and setter (accessors) for the fields it's become a property. Now, the fields describe the class and can be accessed via its accessors.


Share:

Saturday, May 12, 2018

Android - What's new in Android P

Google I/O 2018

Google I/O 2018 has finished and they have rolled out a ton of new things.  I'm excited about the Android P Developer Preview 2 which brings a number of new features and UI changes. So, if you are interested in the Android’s newest version. Let's review all.
1. Smart Replies in Notification:-  One of the most exciting features on Android is the ability to see the last few messages in notification to make it easier for users to get a context of the conversation. Android P also supports images and stickers inside a notification.

2. Screenshot Editing Tool:-  Android P is bringing a screenshot editing tool which OEMs like Samsung have been providing us for years. Now users can edit screenshots using various tools inducing paint, free-hand writing, text, and more.

3.  New Look of Power Menu with More Functionalities:-  Google had introduced a new slide-out Power Menu with Android Oreo which was triggered by long-pressing the power button. Now, with Android P Google is introducing two more toggles. The first one is a Screenshot and another new addition is the Enter Lock Down toggle. Which when turned on disables the biometric authentication and requires a user to enter his PIN or password if he/she wants to unlock their device.


4. Volume Keys:- Same as Power Menu, Android P is bringing a Volume Menu which can be accessed by hitting the volume. It gives you shortcuts such as media control and the ability to mute the phone.


5. Switch Between Landscape and Portrait Orientation:- With the Android P, users will also be able to easily switch between landscape and portrait orientation without having to turn on the rotation toggle. In Android P, when you change the phone’s orientation, a little toggle comes up which allows you to switch between the landscape and portrait orientation.

6. WiFi Improvement:- Android P has improved WiFi connectivity. Now it’s way easier to mark your WiFi connection as “Metered”. It means that the OS will treat your WiFi just as a mobile network and it will stop any background updates or large files download. To set a connection as Metered, just go to WiFi Setting -> Name of the Network -> Advanced.

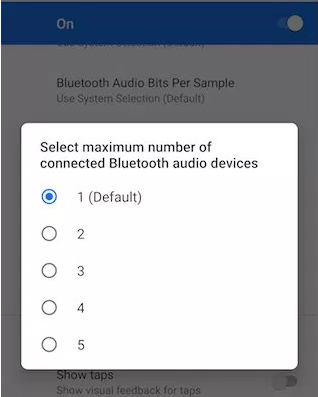
7. Connect up to 5 Bluetooth Devices:-  On Android Oreo, the maximum number of Bluetooth devices that you could connect was two. Now, with Android P, the user can connect 5  Bluetooth devices at once. You will have to enable the developer mode to access this feature. You can find many other options related to Bluetooth including the ability to change audio rate sample, audio channel mode, and more.


So, That's all Android P features that i have discovered till now. Let me know if you know more feature of Android via comments. 


Share:

Sunday, May 6, 2018

Kotlin - Data Classes

In Java, We always create model(POJO) classes for hold data/state. These classes generally contain the same old boilerplate code in the form of getters, setters, equals(), hashcode() and toString() methods and increase number of line code of every class.
User class in Java that just holds id and name of a user and doesn’t have any functionality.
Java Class
public class User {                                                                        
    private String id;
    private String name;
    public User (String id, String name) {
        this.id = id;
        this.name = name;
    }
    public String getId() {
        return id;
    }
    public void setId(String id) {
        this.id = id;
    }
    public String getName() {
        return name;
    }
    public void setName(String name) {
        this.name = name;
    }
    @Override
    public boolean equals(Object o) {
        if (this == o) return true;
        if (o == null || getClass() != o.getClass()) return false;
        User user = (User ) o;
        if (id != null ? !id.equals(user .id) : user .id != null) return false;
        return name != null ? name.equals(user .name) : user.name == null;
    }
    @Override
    public int hashCode() {
        int result = id != null ? id.hashCode() : 0;
        result = 31 * result + (name != null ? name.hashCode() : 0);
        return result;
    }
}
As we can see a simple class with only two member fields. We had to write almost 50 lines of code. If you going to create such classes in Java that will increase LOC(Line of code) of Project. If you want to add a new member field to the class, you’ll need to regenerate/modify the constructors, getters/setters and equals()/hashcode() methods. That's is time-consuming.

Share:

Get it on Google Play

React Native - Start Development with Typescript

React Native is a popular framework for building mobile apps for both Android and iOS. It allows developers to write JavaScript code that ca...