


If you’re a mobile developer, you may have heard about Flutter. This toolkit can speed up and enhance cross-platform app development.
 Flutter is Google’s mobile UI open source framework to build high-quality native (super fast) interfaces for iOS and Android apps with the unified codebase.
Flutter has its own UI components, along with an engine to render them on both the Android and iOS platforms. Most of those UI components, right out of the box, conform to the guidelines of Material Design.
Flutter framework uses Dart language which was also developed by Google. Dart is a fast, object-oriented language with several useful features such as mixins, generics, isolates, and optional static types.
Google has also highlighted the major benefits of using Flutter for your mobile app development.
1. The main aim of flutter is to target the development with multi-platform UI toolkits.
2. Flutter has a feature called Hot Reload that allows developers to experiment with their code. Developers can make changes to the code or fix bugs and see the impact of it immediately.
3. There is an additional feature in Flutter that allows developers to localize their applications so that they can be used internationally.
4. It has an expressive and flexible user interface that focuses on enhancing the user experience. The layered architecture allows customization of UI with flexible designs.
So developers, you don't have to stick only to Android development, as Flutter offers a unified solution for apps supporting multiple platforms. It also has the ability to transform the experience from one platform to another by changing the behavior of the scroll, buttons, sliders, dialog boxes, and switches, among others, from the Android Material Design standards to the Cupertino iOS.
Install Flutter Plugin in Android Studio.
1. Preferences -> Plugins -> Browser Repositories

2. Restart Android Studio.
After everything installed, restart your IDE and Flutter app development.
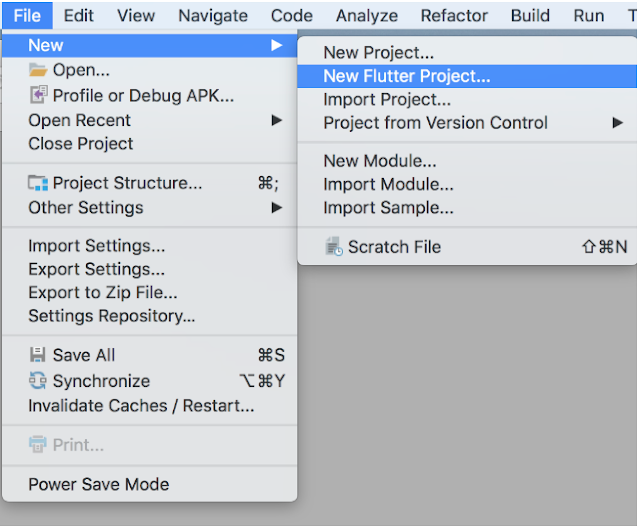
The new dialogue shows us three options, let’s select the Flutter Application and click next.

Now we have the screen below. Fill out the information in this screen as described:

1. Pick a project name with lower-case letters and underscore between words.
2. Give the location of Flutter SDK Path. You can download it as above shown.
3. The project location is the folder that you want to add your project in.
4. The description is only a small description of your application and click next.
In the next page, you will be expected to add a company domain for the package name and you can add Kotlin and Swift support to write the OS-specific part with those languages but that won’t be necessary for now. Let’s click finish afterward.
Add Flutter to Windows Environment variable Path
1. Navigate in to Flutter SDK folder.
2. Go inside to bin folder and copy the directory path (in your case C:\Flutter\bin)
3. Go to “Control Panel > User Accounts > User Accounts > Change my environment variables”
4. Under “User variables” select path variable and click edit.
5. Put C:\Flutter\bin and apply.
Same as Flutter Environment, we have to set the Android SDK path if it is on custom location.
1. Navigate into the Android SDK folder.
2. Copy the directory path (in your case ..AndroidStudioSDK\sdk)
3. Go to “Control Panel > User Accounts > User Accounts > Change my environment variables”
4. Under “User variables” select path variable and click edit.
5. Put ..AndroidStudioSDK\sdk with ANDROID_HOME and apply.
Tips:
If you facing the following issue,
1.[✗] Android toolchain - develop for Android devices
✗ Unable to locate Android SDK.
Install Android Studio from https://developer.android.com/studio/index.html
On the first launch, it will assist you in installing the Android SDK components.
(or visit https://flutter.io/setup/#android-setup for detailed instructions).
If Android SDK has been installed to a custom location, set $ANDROID_HOME to that location.
You can resolve it with the following command.
flutter config --android-sdk <android-sdk-location>
OR
flutter config --android-sdk "android-sdk-location"
2. Error: Unknown argument --licenses
You can resolve it with Following Command.
flutter -v doctor --android-licenses
Now, Pick the emulator you want to use and click the green arrow to run the project. So, here default screen that is already designed.

Let’s get to the code part of flutter.
In the project hierarchy, flutter creates a lib folder that contains the core part of cross-platform development. Here, we have a main.dart file
As you can see void main() => runApp(new MyApp());. This is the entry point to our Flutter Application. The runApp() method which seems to play the role of setContentView() and displays the specified widget on the screen.
In Flutter, every UI component is a Widget, you compose your whole application UI with Widgets that contain other Widgets, even your application class is also a Widget. Inside MyApp, we have overridden the build() method which is responsible for describing how to display that particular widget.
You can see some familiar names here like the title and the theme which again affect the label of our Application and the ActionBar’s look and feel.
myClass.helloWorld()
Learn more about Flutter widget Flutter - Introduction with Flutter widgets.
So, Here all that we need for start Flutter development. But if you still have any doubt, please feel free to clarify that in the comment section below.


