Saturday, June 30, 2018

Flutter - Tab bar controller and left drawer.

When you need to wrap multiple screen in a single screen and navigate through them, you have to use Tab and Drawer. When user select a tab, this object sends a message to the parent container for switch the displayed page. 

           Left drawer of mobile

Tab and Drawer provides all feature of an application on a single page. So, user can know about the app easily.

In this post, we'll see TabBar and Drawer implementation in Flutter Application. For achieve and maintain state of Application we'll use Redux architecture that we have discuss here

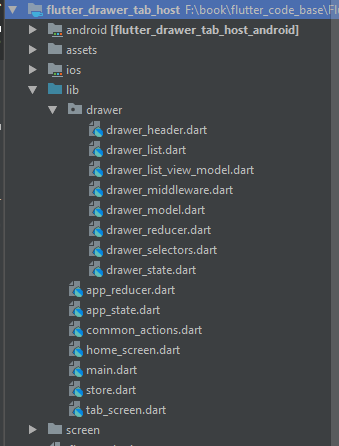
Here, we have complete project structure. 


Let's begin it's implementation with following steps.

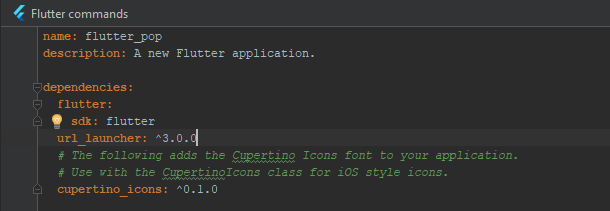
1. Update pubspec.ymal dependencies.
pubspec.ymal
flutter_redux: ^0.5.0 intl: ^0.15.2 shared_preferences: ^0.4.0

2. Now, move on application entry point that is main.dart. Here, we have created store. It'll manage application state like selection of left drawer state. As we have explained all about Store in detail hereIf you have query regarding Redux. You should learn about it. Because, we going to use it in this project. As you can see, we have created store.
main.dart
Future<Null> main() async { var store = await createStore(); runApp(new BuyMeApp(store)); } 

After that create base and initialize state of application.
main.dart
class _BuyMeAppState extends State<BuyMeApp> { @override void initState() { super.initState(); widget.store.dispatch(new InitAction()); } @override Widget build(BuildContext context) { return new StoreProvider<AppState>( store: widget.store, child: new MaterialApp( title: 'BuyMe', theme: new ThemeData( primaryColor: const Color(0xFF02BB9F), primaryColorDark: const Color(0xFF167F67), accentColor: const Color(0xFFFFAD32), ), home: const HomeScreen(), ), ); } }

3. Create another dart file and name it home_screen.dart. Here, we'll create TabBar and Left Drawer menu. For handle Tabbar, we have created instance of TabController and given length 3 because we need three tab. 

For manage Drawer, we have created instance of Drawer and append instance of DrawerHeaderBox that'll contain header of drawer. As you can see complete file below.
home_screen.dart
import 'package:flutter/material.dart'; import 'package:flutter_drawer_tab_host/tab_screen.dart'; import 'package:flutter_drawer_tab_host/drawer/drawer_header.dart'; import 'package:flutter_drawer_tab_host/drawer/drawer_list.dart'; class HomeScreen extends StatefulWidget { const HomeScreen(); @override _HomeScreenState createState() => new _HomeScreenState(); } class _HomeScreenState extends State<HomeScreen> with SingleTickerProviderStateMixin { static final GlobalKey<ScaffoldState> scaffoldKey = new GlobalKey<ScaffoldState>(); TabController _controller; @override void initState() { super.initState(); _controller = new TabController(length: 3, vsync: this, ); } @override Widget build(BuildContext context) { return new Scaffold( key: scaffoldKey, appBar: new AppBar( iconTheme: new IconThemeData(color: const Color(0xFFFFFFFF),), title: new Text("BuyMe", style: new TextStyle( color: const Color(0xFFFFFFFF), fontSize: 20.0, fontWeight: FontWeight.w300, letterSpacing: 0.3, ), ), bottom: new TabBar( controller: _controller, indicatorSize: TabBarIndicatorSize.tab, labelColor: Color(0xFFFFFFFF), tabs: const <Tab>[ const Tab(text: 'Tranding'), const Tab(text: 'Men'), const Tab(text: 'Women'), ], ), ), drawer: new Drawer( child: new DrawerList( header: const DrawerHeaderBox(), onTheaterTapped: () => Navigator.pop(context), ), ), body: new TabBarView( controller: _controller, children: <Widget>[ new TabScreen("Tranding"), new TabScreen("Men"),
new TabScreen("Women"),
], ), ); } }


4. After that create tab_screen.dart file. It'll show tab screen content after switching. In this file, we just showing a text that display tab title. You can modify it according to your need.
tab_screen.dart
import 'package:flutter/cupertino.dart'; import 'package:flutter/material.dart'; class TabScreen extends StatelessWidget { TabScreen(this.listType); final String listType; @override Widget build(BuildContext context) { return new Scaffold( body: new Center( child: new Column( mainAxisAlignment: MainAxisAlignment.center, children: <Widget>[ new Text( listType, style: Theme.of(context).textTheme.display1, ), ], ), ), ); } }
5. After that create some redux dart that manage state of app.
app_reducer.dart
import 'package:flutter_drawer_tab_host/app_state.dart'; import 'package:flutter_drawer_tab_host/drawer/drawer_reducer.dart'; AppState appReducer(AppState state, dynamic action) { return new AppState( drawerState: drawerReducer(state.drawerState, action), ); }
app_state.dart
import 'package:flutter_drawer_tab_host/drawer/drawer_state.dart'; import 'package:meta/meta.dart'; @immutable class AppState { final DrawerState drawerState; AppState({ @required this.drawerState, }); factory AppState.initial() { return new AppState( drawerState: new DrawerState.initial(), ); } }

common_actions.dart
import 'package:flutter_drawer_tab_host/drawer/drawer_model.dart'; class InitAction {} class InitCompleteAction { InitCompleteAction( this.drawer, this.selectedDrawer, ); final List<DrawerModel> drawer; final DrawerModel selectedDrawer; } class ChangeCurrentTheaterAction { ChangeCurrentTheaterAction(this.selectedDrawer); final DrawerModel selectedDrawer; }

6. Now, Let's create our drawer screen. For it create a directory drawer. Here, We'll put all drawer files.


7. In drawer folder,  first of all create drawer_header.dart. Here, we using CircleAvatar, Image and two Text for screen header interface. 
drawer_header.dart
import 'package:flutter/material.dart'; class DrawerHeaderBox extends StatefulWidget { const DrawerHeaderBox(); @override _DrawerHeaderState createState() => new _DrawerHeaderState(); } class _DrawerHeaderState extends State<DrawerHeaderBox> { @override Widget build(BuildContext context) { var textTheme = Theme.of(context).textTheme; return new Container( color: const Color(0xFF02BB9F), constraints: const BoxConstraints.expand(height: 175.0), child: new Center( child: new Padding( padding: const EdgeInsets.all(16.0), child: new Column( crossAxisAlignment: CrossAxisAlignment.center, mainAxisAlignment: MainAxisAlignment.end, children: <Widget>[ new Stack( alignment: Alignment.center, children: <Widget>[ new CircleAvatar( radius: 30.0, backgroundColor: const Color(0xFF167F67), ), new Container( height: 30.0, width: 30.0, child: new Image.asset("assets/fevicn.png"), ) ], ), new Text( 'Developer Libs', style: textTheme.subhead.copyWith(color: Colors.white70), ), new Text( 'developerlibs@gmail.com', style: textTheme.subhead.copyWith(color: Colors.white70), ), ], ), ), ), ); } }


8. It's time to create dynamic list of drawer. To achieve it, Create drawer_list.dart. Here, We will display drawer list items.
drawer_list.dart
import 'package:flutter/material.dart'; import 'package:flutter_drawer_tab_host/app_state.dart'; import 'package:flutter_drawer_tab_host/drawer/drawer_list_view_model.dart'; import 'package:flutter_redux/flutter_redux.dart'; import 'package:meta/meta.dart'; class DrawerList extends StatelessWidget { DrawerList({ @required this.header, @required this.onItemTapped, }); final Widget header; final VoidCallback onItemTapped; @override Widget build(BuildContext context) { var statusBarHeight = MediaQuery.of(context).padding.vertical; return new Transform( transform: new Matrix4.translationValues(0.0, -statusBarHeight, 0.0), child: new StoreConnector<AppState, DrawerListViewModel>( distinct: true, converter: (store) => DrawerListViewModel.fromStore(store), builder: (BuildContext context, DrawerListViewModel viewModel) { return new DrawerListContent( header: header, onTheaterTapped: onItemTapped, viewModel: viewModel, ); }, ), ); } } class DrawerListContent extends StatelessWidget { DrawerListContent({ @required this.header, @required this.onTheaterTapped, @required this.viewModel, }); final Widget header; final VoidCallback onTheaterTapped; final DrawerListViewModel viewModel; @override Widget build(BuildContext context) { return new ListView.builder( itemCount: viewModel.drawer.length + 1, itemBuilder: (BuildContext context, int index) { if (index == 0) { return header; } var theater = viewModel.drawer[index - 1]; var isSelected = viewModel.currentDrawer.id == theater.id; var backgroundColor = isSelected ? const Color(0xFF01332b) : Theme.of(context).canvasColor; return new Material( color: backgroundColor, child: new Container( margin: EdgeInsets.fromLTRB(10.0, 0.0, 10.0, 0.0), padding: EdgeInsets.fromLTRB(10.0, 0.0, 10.0, 0.0), child: new Column( children: <Widget>[ new ListTile( onTap: () { viewModel.changeCurrentDrawer(theater); onTheaterTapped(); }, selected: isSelected, title: new Text( theater.name, style: new TextStyle( color: isSelected ? const Color(0xFFFFFFFF) : const Color(0xFF01332b), fontSize: 20.0, fontWeight: FontWeight.w300, letterSpacing: 0.3, ), ), ) ], ), decoration: new BoxDecoration(border: new Border(bottom: new BorderSide())), ), ); }, ); } }


9. Now create drawer_list_view_model.dart file. Here, we maintain state and keep drawer resource.
drawer_list_view_model.dart
import 'package:flutter_drawer_tab_host/app_state.dart'; import 'package:flutter_drawer_tab_host/common_actions.dart'; import 'package:flutter_drawer_tab_host/drawer/drawer_model.dart'; import 'package:flutter_drawer_tab_host/drawer/drawer_selectors.dart'; import 'package:meta/meta.dart'; import 'package:redux/redux.dart'; class DrawerListViewModel { DrawerListViewModel({ @required this.currentDrawer, @required this.drawer, @required this.changeCurrentDrawer, }); final DrawerModel currentDrawer; final List<DrawerModel> drawer; final Function(DrawerModel) changeCurrentDrawer; static DrawerListViewModel fromStore(Store<AppState> store) { return new DrawerListViewModel( currentDrawer: currentDrawerSelector(store.state), drawer: drawerSelector(store.state), changeCurrentDrawer: (theater) { store.dispatch(new ChangeCurrentTheaterAction(theater)); }, ); } }

10. After that create drawer_middleware.dart file. Here, You can change list item text and add new. In this file, we have write some code redux as discuss above.
drawer_middleware.dart
import 'dart:async'; import 'package:flutter/services.dart'; import 'package:flutter_drawer_tab_host/app_state.dart'; import 'package:flutter_drawer_tab_host/common_actions.dart'; import 'package:flutter_drawer_tab_host/drawer/drawer_model.dart'; import 'package:redux/redux.dart'; import 'package:shared_preferences/shared_preferences.dart'; class DrawerMiddleware extends MiddlewareClass<AppState> { static const String kDefaultTheaterId = 'default_theater_id'; final AssetBundle bundle; final SharedPreferences preferences; DrawerMiddleware(this.bundle, this.preferences); @override Future<Null> call(Store<AppState> store, action, NextDispatcher next) async { if (action is InitAction) { await _init(action, next); } else if (action is ChangeCurrentTheaterAction) { await _changeCurrentTheater(action, next); } else { next(action); } } Future<Null> _init( InitAction action, NextDispatcher next, ) async { List<DrawerModel> allTheaters = new List(); DrawerModel theater = new DrawerModel(id: "1030", name: "Electronics"); DrawerModel theater1 = new DrawerModel(id: "1014", name: "Fashion"); DrawerModel theater2 = new DrawerModel(id: "1012", name: "Furniture"); DrawerModel theater3 = new DrawerModel(id: "1039", name: "Sports"); DrawerModel theater4 = new DrawerModel(id: "1038", name: "Books"); DrawerModel theater5 = new DrawerModel(id: "1031", name: "Medical"); DrawerModel theater6 = new DrawerModel(id: "1011", name: "Vegetable"); DrawerModel theater7 = new DrawerModel(id: "1015", name: "Drink"); DrawerModel theater8 = new DrawerModel(id: "1016", name: "Watch"); allTheaters.add(theater); allTheaters.add(theater1); allTheaters.add(theater2); allTheaters.add(theater3); allTheaters.add(theater4); allTheaters.add(theater5); allTheaters.add(theater6); allTheaters.add(theater7); allTheaters.add(theater8); next(new InitCompleteAction(allTheaters, allTheaters.first)); } Future<Null> _changeCurrentTheater( ChangeCurrentTheaterAction action, NextDispatcher next, ) async { preferences.setString(kDefaultTheaterId, action.selectedDrawer.id); next(action); } }
11. Create drawer_model.dart  and put following model code.
drawer_model.dart
import 'package:meta/meta.dart'; class DrawerModel { DrawerModel({ @required this.id, @required this.name, }); final String id; final String name; }

12. Create drawer_reducer.dart. It will change state of drawer on basis of event.
drawer_reducer.dart
import 'package:flutter_drawer_tab_host/common_actions.dart'; import 'package:flutter_drawer_tab_host/drawer/drawer_state.dart'; import 'package:redux/redux.dart'; final drawerReducer = combineReducers<DrawerState>([ new TypedReducer<DrawerState, InitCompleteAction>(_initComplete), new TypedReducer<DrawerState, ChangeCurrentTheaterAction>( _currentTheaterChanged), ]); DrawerState _initComplete(DrawerState state, InitCompleteAction action) { return state.copyWith( currentTheater: action.selectedDrawer, theaters: action.drawer, ); } DrawerState _currentTheaterChanged(DrawerState state, ChangeCurrentTheaterAction action) { return state.copyWith(currentTheater: action.selectedDrawer); }
13. Create drawer_selectors.dart. It will maintain state of selected drawer item. 
drawer_selectors.dart
import 'package:flutter_drawer_tab_host/app_state.dart'; import 'package:flutter_drawer_tab_host/drawer/drawer_model.dart'; DrawerModel currentDrawerSelector(AppState state) => state.drawerState.currentTheater; List<DrawerModel> drawerSelector(AppState state) => state.drawerState.theaters;

14. Create drawer_state.dart. Here, we'll keep state of drawer.
drawer_state.dart
import 'package:flutter_drawer_tab_host/drawer/drawer_model.dart'; import 'package:meta/meta.dart'; @immutable class DrawerState { DrawerState({ @required this.currentTheater, @required this.theaters, }); final DrawerModel currentTheater; final List<DrawerModel> theaters; factory DrawerState.initial() { return new DrawerState( currentTheater: null, theaters: <DrawerModel>[], ); } DrawerState copyWith({ DrawerModel currentTheater, List<DrawerModel> theaters, }) { return new DrawerState( currentTheater: currentTheater ?? this.currentTheater, theaters: theaters ?? this.theaters, ); } @override bool operator ==(Object other) => identical(this, other) || other is DrawerState && runtimeType == other.runtimeType && currentTheater == other.currentTheater && theaters == other.theaters; @override int get hashCode => currentTheater.hashCode ^ theaters.hashCode; }

At the end,  merge all file and run it. You'll see 


You can get complete working project from Github. If you any query regarding above project feel free to ask it in comment section below.


Share:

Thursday, June 28, 2018

Kotlin - Great thing about Extension Functions.

Before start Kotlin Extension Functions, let's recall inheritance in Java. Suppose, you need to extend a class with new functionality. In most programming languages, you either derive a new class or use some kind of design pattern to do this. I have created a subclass and added extra methods as you can see below. 
Java Inheritance
public class CircularImageView extends ImageView { public CircularImageView (Context context) { super(context); }
public void loadProfilePic(String url) { // Download the image } }

There are a few problems with this approach:

1. Composition over inheritance is a principle in object-oriented programming languages. Its main idea is that classes should achieve polymorphic behavior and code reuse by containing instances of other classes rather than inheriting from a parent class. In Java, there is no multiple inheritances (nor in Kotlin) which protects us programmers from making a deadlock, but it also makes hard to e.g. mix the functionality of CircularImageView with ZoomImageView into one AwesomeImageView class.

2. Using custom types instead of what the Android SDK provides is sometimes inconvenient. You have to write more code to make the place for subclasses instead of just using the regular ImageView. You and everyone working on a project have to keep in mind what kind of special class fits the current requirement.

Share:

Saturday, June 23, 2018

Flutter - Redux architecture example with Flutter.

Redux is a unidirectional application architecture, originally made for JavaScript but now used in mobile applications development (such as React Native or Flutter). Redux makes easy to develop, maintain and test applications.

Redux was created by Dan Abramov around June 2015. It was inspired by Facebook’s Flux and functional programming language Elm. Redux got popular very quickly because of its simplicity, small size (only 2 KB) and great documentation. 


Basically, you should know three things about Redux architecture. 

1. Whole application state is kept only one place that is called store.
2. To change the application state you need to dispatch an action.
3. Changes are made with pure functions. It takes the previous state and an action and returns a new state.


As you can see above, a store which holds a State object that represents the state of the whole application. Every application event is represented as an action that gets dispatched to a Reducer function. This Reducer updates the store with a new State depending on what action it receives and whenever a new state is pushed through the store the View is recreated to reflect the changes. 

In Redux most components are decoupled, making UI changes very easy to make. In addition, the only business logic sits in the Reducer functions. A Reducer is a function that takes an action and the current application state and it returns a new state object, therefore it is straightforward to test because we can write a unit test that sets up an initial State and checks that the Reducer returns the new and modified State.

What are the advantages of Redux?
  • Easy to understand how the data flow works in the application.
  • The use of "pure" reducer functions makes logic easier to test, and enables useful features like "time-travel debugging".
  • Centralizing the state makes it easier to implement things like logging changes to the data, or persisting data between page refreshes.

In this post, I'll explain how you can start writing mobile apps with Flutter using the Redux architecture.

Share:

Saturday, June 16, 2018

Flutter - Design user interface with Flutter layouts.

Before start building layouts for Flutter applications. It’s important to understand how the framework handles the creation of these layouts. The Flutter framework builds its layout via the composition of widgets, everything that you construct programmatically is a widget and these are compiled together to create the user interface. 


I have already created a post for Flutter widget that explains the fundamentals of Flutter building a Flutter app. So I’m going to assume you’ve followed one of those already and instead call out interesting elements of the app that highlight strengths of Flutter as a mobile toolkit.

Let’s take a look at the TabLayout that is a common view component used within mobile applications:


If we manually build this layout within a Flutter application, then the structure of the layout file looks:
Share:

Saturday, June 9, 2018

Flutter - Introduction with Flutter widgets.

Flutter is a mobile framework that is built by Google. Which helps in creating modern mobile apps for iOS and Android using a single(almost) code base. It’s a new entrant in the cross-platform mobile application development and unlike other frameworks like React Native. Flutter is a really interesting piece of technology that can prove very useful in many situations both for indie developers as well as software companies. 

If you have not installed and setup Flutter. I recommend do it from Flutter - Installation, and Introduction,  that's we need to implement some examples.


Flutter Widgets
In Flutter, every UI component is a Widget. You can compose your whole application UI with Widgets that contain other Widgets.

These widgets arranged in a hierarchical order to be displayed onto the screen. The widgets which can hold widgets inside it are called Container Widget. Most of the layout widgets are container widgets except for the widgets which does a minimal job like Text WidgetYou can imagine a hierarchy of widget with bellow diagram.  


Widget's in Flutter either be a StatelessWidget or a StatefulWidget: 

Share:

Wednesday, June 6, 2018

Flutter - ListView Flutter example.

Whenever you need to display a group of related items in the vertical or horizontal direction in mobile. We always need a ListView to display it. Display a specific list is essential almost every app that queries a set of data and returns a list of results, so many apps need to do this at one point or another.

For instance, a list of news items, a list of recipes. It helps you in displaying the data in the form of a scrollable list. Users can then select any list item by clicking on it. 

By working through this tutorial, you’ll become familiar with ListView in Flutter and you will be able to fetch data from the server. You can see the final output of the project below.


Let's start its implementation with the following steps.

1. First of all, open main.dart file and create the base of Application. Add application app bar and use builder param. Builder param shows a progress indicator until network fetching result from the server.

main.dart build method
@override Widget build(BuildContext context) { return new Scaffold( appBar: new AppBar( title: new Text(title), ), body: new FutureBuilder<List<Country>>( future: fetchCountry(new http.Client()), builder: (context, snapshot) { if (snapshot.hasError) print(snapshot.error); return snapshot.hasData ? new CountyList(country: snapshot.data) : new Center(child: new CircularProgressIndicator()); }, ), ); }

2. For fetch data from the server, we have to add HTTP dependency.


after that create networklayer.dart file. We use it to get data from the server. As you can bellow, we using client.get('API URL') method. It will get data and put in compute method for parse it.
networklayer.dart
Future<List<Country>> fetchCountry(http.Client client) async { final response = await client.get('http://restcountries.eu/rest/v2/all'); // Use the compute function to run parse response in a separate isolate return compute(parseData, response.body); }
once response received from the server, parse it with bellow method. It will create an instance of Country model and parse it.
networklayer.dart
List<Country> parseData(String responseBody) { final parsed = json.decode(responseBody).cast<Map<String, dynamic>>(); return parsed.map<Country>((json) => new Country.fromJson(json)).toList(); }

3. Now, create a ListView widget that will show a group of items. Here, we use a card widget as a container of the list and two texts for display name and capital of the country
list.dart
@override Widget build(BuildContext context) { return new ListView.builder( itemCount: country == null ? 0 : country.length, itemBuilder: (BuildContext context, int index) { return new Card( child: new Container( child: new Center( child: new Column( // Stretch the cards in horizontal axis crossAxisAlignment: CrossAxisAlignment.stretch, children: <Widget>[ new Text( // Read the name field value and set it in the Text widget country[index].name, // set some style to text style: new TextStyle( fontSize: 20.0, color: Colors.lightBlueAccent), ), new Text( // Read the name field value and set it in the Text widget "Capital:- " + country[index].capital, // set some style to text style: new TextStyle( fontSize: 20.0, color: Colors.amber), ), ], )), padding: const EdgeInsets.all(15.0), ), ); }); }

At the end merge code snippet and put in its files. Final project structure will look like this.


You can view and download all working files from below.
main.dart
import 'package:flutter/foundation.dart'; import 'package:flutter/material.dart'; import 'package:flutter_list_http_progress/country.dart'; import 'package:flutter_list_http_progress/list.dart'; import 'package:flutter_list_http_progress/netwoklayer.dart'; import 'package:http/http.dart' as http; void main() => runApp(new MyApp()); class MyApp extends StatelessWidget { @override Widget build(BuildContext context) { final appTitle = 'World'; return new MaterialApp( title: appTitle, home: new MyHomePage(title: appTitle), ); } } class MyHomePage extends StatelessWidget { final String title; MyHomePage({Key key, this.title}) : super(key: key); @override Widget build(BuildContext context) { return new Scaffold( appBar: new AppBar( title: new Text(title), ), body: new FutureBuilder<List<Country>>( future: fetchCountry(new http.Client()), builder: (context, snapshot) { if (snapshot.hasError) print(snapshot.error); return snapshot.hasData ? new CountyList(country: snapshot.data) : new Center(child: new CircularProgressIndicator()); }, ), ); } }


networklayer.dart
import 'dart:async'; import 'dart:convert'; import 'package:flutter/foundation.dart'; import 'package:flutter_list_http_progress/country.dart'; import 'package:http/http.dart' as http; Future<List<Country>> fetchCountry(http.Client client) async { final response = await client.get('http://restcountries.eu/rest/v2/all'); // Use the compute function to run parse response in a separate isolate return compute(parseData, response.body); } // A function that will convert a response body into a List<Country> List<Country> parseData(String responseBody) { final parsed = json.decode(responseBody).cast<Map<String, dynamic>>(); return parsed.map<Country>((json) => new Country.fromJson(json)).toList(); }

list.dart
import 'package:flutter/foundation.dart'; import 'package:flutter/material.dart'; import 'package:flutter_list_http_progress/country.dart'; class CountyList extends StatelessWidget { final List<Country> country; CountyList({Key key, this.country}) : super(key: key); @override Widget build(BuildContext context) { return new ListView.builder( itemCount: country == null ? 0 : country.length, itemBuilder: (BuildContext context, int index) { return new Card( child: new Container( child: new Center( child: new Column( // Stretch the cards in horizontal axis crossAxisAlignment: CrossAxisAlignment.stretch, children: <Widget>[ new Text( // Read the name field value and set it in the Text widget country[index].name, // set some style to text style: new TextStyle( fontSize: 20.0, color: Colors.lightBlueAccent), ), new Text( // Read the name field value and set it in the Text widget "Capital:- " + country[index].capital, // set some style to text style: new TextStyle( fontSize: 20.0, color: Colors.amber), ), ], )), padding: const EdgeInsets.all(15.0), ), ); }); } }

country.dart
class Country { final String name; final String flag; final String capital; Country({this.name, this.flag, this.capital}); factory Country.fromJson(Map<String, dynamic> json) { return new Country( name: json['name'] as String, flag: json['flag'] as String, capital: json['capital'] as String, ); } }

That's all about the ListView with HTTP in Flutter. If have any query, please feel free to clarify it with comment section below. 


Share:

Sunday, June 3, 2018

Flutter - Search widget on Appbar in Flutter

If you’re building a mobile application, then most likely you’ll need to implement a search feature in it to let the user search through a set of data that could be emails, messages, chats, photos, files, etc. 

Flutter provides us various widget for achieving it. Here, we going to use TextField to build search widget in Appbar. Appbar is the preferred way to use this widget to provide search feature in our application. It provides a user interface for the user to enter a search query and submit the request.

In this tutorial, we build search box in app bar that will open when we click on the search icon. Here, user can type a query for search. 

The final widget will look like.


>
Let's start it with modification of build method of state class.

1. Here, we going to build a base of Application. As you can see, I'm using leading, title and action param of App-bar that will update the widget when we change the state of _isSearching.
build method
@override Widget build(BuildContext context) { return new Scaffold( key: scaffoldKey, appBar: new AppBar( leading: _isSearching ? const BackButton() : null, title: _isSearching ? _buildSearchField() : _buildTitle(context), actions: _buildActions(), ), body: new Center( child: new Column( mainAxisAlignment: MainAxisAlignment.center, children: <Widget>[ new Text( '$searchQuery', style: Theme.of(context).textTheme.display1, ), ], ), ), ); }
In the center of the screen, we managing a text that will show the query of the search box.

Share:

Saturday, June 2, 2018

Flutter - Flutter popup menu example.

Pop-up is like a dialog box that gains complete focus when it appears on the screen. Pop-up is usually used to show some additional information or something a user wants to know after an event takes place.

In this tutorial, we will create a pop-up widget with Flutter framework. It will show some normal and clickable text. The final widget will look like this.


If you haven't installed and set-up Flutter. I suggest you  do it and read base of Flutter from here:-  Flutter - Introduction and setup

As we know, everything in flutter is a widget. So, we going to create a widget that will display a pop-up alert with an image and clickable text. Let's start it.

1. Create a flutter project as I have explained here:- Flutter - Introduction, and setup.
2. Open main.dart file and start building widget.
3. To build a pop-up, we going to use the stateful widget.
class Home extends StatefulWidget {                                                             StatefulWidget
  const Home();
  @override
  _HomeState createState() => new _HomeState();
}


4. After that create state class that will manage a state of the widget.
class _HomeState extends State<Home> {                                                   Widget State Class


}


5. Now, start modifying the build method.
@override                                                                                                                 Main build
  Widget build(BuildContext context) {
    return new Container(

      //We have set padding from top of screen.
      padding: const EdgeInsets.only(top: 100.0),

      //Screen Theme.
      color: Theme.of(context).scaffoldBackgroundColor,

      // It will display a button. Will will display pop-up on click here.
      child: new Column(
        children: <Widget>[
          home(context),
        ],
      ),
    );
}


6. Create a RaisedButton widget that will show a pop-up when we click on it.
Widget home(BuildContext context) {
    return new Material(
      child: new RaisedButton(
        child: const Text('Show'),
        color: Theme.of(context).accentColor,
        elevation: 4.0,
        splashColor: Colors.amberAccent,
        textColor: const Color(0xFFFFFFFF),
        onPressed: () {
          showDialog(
            context: context,
            builder: (BuildContext context) => _buildAboutDialog(context),
          );
          // Perform some action
        },
      ),
    );
}
 FF),
It will look like:-  


7. Now, Let's create the main part of the tutorial that is a pop-up widget.
Widget _buildAboutDialog(BuildContext context) {
    return new AlertDialog(
      title: const Text('About Pop up'),
      content: new Column(
        mainAxisSize: MainAxisSize.min,
        crossAxisAlignment: CrossAxisAlignment.start,
        children: <Widget>[
          _buildAboutText(),
          _buildLogoAttribution(),
        ],
      )
      actions: <Widget>[
        new FlatButton(
          onPressed: () {
            Navigator.of(context).pop();
          },
          textColor: Theme.of(context).primaryColor,
          child: const Text('Okay, got it!'),
        ),
      ],
    );
}
 rimaryColor,
above is a container for our pop-up. It contains other widget and a FloatButton. We use it for the close pop-up.

As you can see, we have created  _buildAboutText() and _buildLogoAttribution() widgets.  Here, _buildAboutText()  show some text information of pop  and _buildLogoAttribution() will show image on pop-up.

8. To manage clickable content. We have to add url_launcher: ^3.0.0 dependency as I have used.


It will help us to navigate to other Application of OS. Like here, we will move on chrome to open a website.


9. After that create TapGestureRecognizer for those content where you want to click.
TapGestureRecognizer _flutterTapRecognizer;
TapGestureRecognizer _githubTapRecognizer;

@override
void initState() {
  super.initState();
  _flutterTapRecognizer = new TapGestureRecognizer()..onTap = () => _openUrl(flutterUrl);
  _githubTapRecognizer = new TapGestureRecognizer()..onTap = () => _openUrl(githubUrl);
}


10. Create assets folder on the root of the project and put any png file as i have put flutter.png.


At the end, let's see complete main.dart file.
import 'package:flutter/gestures.dart';
import 'package:flutter/material.dart';
import 'package:url_launcher/url_launcher.dart';

void main() => runApp(new MyApp());

class MyApp extends StatelessWidget {

  @override
  Widget build(BuildContext context) {
    return new MaterialApp(
      home: new Home(),
    );
  }

}

class Home extends StatefulWidget {
  const Home();
  @override
  _HomeState createState() => new _HomeState();
}

class _HomeState extends State<Home> {

  static const String flutterUrl = 'https://flutter.io/';
  static const String githubUrl = 'http://www.codesnippettalk.com';

  static const TextStyle linkStyle = const TextStyle(
    color: Colors.blue,
    decoration: TextDecoration.underline,
  );

  TapGestureRecognizer _flutterTapRecognizer;
  TapGestureRecognizer _githubTapRecognizer;

  @override
  void initState() {
    super.initState();
    _flutterTapRecognizer = new TapGestureRecognizer()..onTap = () => _openUrl(flutterUrl);
    _githubTapRecognizer = new TapGestureRecognizer()..onTap = () => _openUrl(githubUrl);
  }

  @override
  void dispose() {
    _flutterTapRecognizer.dispose();
    _githubTapRecognizer.dispose();
    super.dispose();
  }

  void _openUrl(String url) async {
    // Close the about dialog.
    Navigator.pop(context);

    if (await canLaunch(url)) {
      await launch(url);
    } else {
      throw 'Could not launch $url';
    }
  }

  Widget home(BuildContext context) {
    return new Material(
      child: new RaisedButton(
        child: const Text('Show Pop-up'),
        color: Theme.of(context).accentColor,
        elevation: 4.0,
        splashColor: Colors.amberAccent,
        textColor: const Color(0xFFFFFFFF),
        onPressed: () {
          showDialog(
            context: context,
            builder: (BuildContext context) => _buildAboutDialog(context),
          );
          // Perform some action
        },
      ),
    );
  }

  Widget _buildAboutDialog(BuildContext context) {
    return new AlertDialog(
      title: const Text('About Pop up'),
      content: new Column(
        mainAxisSize: MainAxisSize.min,
        crossAxisAlignment: CrossAxisAlignment.start,
        children: <Widget>[
          _buildAboutText(),
          _buildLogoAttribution(),
        ],
      ),
      actions: <Widget>[
        new FlatButton(
          onPressed: () {
            Navigator.of(context).pop();
          },
          textColor: Theme.of(context).primaryColor,
          child: const Text('Okay, got it!'),
        ),
      ],
    );
  }

  Widget _buildAboutText() {
    return new RichText(
      text: new TextSpan(
        text: 'Android Popup Menu displays the menu below the anchor text if space is available otherwise above the anchor text. It disappears if you click outside the popup menu.\n\n',
        style: const TextStyle(color: Colors.black87),
        children: <TextSpan>[
          const TextSpan(text: 'The app was developed with '),
          new TextSpan(
            text: 'Flutter',
            recognizer: _flutterTapRecognizer,
            style: linkStyle,
          ),
          const TextSpan(
            text: ' and it\'s open source; check out the source '
                'code yourself from ',
          ),
          new TextSpan(
            text: 'www.codesnippettalk.com',
            recognizer: _githubTapRecognizer,
            style: linkStyle,
          ),
          const TextSpan(text: '.'),
        ],
      ),
    );
  }

  Widget _buildLogoAttribution() {
    return new Padding(
      padding: const EdgeInsets.only(top: 16.0),
      child: new Row(
        children: <Widget>[
          new Padding(
            padding: const EdgeInsets.only(top: 0.0),
            child: new Image.asset(
              "assets/flutter.png",
              width: 32.0,
            ),
          ),
          const Expanded(
            child: const Padding(
              padding: const EdgeInsets.only(left: 12.0),
              child: const Text(
                'Popup window is like a dialog box that gains complete focus when it appears on screen.',
                style: const TextStyle(fontSize: 12.0),
              ),
            ),
          ),
        ],
      ),
    );
  }

  @override
  Widget build(BuildContext context) {
    return new Container(

      padding: const EdgeInsets.only(top: 100.0),

      color: Theme.of(context).scaffoldBackgroundColor,

      child: new Column(
        children: <Widget>[
          home(context),
        ],
      ),
    );
  }
}

Put above main.dart file in your project and resource. Now, run it and view the pop-up action.


If you have any doubt, please feel free to clarify that in the comment section below.


Share:

Friday, June 1, 2018

Android - Install and setup Crashlytics in Andorid project.

Crashlytics is a crash and issue reporting service provided by Fabric. It helps developers to build, deploy, and maintain high-quality apps. Fabric will alert you to new issues in real-time by mail and you can find the same issue in the project. You can learn about new issues and fix it.


There is also an opportunity to proactively reach out to users impacted by ongoing issues. fatal and non-fatal issues happening in your app and their complete information with device, orientation, carrier etc. It provides various simple APIs to reports crashes and also stores user information & other details related to crash.

In this tutorial, we will learn how to integrate Crashlytics and track fatal and non-fatal issue in Android application.

Let's start it with registration on Fabric.

1. Register on Fabric
Before starting to integrate, you’ll need to sign up for a free Fabric account. After creating an account, it will send you a confirmation mail. You need to confirm account creation by clicking on the confirmation link received in your inbox. Once, confirmation is complete, you will be redirected to Install Fabric screen and will be asked to choose your IDE.

2. Integrate Fabric Plugin
To use Crashlytics in your project, you need to integrate Fabric plugin in Android Studio as this is the easiest way to integrate Crashlytics kit.


After installing it, restart Android Studio. Now, will see Fabric plugin right side of Android studio.

3. Create a new project in Android Studio.
4.  Next step is to integrate Crashlytics in App. Click on the Fabric plugin icon in the toolbar of Android Studio and log in using your credentials.


Once logged it will show organizations added in your account. Select an organization for your app and click on Next button.

5. Click on the Next button will take you to the list of all the kits available in Fabric plugin. Select Crashlytics from the list and it will take you to Install screen. Click on the Install button to install Crashlytics kit in your app and accept terms and condition.


During the installation process, Fabric plugin will show you all the modification needed to be done to integrate Crashlytics kit and ask you to confirm it. To confirm, press on next button and plugin will start modifying app’s code. When all modifications are complete then it will ask you to run your application to complete the integration.

6. Now, you will see the whole project is modified by the Fabric.
build.gradle
//In your build.gradle app module, you will need to add four code snippets.
//1. Add the following buildscript:
buildscript { repositories { maven { url 'https://maven.fabric.io/public' } } dependencies { classpath 'io.fabric.tools:gradle:1.+' } }
//2. Apply the Fabric plugin: apply plugin: 'io.fabric' //3. Add the Fabric Maven repository: repositories { maven { url 'https://maven.fabric.io/public' } } //4. Add the following to your dependencies: compile('com.crashlytics.sdk.android:crashlytics:2.6.8@aar') { transitive = true; }

Fabric will add your API key to the Manifest.xml file:
Menifest.xml

<meta-data

    android:name="io.fabric.ApiKey"

    android:value="<YOUR_FABRIC_API_KEY>"

/>


//Request permission for your application to open network sockets:
<uses-permission android:name="android.permission.INTERNET" />

The fabric may force you to create an application file for put Fabric.with(this, new Crashlytics());. You can add it in MainActivity.java manually as well.

Once integration is complete, Crashlytics will start tracking all the crashes happening in the app without any extra code.

Handle Caught Exceptions.
In addition to automatically reporting your app’s crashes, Crashlytics for Android can also log caught exceptions from app’s catch blocks. To log caught exceptions, add Crashlytics.logException() method to your catch block and pass an exception as an argument.
Handle Caught Exceptions.
try { JSONObject obj = new JSONObject(&quot;something&quot;); } catch (Exception e) { Crashlytics.logException(e); }
All caught exceptions logged by Crashlyitcs will appear as a non-fatal issue in Fabric dashboard. Your issue summary will contain all the state information.


So,  that's all about Fabric Crashlyitics, But if still, you have any doubt, please feel free to clarify that in the comment section below.


Share:

Get it on Google Play

React Native - Start Development with Typescript

React Native is a popular framework for building mobile apps for both Android and iOS. It allows developers to write JavaScript code that ca...