


Monday, July 30, 2018
Kotlin - Lambda expressions
Sunday, July 29, 2018
Flutter - How to fix white screen on app startup in Flutter.
If you are a mobile application developer. You definitely have seen a blank white screen before application first screen launch.
 Mobile applications do take some amount of time to start up, especially on a cold start. There is a delay there that you may not be able to avoid. This is an unconfigured section of the app that first time they launch. Instead of leaving a blank screen during this time. We should use it to display a splash screen until the app takes to configure itself.

Friday, July 27, 2018
Flutter - Custom fonts family
If you are a mobile application developer. You definitely know, we should implement uniform themes in our application. Uniform themes are a great way to create a consistent look for your application. They can makes applications look very similar to each other.
 Custom font is a way to achieve it. Fonts can be very important in mobile applications. They make a text more readable and show more attention to various pieces of text. Fonts can make a format look bad or look great depending on how they are integrated into the application. Flutter comes with a few default fonts, however, we are also able to import custom font assets as we would like. After importing the fonts, we can directly call them in the dart code by passing a string to a property.
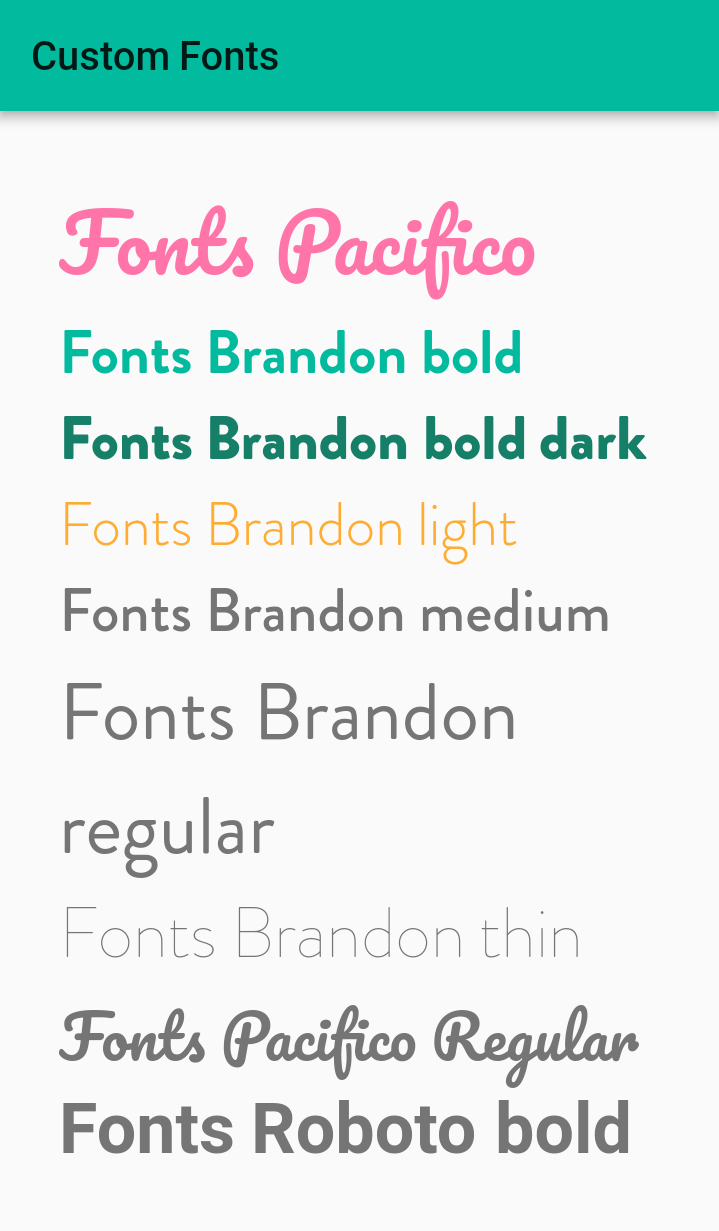
In this post, we'll look at importing custom fonts and using them inside of our application. At the end of this blog, we will be able to add Text with some fonts using flutter widgets which will look like this.

Create a new Flutter Project.
1. Create a new project from File ⇒ New Flutter Project with your development IDE.
2. Create an asset folder on the project root and put all custom fonts that you want to use in the project. As you can see below.

3. After that, declare all the custom fonts in the pubspec.yaml.

As you can see, the font declarations inside of the pubspec.yaml file for our application. In Flutter, we are able to directly specify which font file should correspond with which font family, font weight and font style. This allows us to call these values inside of our application later in a way that feels comfortable.
4. Now, open main.dart file and edit it. As we have set our theme and change debug banner property of Application.
5. After that create a getCustomFont method inside HomePage state full widget class. It'll give a font according to the given param.
6. Now edit build method of HomePage widget. As we have used a column inside of the container and call getCustomFont from the text with different font name, size, and color. Font name should be same as we have declared in the pubspec.yaml.
Now merge all the code snippet. You will find the final code snippet look like below.
Now, run the project and you will see the above output.
If you have followed the article carefully, you can see the app running very smoothly as shown above. But if you facing any problem, please feel free to ask in the comment section below.

In this post, we'll look at importing custom fonts and using them inside of our application. At the end of this blog, we will be able to add Text with some fonts using flutter widgets which will look like this.
Create a new Flutter Project.
1. Create a new project from File ⇒ New Flutter Project with your development IDE.
2. Create an asset folder on the project root and put all custom fonts that you want to use in the project. As you can see below.

3. After that, declare all the custom fonts in the pubspec.yaml.

As you can see, the font declarations inside of the pubspec.yaml file for our application. In Flutter, we are able to directly specify which font file should correspond with which font family, font weight and font style. This allows us to call these values inside of our application later in a way that feels comfortable.
4. Now, open main.dart file and edit it. As we have set our theme and change debug banner property of Application.
5. After that create a getCustomFont method inside HomePage state full widget class. It'll give a font according to the given param.
6. Now edit build method of HomePage widget. As we have used a column inside of the container and call getCustomFont from the text with different font name, size, and color. Font name should be same as we have declared in the pubspec.yaml.
Now merge all the code snippet. You will find the final code snippet look like below.
Now, run the project and you will see the above output.
If you have followed the article carefully, you can see the app running very smoothly as shown above. But if you facing any problem, please feel free to ask in the comment section below.
Wednesday, July 25, 2018
Flutter - Bottom navigation bar.
To navigate from one screen to another screen on a single page, there are many options for making navigation easy in your application for the user. Bottom Navigation Bar is one of them.
 Bottom Navigation Bar always stays at the bottom of your mobile application and provides navigation between the views of the mobile application. Each Bottom Navigation bar item denotes a different sub screen or feature of an application.
You should use Bottom Navigation if you have three to five top-level navigation items of the mobile application. Otherwise, we should use Navigation Drawer and scrollable Tabbar. You can see a simple example of Drawer and Tabbar here.
To create a bottom bar based app, Flutter SDK provides us an inbuilt widget BottomNavigationBar. You have to use BottomNavigationBarItem to define item properties.
In this post, we going to explain a basic of bottom bar implementation in Flutter. We'll use three item, Home, Location, and Friends. After clicking or swipe on the screen, you'll able to change application feature.
This blog assumes that you have already set up the flutter in your PC and you have a basic idea of Flutter Application. If you have not install flutter yet, get started from here.
So, let's start it,
Sunday, July 15, 2018
Flutter - Sqlite Database Example.
In the Mobile devices, there are several ways to store persistent data. Flutter and Dart don't provide a built-in abstraction for accessing SQLite databases.
.
 But Flutter supports an open source module SQFlite. SQFlite is a way of storing app data in Flutter Application. SQFlite is a Database plugin for flutter. It is highly reliable and embedded Database engine. All the CRUD operation in the database will run on a background thread. SQFlite support transactions batches and automatic version management during open.
.

Monday, July 9, 2018
Flutter - Google map plugin.
Flutter team has been building Google map plugin for display google map in Ios and Android. In this post, we going to view the progress of Google map plugin. Before starting a google map Flutter project. Let's know about the power of Google map.
.
 Google Maps is a web-based service that gives us information about geographical regions around the world. Google Maps offers aerial and satellite views of many places. In some cities, Google Maps offers street views photographs that are taken from its official vehicles.
Google Maps offers several services as part of the larger application, as follows.
1. A route planner offers directions for drivers, bikers, walkers, and users of public transportation who want to take a trip from one location to another.
2. The Google maps application program API's makes it possible for web site administrators to embed Google Maps into a proprietary site such as a real estate guide or community service page.
3. Google maps for mobile offers a location service for motorists that utilizes the Global Positioning System (GPS) location of the mobile device.
4. Google Street View enables users to view and navigate through horizontal and vertical panoramic street-level images of various cities around the world.
As we know, Google Maps SDK have a large API. In this post, we'll cover the following API.
MapView for native Ios and Android application is still in progress. So, we can't add it inside of Flutter hierarchy widgets. But don't worry, we have an alternative solution to use the Google Maps. We can use static map API for show maps inline while using the Google Maps SDK for iOS and Android to allow the user to interact with the full-screen map.
Before start Flutter google map application development we have to get google map API key. So, let's get it first.
.

Google Maps offers several services as part of the larger application, as follows.
1. A route planner offers directions for drivers, bikers, walkers, and users of public transportation who want to take a trip from one location to another.
2. The Google maps application program API's makes it possible for web site administrators to embed Google Maps into a proprietary site such as a real estate guide or community service page.
3. Google maps for mobile offers a location service for motorists that utilizes the Global Positioning System (GPS) location of the mobile device.
4. Google Street View enables users to view and navigate through horizontal and vertical panoramic street-level images of various cities around the world.
As we know, Google Maps SDK have a large API. In this post, we'll cover the following API.
- Markers
- The ability to show maps inline
- Camera Updates
- Map callbacks
MapView for native Ios and Android application is still in progress. So, we can't add it inside of Flutter hierarchy widgets. But don't worry, we have an alternative solution to use the Google Maps. We can use static map API for show maps inline while using the Google Maps SDK for iOS and Android to allow the user to interact with the full-screen map.
Before start Flutter google map application development we have to get google map API key. So, let's get it first.


