Sunday, July 15, 2018

Flutter - Sqlite Database Example.

In the Mobile devices, there are several ways to store persistent data. Flutter and Dart don't provide a built-in abstraction for accessing SQLite databases.
.
Flow of stored data in the database.
But Flutter supports an open source module SQFlite. SQFlite is a way of storing app data in Flutter Application. SQFlite is a Database plugin for flutter. It is highly reliable and embedded Database engine. All the CRUD operation in the database will run on a background thread. SQFlite support transactions batches and automatic version management during open.


In this article, we are going to learn the basics of SQFlite database with a real-time example.


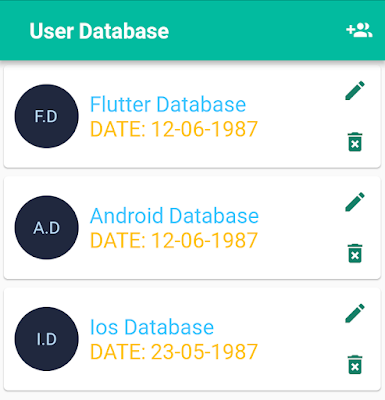
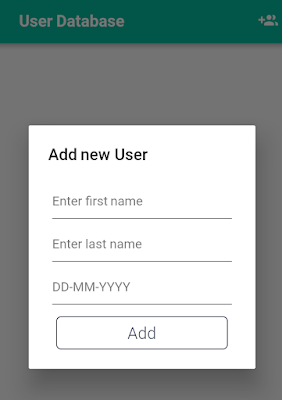
In this example, we are going to create a user database and we'll perform save, retrieve, update and delete operation. As you can see above, the first screen of app showing list of store user information. We have implemented dialog for add and edit stored user information.

So, let's start the implementation of SQFlite database. At the end, the final project structure looks like :
1. user.dart is a POJO and table for the database.
2. database_hepler.dart is our database utility class. Here, we handle our project CRUD operations.
3. add_user_dialog.dart is a dialog. With the help of this user interface, we can store and edit the database.
4. home_presenter.dart will maintain a business layer of the app.
5. homescreen.dart will display the first screen of the project.
6. list.dart will show a list of users that is stored in the database.
7. main.dart is the entry point of the app.
                            
Create a new project.
1. Let's start it and create a new Flutter project from New->new Flutter Project. I'm assuming, you have set up development tool and you have basic knowledge of flutter application development. If not, do it here.
2. Now modify project dependency pubspec.yaml.


  •   sqflite: "^0.11.0" is SQFlite is a Database plugin for flutter. It'll handle all CRUD operations.
  •   path_provider: ^0.3.1 plugin allows us to access the user directories on iOS and Android. Where we have stored the SQFlite database file.

3. Then create a subfolder database and model in your project as shown above. After that, create a new file  database_hepler.dart inside database folder and have the following code below.
database_helper.dart
import 'dart:async'; import 'dart:io' as io; import 'package:flutter_database/database/model/user.dart'; import 'package:path/path.dart'; import 'package:path_provider/path_provider.dart'; import 'package:sqflite/sqflite.dart'; class DatabaseHelper { static final DatabaseHelper _instance = new DatabaseHelper.internal(); factory DatabaseHelper() => _instance; static Database _db; Future<Database> get db async { if (_db != null) return _db; _db = await initDb(); return _db; } DatabaseHelper.internal(); initDb() async { io.Directory documentsDirectory = await getApplicationDocumentsDirectory(); String path = join(documentsDirectory.path, "main.db"); var theDb = await openDatabase(path, version: 1, onCreate: _onCreate); return theDb; } void _onCreate(Database db, int version) async { // When creating the db, create the table await db.execute( "CREATE TABLE User(id INTEGER PRIMARY KEY, firstname TEXT, lastname TEXT, dob TEXT)"); } Future<int> saveUser(User user) async { var dbClient = await db; int res = await dbClient.insert("User", user.toMap()); return res; } Future<List<User>> getUser() async { var dbClient = await db; List<Map> list = await dbClient.rawQuery('SELECT * FROM User'); List<User> employees = new List(); for (int i = 0; i < list.length; i++) { var user = new User(list[i]["firstname"], list[i]["lastname"], list[i]["dob"]); user.setUserId(list[i]["id"]); employees.add(user); } print(employees.length); return employees; } Future<int> deleteUsers(User user) async { var dbClient = await db; int res = await dbClient.rawDelete('DELETE FROM User WHERE id = ?', [user.id]); return res; } Future<bool> update(User user) async { var dbClient = await db; int res = await dbClient.update("User", user.toMap(), where: "id = ?", whereArgs: <int>[user.id]); return res > 0 ? true : false; } }

here, we have a singleton instance of the database and CRUD operation of the project. 
It will act as our data access object as well by providing functions to query for specific data models.

4. After that create a model dart file user.dart in the model subfolder of the database. It'll be a table in our database.
user.dart
class User { int id; String _firstName; String _lastName; String _dob; User(this._firstName, this._lastName, this._dob); User.map(dynamic obj) { this._firstName = obj["firstname"]; this._lastName = obj["lastname"]; this._dob = obj["dob"]; } String get firstName => _firstName; String get lastName => _lastName; String get dob => _dob; Map<String, dynamic> toMap() { var map = new Map<String, dynamic>(); map["firstname"] = _firstName; map["lastname"] = _lastName; map["dob"] = _dob; return map; } void setUserId(int id) { this.id = id; } }

we'll use it for database operation and display list of stored user in the database.

5. Now, move to the user interface part and create main.dart. 
In this class initializes the theme of the app. as shown below.
main.dart
import 'package:flutter/material.dart'; import 'package:flutter_database/homescreen.dart'; void main() => runApp(new MyApp()); class MyApp extends StatelessWidget { @override Widget build(BuildContext context) { return new MaterialApp( title: 'Flutter Database', debugShowCheckedModeBanner: false, theme: new ThemeData( primaryColor: const Color(0xFF02BB9F), primaryColorDark: const Color(0xFF167F67), accentColor: const Color(0xFFFFAD32), ), home: new MyHomePage(title: 'Flutter Database'), ); } }
here, we have provided our home screen widget instance.

6. After that create home screen widget hierarchy. Here, we have added a title and an add new user button in AppBar. To display the list of users, we have used 
FutureBuilder.

It's showing list of stored user in Flutter database.


homescreen.dart
import 'dart:async'; import 'dart:io'; import 'package:flutter/material.dart'; import 'package:flutter_database/add_user_dialog.dart'; import 'package:flutter_database/database/database_hepler.dart'; import 'package:flutter_database/database/model/user.dart'; import 'package:flutter_database/home_presenter.dart'; import 'package:flutter_database/list.dart'; class MyHomePage extends StatefulWidget { MyHomePage({Key key, this.title}) : super(key: key); final String title; @override _MyHomePageState createState() => new _MyHomePageState(); } class _MyHomePageState extends State<MyHomePage> implements HomeContract { HomePresenter homePresenter; @override void initState() { super.initState(); homePresenter = new HomePresenter(this); } displayRecord() { setState(() {}); } Widget _buildTitle(BuildContext context) { var horizontalTitleAlignment = Platform.isIOS ? CrossAxisAlignment.center : CrossAxisAlignment.center; return new InkWell( child: new Padding( padding: const EdgeInsets.symmetric(horizontal: 12.0), child: new Column( mainAxisAlignment: MainAxisAlignment.center, crossAxisAlignment: horizontalTitleAlignment, children: <Widget>[ new Text('User Database', style: new TextStyle( fontWeight: FontWeight.bold, color: Colors.white, ), ), ], ), ), ); } Future _openAddUserDialog() async { showDialog( context: context, builder: (BuildContext context) => new AddUserDialog().buildAboutDialog(context, this, false, null), ); setState(() {}); } List<Widget> _buildActions() { return <Widget>[ new IconButton( icon: const Icon( Icons.group_add, color: Colors.white, ), onPressed: _openAddUserDialog, ), ]; } @override Widget build(BuildContext context) { return new Scaffold( appBar: new AppBar( title: _buildTitle(context), actions: _buildActions(), ), body: new FutureBuilder<List<User>>( future: homePresenter.getUser(), builder: (context, snapshot) { if (snapshot.hasError) print(snapshot.error); var data = snapshot.data; return snapshot.hasData ? new UserList(data,homePresenter) : new Center(child: new CircularProgressIndicator()); }, ), ); } @override void screenUpdate() { setState(() {}); } }
 It'll display a progress bar until we loading user list from the database.

7. For project simplicity, we using here MVP architecture. So create a presenter home_presenter.dart. Here, We have written, all CRUD operations that'll invoke from home or dialog widget.
home_presenter.dart
import 'package:flutter_database/database/database_hepler.dart'; import 'package:flutter_database/database/model/user.dart'; import 'dart:async'; abstract class HomeContract { void screenUpdate(); } class HomePresenter { HomeContract _view; var db = new DatabaseHelper(); HomePresenter(this._view); delete(User user) { var db = new DatabaseHelper(); db.deleteUsers(user); updateScreen(); } Future<List<User>> getUser() { return db.getUser(); } updateScreen() { _view.screenUpdate(); } }

8. For perform edit and add a new user entry in the database. We have created a dialog. If you facing any issue to implement dialog in Flutter. please read it here in detail.


Add and edit user entry in Flutter database


add_user_dialog.dart
import 'dart:async'; import 'package:flutter/material.dart'; import 'package:flutter_database/database/database_hepler.dart'; import 'package:flutter_database/database/model/user.dart'; class AddUserDialog { final teFirstName = TextEditingController(); final teLastFirstName = TextEditingController(); final teDOB = TextEditingController(); User user; static const TextStyle linkStyle = const TextStyle( color: Colors.blue, decoration: TextDecoration.underline, ); Widget buildAboutDialog( BuildContext context, _myHomePageState, bool isEdit, User user) { if (user != null) { this.user=user; teFirstName.text = user.firstName; teLastFirstName.text = user.lastName; teDOB.text = user.dob; } return new AlertDialog( title: new Text(isEdit ? 'Edit' : 'Add new User'), content: new SingleChildScrollView( child: new Column( mainAxisSize: MainAxisSize.min, crossAxisAlignment: CrossAxisAlignment.start, children: <Widget>[ getTextField("Enter first name", teFirstName), getTextField("Enter last name", teLastFirstName), getTextField("DD-MM-YYYY", teDOB), new GestureDetector( onTap: () { addRecord(isEdit); _myHomePageState.displayRecord(); Navigator.of(context).pop(); }, child: new Container( margin: EdgeInsets.fromLTRB(10.0, 0.0, 10.0, 0.0), child: getAppBorderButton( isEdit?"Edit":"Add", EdgeInsets.fromLTRB(0.0, 10.0, 0.0, 0.0)), ), ), ], ), ), ); } Widget getTextField( String inputBoxName, TextEditingController inputBoxController) { var loginBtn = new Padding( padding: const EdgeInsets.all(5.0), child: new TextFormField( controller: inputBoxController, decoration: new InputDecoration( hintText: inputBoxName, ), ), ); return loginBtn; } Widget getAppBorderButton(String buttonLabel, EdgeInsets margin) { var loginBtn = new Container( margin: margin, padding: EdgeInsets.all(8.0), alignment: FractionalOffset.center, decoration: new BoxDecoration( border: Border.all(color: const Color(0xFF28324E)), borderRadius: new BorderRadius.all(const Radius.circular(6.0)), ), child: new Text( buttonLabel, style: new TextStyle( color: const Color(0xFF28324E), fontSize: 20.0, fontWeight: FontWeight.w300, letterSpacing: 0.3, ), ), ); return loginBtn; } Future addRecord(bool isEdit) async { var db = new DatabaseHelper(); var user = new User(teFirstName.text, teLastFirstName.text, teDOB.text); if (isEdit) { user.setUserId(this.user.id); await db.update(user); } else { await db.saveUser(user); } } }
Here, we have used textField widget for entering user details. Once, you tab on add or edit. All information will be stored in the database.

9. At the end create user list widget where we'll display store user list. 
list.dart
import 'package:flutter/foundation.dart'; import 'package:flutter/material.dart'; import 'package:flutter_database/add_user_dialog.dart'; import 'package:flutter_database/database/model/user.dart'; import 'package:flutter_database/home_presenter.dart'; class UserList extends StatelessWidget { List<User> country; HomePresenter homePresenter; UserList( List<User> this.country, HomePresenter this.homePresenter, { Key key, }) : super(key: key); @override Widget build(BuildContext context) { return new ListView.builder( itemCount: country == null ? 0 : country.length, itemBuilder: (BuildContext context, int index) { return new Card( child: new Container( child: new Center( child: new Row( children: <Widget>[ new CircleAvatar( radius: 30.0, child: new Text(getShortName(country[index])), backgroundColor: const Color(0xFF20283e), ), new Expanded( child: new Padding( padding: EdgeInsets.all(10.0), child: new Column( crossAxisAlignment: CrossAxisAlignment.start, children: <Widget>[ new Text( country[index].firstName + " " + country[index].lastName, // set some style to text style: new TextStyle( fontSize: 20.0, color: Colors.lightBlueAccent), ), new Text( "DATE: " + country[index].dob, // set some style to text style: new TextStyle( fontSize: 20.0, color: Colors.amber), ), ], ), ), ), new Column( mainAxisAlignment: MainAxisAlignment.spaceBetween, children: <Widget>[ new IconButton( icon: const Icon( Icons.edit, color: const Color(0xFF167F67), ), onPressed: () => edit(country[index], context), ), new IconButton( icon: const Icon(Icons.delete_forever, color: const Color(0xFF167F67)), onPressed: () => homePresenter.delete(country[index]), ), ], ), ], ), ), padding: const EdgeInsets.fromLTRB(10.0, 0.0, 0.0, 0.0)), ); }); } displayRecord() { homePresenter.updateScreen(); } edit(User user, BuildContext context) { showDialog( context: context, builder: (BuildContext context) => new AddUserDialog().buildAboutDialog(context, this, true, user), ); homePresenter.updateScreen(); } String getShortName(User user) { String shortName = ""; if (!user.firstName.isEmpty) { shortName = user.firstName.substring(0, 1) + "."; } if (!user.lastName.isEmpty) { shortName = shortName + user.lastName.substring(0, 1); } return shortName; } }


If you have followed the article carefully, you can see the app running very smoothly as shown in the video demo.  You can get working project source code of Flutter SQFlite database on Github.


Source Code               Flutter firebse storage apk


But if you facing any problem, please feel free to ask in the comment section below.

                                         
                                                                      Learn Flutter SQlite datebase from Expert- Udemy

Share:

Get it on Google Play

React Native - Start Development with Typescript

React Native is a popular framework for building mobile apps for both Android and iOS. It allows developers to write JavaScript code that ca...