To build apps for mobile platforms, we always need a backend server to store data that support your apps. You also want to get your users log-in, which means your backend would have to scale. Then, after you solve your scaling problem, you would need to find creative ways to get more users and measure these activities on your admin dashboard. So, Firebase is a way that we can use as a backend for mobile application.
Flutter is Google's SDK for building mobile apps for iOS and Android. Firebase gives you access to backend services for mobile applications and provides various feature including authentication, storage, database, and hosting, without maintaining your own servers.
In this post, we going to integrate Firebase in Flutter project. We'll see, how can we create a project on Firebase console and integrate it into flutter project. Let's start it with the following steps.
1. Create a new project from File ⇒ New Flutter Project with your development IDE.
2. Before using to Firebase in the Flutter, you must have a google account to access Firebase services. You can create google account from here if not available.
3. Once you created a google account, move to Firebase console.
Here, we'll create a Firebase project to connect the Flutter app with Firebase.
4. To create a Firebase project, click on Add project and give a name to your project. In the next field, set the Country/region to the location of your company or organization. Click Create Project.
After a minute your project will be ready.
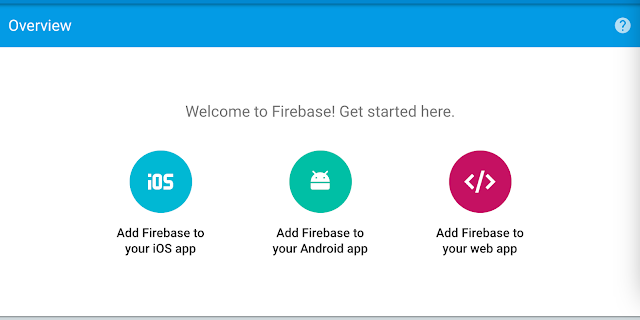
5. Once you've created a project, this is how the console of your Firebase project will look like.
as we know, we going to setup Firebase for a flutter application. If your Flutter app will be released on both iOS and Android, you need to register both the iOS and Android versions within the same Firebase project. So, we have to do platform-specific Firebase configuration. We'll configure Android and Ios one by one.
Android configuration
6. After clicking on Android icon the following window will open.
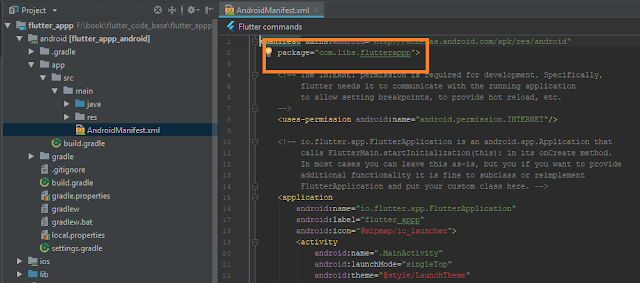
in the above window, you have to put your android package id. You can get package id from the Android native package manifest file.
You can leave next field as empty if you don't need to debug signing certificate for dynamic links, invites, Google sign in, support OAuth, etc.
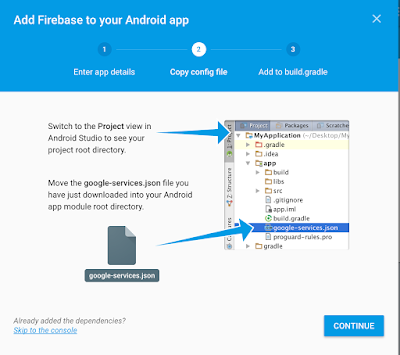
7. After completing it, you'll find a google-services.json config file. Download it and add it in the app folder of your native android project as shown below.
8. The next thing you need to do is to add Google Services classpath to your project. Go to your project's build.gradle file and add the following line in the dependencies section:
And then add the following line at the end of your app’s build.gradle (Module:app) file:
This creates your Firebase project, which is well integrated with your Android app.
Now, you have successfully integrated Firebase in your Android app, you can run your project in the emulator.
Ios configuration
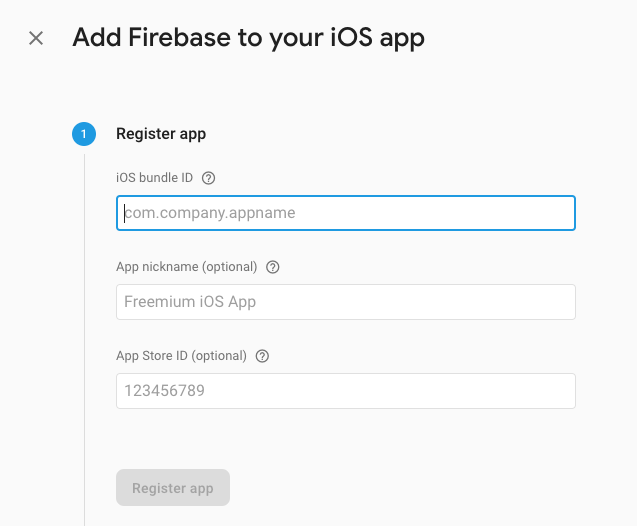
9. For iOS configuration, go to Firebase dashboard page and click on iOS tab.
After that ios app registration form will open.
10. To completely register a ios app on Firebase, you must have Xcode. Without xCode, we can't get bundle identifier of Flutter app and we can't configure Firebase credential file. So, let's open Xcode and click the top-level Runner in the left pane to show the General tab in the right pane, as shown in the figure below. Copy the Bundle Identifier.
11. After that click Register App and continuing in Firebase, follow the instructions to download the config file GoogleService-Info.plist.
12. In Xcode, notice that Runner has a subfolder also called Runner, as shown in the figure above. Drag the GoogleService-Info.plist file that you just downloaded into that Runner subfolder. In the Choose options for adding these files dialog that appears, click Finish.
In Firebase, click Next and skip the remaining steps and go back to the main page of the Firebase console.
How can add physical iOS device on Apple developer account?
1. First of all, we need to find a unique id(UDID) of an iOS device. You can follow these steps to find UDID of an iOS device.
2. Once you find UDID, go to your Apple Developer account and click on Certificate, Identifiers & Profiles.
3. After that click on Devices tab and select your device type. Like, I have selected the iPhone and click on + sign in the upper right.
4. Now under the Register Device, enter the device name and the UDID that you have, and click the Continue button. After that, simply click on the Register button for register the device.
You’ll then come to the completion screen, just click the Done button.
So, these are complete steps that we need to configure Firebase in the Flutter app. After all this integration, you can add other libs in the Flutter core file pubspec.yaml. like if you are going to use Firebase database feature. Then you have to use firebase_database.
With the help of above firebase configuration and setup. We have explored other thing of Firebase:
Login and registration authentication with Firebase.
Firebase Realtime Database CRUD Operation.
I hope, you have configured Firebase in the Flutter app as explained above. If you facing any issue to configure it, please ask it from the comment section below and you can ask it on SLACK.


