Showing posts with label Android Studio. Show all posts

Sunday, April 26, 2020

Flutter - How to generate Android apk.

As we know, Flutter SDK can develop mobile apps for Android and iOS. So, if you have a developed Flutter application and you want to publish or distribute the Android app. You have to create a signed Android APK(Android Package Kit) file format that is used by the Android operating system. 

In this post, we going to explain how we can create a signed Flutter Android apk and publish it on google play store.


Share:

Saturday, July 27, 2019

Android - Configuring SonarQube with Android Studio project.

CI/CD (Continuous Integration/Continuous Deployment) is the backbone of the organizations to build a good quality products. The CI/CD bridges the gap between development and operations teams by automating build, test, and deployment of applications. It helps the development team to find code smells in the projects.

sonar qube installation in Android Studio project
Code smells are bugs in your code that produce the performance issue of the Application. We can find this smell with the help of the various tool. The tool can help you define custom rules, in addition to the common code smell patterns, externalize these rules and have the flexibility to apply them to the code at the project level, department level and at the enterprise level.  

The SonarQube is an open-source service that can scan code in 25+ languages and generates reports of smells, vulnerabilities, and bugs. It provides a beautiful dashboard scanning data where we can analyze our code quality. SonarQube is a big step toward automating development operations as it enables continuous code inspection that will improve code quality and ensures clean code.  It can easily be integrated right into the CI/CD process, which will enable continuous inspection of code for bugs, vulnerabilities, and smells, and can be extended. SonarQube can also be extended by using plugins. For example, we can use the CodeAnalyzer plugin to measure cyclomatic complexity.
Share:

Saturday, June 8, 2019

Flutter — IDE Shortcuts for Faster and Efficient Development.

The IDE shortcuts help us a lot while developing, especially when we have a lot of code to go through and we have to find the opening and closing brackets, insert and remove the widget.
flutter shortcuts key widgets
If you’re new to Flutter development then you definitely facing problem to understand the nested structures and you spending the whole day for match the opening brackets to their closing ones. To increase development speed, we have to find out all important shortcuts of Flutter framework.

Share:

Monday, January 28, 2019

Android - Introduction and Example of Jetpack Navigation Architecture.

Today, All mobile application contains more than one screens to provide all necessary feature to the end users. Like user can move from splash screen to home screen.

jetpack-navigation-architecture-graph
From this home screen, the user can perform other tasks that show a result in other screens. These screens will usually take the form of activity and fragment within the app. An end user can navigate on all other screens with the help of screen gestures, button clicks, and menu selections. All of the work involved in navigation between destinations and stack that is handled by a navigation controller. Without navigation, we have to write a very big manual code to move from one screen to another screen that creates complex navigation paths.
Share:

Friday, November 9, 2018

How to push source code to BitBucket from Android Studio

If you are working on a big application with Android Studio and you may want to securely store the project code to a remote server. For this purpose, we can use BitBucket repository system. Which will allow you to create a repository and push all source code safely.

Android-studio-bitbucket-source-code-pushIt is an online Application for versioning control, web-based storage of codes. In simplest term, it can contain a repository of project source codes in Mercurial or Git revision control system. It’ll provide you all Git features with Project management system. So you can create Multiple branches, Tags and manage your source code safely even with multiple developers working on the same project.

Share:

Friday, June 1, 2018

Android - Install and setup Crashlytics in Andorid project.

Crashlytics is a crash and issue reporting service provided by Fabric. It helps developers to build, deploy, and maintain high-quality apps. Fabric will alert you to new issues in real-time by mail and you can find the same issue in the project. You can learn about new issues and fix it.


There is also an opportunity to proactively reach out to users impacted by ongoing issues. fatal and non-fatal issues happening in your app and their complete information with device, orientation, carrier etc. It provides various simple APIs to reports crashes and also stores user information & other details related to crash.

In this tutorial, we will learn how to integrate Crashlytics and track fatal and non-fatal issue in Android application.

Let's start it with registration on Fabric.

1. Register on Fabric
Before starting to integrate, you’ll need to sign up for a free Fabric account. After creating an account, it will send you a confirmation mail. You need to confirm account creation by clicking on the confirmation link received in your inbox. Once, confirmation is complete, you will be redirected to Install Fabric screen and will be asked to choose your IDE.

2. Integrate Fabric Plugin
To use Crashlytics in your project, you need to integrate Fabric plugin in Android Studio as this is the easiest way to integrate Crashlytics kit.


After installing it, restart Android Studio. Now, will see Fabric plugin right side of Android studio.

3. Create a new project in Android Studio.
4.  Next step is to integrate Crashlytics in App. Click on the Fabric plugin icon in the toolbar of Android Studio and log in using your credentials.
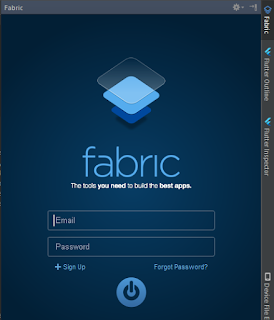
 

Once logged it will show organizations added in your account. Select an organization for your app and click on Next button.

5. Click on the Next button will take you to the list of all the kits available in Fabric plugin. Select Crashlytics from the list and it will take you to Install screen. Click on the Install button to install Crashlytics kit in your app and accept terms and condition.


During the installation process, Fabric plugin will show you all the modification needed to be done to integrate Crashlytics kit and ask you to confirm it. To confirm, press on next button and plugin will start modifying app’s code. When all modifications are complete then it will ask you to run your application to complete the integration.

6. Now, you will see the whole project is modified by the Fabric.
build.gradle
//In your build.gradle app module, you will need to add four code snippets.
//1. Add the following buildscript:
buildscript { repositories { maven { url 'https://maven.fabric.io/public' } } dependencies { classpath 'io.fabric.tools:gradle:1.+' } }
//2. Apply the Fabric plugin: apply plugin: 'io.fabric' //3. Add the Fabric Maven repository: repositories { maven { url 'https://maven.fabric.io/public' } } //4. Add the following to your dependencies: compile('com.crashlytics.sdk.android:crashlytics:2.6.8@aar') { transitive = true; }

Fabric will add your API key to the Manifest.xml file:
Menifest.xml

<meta-data

    android:name="io.fabric.ApiKey"

    android:value="<YOUR_FABRIC_API_KEY>"

/>


//Request permission for your application to open network sockets:
<uses-permission android:name="android.permission.INTERNET" />

The fabric may force you to create an application file for put Fabric.with(this, new Crashlytics());. You can add it in MainActivity.java manually as well.

Once integration is complete, Crashlytics will start tracking all the crashes happening in the app without any extra code.

Handle Caught Exceptions.
In addition to automatically reporting your app’s crashes, Crashlytics for Android can also log caught exceptions from app’s catch blocks. To log caught exceptions, add Crashlytics.logException() method to your catch block and pass an exception as an argument.
Handle Caught Exceptions.
try { JSONObject obj = new JSONObject(&quot;something&quot;); } catch (Exception e) { Crashlytics.logException(e); }
All caught exceptions logged by Crashlyitcs will appear as a non-fatal issue in Fabric dashboard. Your issue summary will contain all the state information.


So,  that's all about Fabric Crashlyitics, But if still, you have any doubt, please feel free to clarify that in the comment section below.


Share:

Tuesday, July 21, 2015

Android - Upload project on github

Overview:    I am going to explain some easy steps for upload project on GitHub by using eclipse Git.

So let's start eclipse and create a demo project for upload.

Before upload, a project on GitHub create an account on github.com if you are not on GitHub.

1. Create a new repository.


2. Give repository name, description, public or private etc and hit create repository button.


3. Now you can see your repository created.


4. Now copy HTTP clone url.


5. Now start Eclipse and create a clone repository.


6. You can see now all requir field is filled automatically if not just past clone that you copied from github. Enter user name and password in the following box. After click next you will master box, click next on it. 


7. Now change the following field if require and click on finish button.

8. Now you can find in your directory create git created with given folder name. Now past your project in that directory.

9. Now in Eclipse you can repository showing all required package in the following box. Come right on working directory and commit button.


10. In the following box, you can all project file. We can select or deselect file for commit on GitHub.
Now hit commit button for commit on Github. Click ok

11. Now refresh the Github page. We can see project uploaded on Github.


If you face any problem comment below.
Share:

Get it on Google Play

React Native - Start Development with Typescript

React Native is a popular framework for building mobile apps for both Android and iOS. It allows developers to write JavaScript code that ca...