Today, All mobile application contains more than one screens to provide all necessary feature to the end users. Like user can move from splash screen to home screen.
From this home screen, the user can perform other tasks that show a result in other screens. These screens will usually take the form of activity and fragment within the app. An end user can navigate on all other screens with the help of screen gestures, button clicks, and menu selections. All of the work involved in navigation between destinations and stack that is handled by a navigation controller. Without navigation, we have to write a very big manual code to move from one screen to another screen that creates complex navigation paths.
To make it easy and better, Google has introduced Navigation Architecture Component that combined with support for navigation graphs in Android Studio 3.2. To add navigation in an Android project using the Navigation Architecture Component is a straightforward process involving a navigation host, navigation graph, navigation actions and a minimal amount of code.
Google has release Navigation Architecture Component is part of Android Jetpack.
What is Jetpack?
Android Jetpack is a set of libraries, tools and architectural guidelines that help us to make quick and easy Android apps. It provides a common infrastructure code to project. You can read more about it here.
Benefits of Navigation Architecture.
Components of Navigation
1. Navigation Graph: The Navigation Graph is a graph that shows a group of Navigation destinations and their connections. In this file, you can define the different destinations in the application and how they are connected. An application can have more than one Navigation Graph and these Navigation Graphs can be nested together
2. Destinations: A Navigation Destination can be a screen(Activity or Fragment). We can specify arguments, actions and deep link URLs for these destinations.
3. Host: The Navigation Host is a component that knows about all the destinations and actions in the Navigation Graph. It handles navigation of different destinations.
4. Actions: A Navigation action is a link that connects a destination with another. An action knows which destinations it is connected and what kind of information that will flow between them.
Implementation of Navigation Components in project
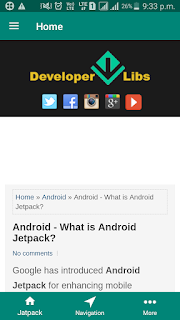
As we saw some basic requirement that we need before using navigation architecture in an Android application. We'll create an Android application with the help of Jetpack Navigation and the final output of app will look like below:
Let's start its blueprint with real code.
1. First of all, you should have Android Studio 3.2 for the Navigation Editor and adding the Navigation file. So, install or update Android studio if you are using below version.
2. Now go over to the experimental tab in the Settings screen and check Enable Navigation Editor and restart your Android Studio. This will enable the Navigation GUI.
3. Create a new Android Studio Project and add the following classpath inside the root build.gradle file:
now add the following dependency inside app build.gradle file:
We using ktx suffix in both dependencies for the kotlin. If you are using java then use dependencies without ktx. At the end, add the following plugin inside app’s build.gradle:
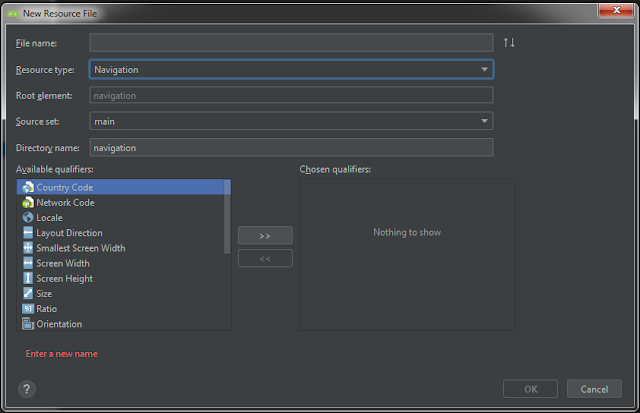
4. The first step to start using the Navigation Components is to create a Navigation Graph resource file. To create a Navigation Graph file, perform a right on app module, select the option New -> Android Resource File. This will open a template to create a new Android resource file. Fill the template by giving the name of your file and use the Resource Type drop-down to select the Navigation resource type.
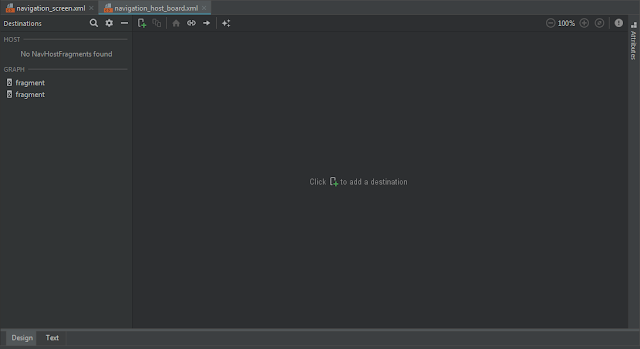
When you are done, press ok and the Navigation Editor for this file will be opened as shown below:
you can switch it in design mode:
The Navigation editor shown above is divided into 3 different sections. From left to right:
5. After that create main_activity.xml and menu_drawer.xml file. The menu_drawer.xml will display items of the left drawer of the application.
as always, we'll use main_activity.xml in MainActivity.kt
NavHostFragment will basically behave like a container to swap our fragments. The most of the code above looks familiar but there are three new tags.
To attach the above graph, we have to call extension function setupWithNavController as shown in code snippet below.
6. Next, let's add two fragments to our project and name it as HostNavFragment.kt and InfoFragment.kt.
here, you can see a layout file of the above fragment. Basically, it is a container for all other screens. All screens of this project will push inside this fragment.
To display the bottom item of the app. We have created a bottom_navigation_menu.xml file and added it in the above file. It will display Jetpack, Navigation and More tab in this project.
The InfoFragment.kt will show a url in WebView when you will tap on left drawer option.
We using fragment_web_view.xml layout file to display url in many screens.
7. Now, we have created a required component for the navigation graph. So, let's add all fragments in the navigation_host_board.xml layout that we created above. After edit it, a file will look as below:
8. To manage tab switching, we have to create a new navigation graph for bottom bar tabs. So, Let's create Fragments for the bottom tabs. Like first one is:
the second is:
In this fragment, we'll display url that will pass from NavigationFragment.kt.
9. In the NavigationFragmnet.kt class, we going to explain action and argument in the Navigation Architecture. As explained above about Actions. With the help of action, we can move on another fragment or activity. An action is created with an id specified. You can choose the transition animations.
Passing Arguments
The navigation architecture component comes bundled with a way for you to pass arguments through bundles in a type-safe way. It accomplishes this through code generation. Let’s take a look at this in action as written above. Consider a fragment in our Navigation graph as below:
now sync the project and run it. If you facing any problem to implement it. Please check working source code from below link and you can quickly check interface and feature with the help of Android APK that is given here:
If you have followed the article carefully, you can see the app running very smoothly as shown in the above video. But if you are facing any problem or you have any quires, please feel free to ask it from below comment section and you can ask it on SLACK.
To make it easy and better, Google has introduced Navigation Architecture Component that combined with support for navigation graphs in Android Studio 3.2. To add navigation in an Android project using the Navigation Architecture Component is a straightforward process involving a navigation host, navigation graph, navigation actions and a minimal amount of code.
Google has release Navigation Architecture Component is part of Android Jetpack.
What is Jetpack?
Android Jetpack is a set of libraries, tools and architectural guidelines that help us to make quick and easy Android apps. It provides a common infrastructure code to project. You can read more about it here.
Benefits of Navigation Architecture.
- The Fragment transaction takes place asynchronously.
- Testing is much easier.
- It makes deep linking easy and consistent.
- Passing arguments is much safer.
- Handling up and back correctly by default.
- It provides type safety when passing information while navigating.
- We can set default transition animations.
- The android application should have a fixed starting destination: The user should always arrive at a fixed destination after launching the app. The end users know what to expect when opening your app.
- A stack(LIFO) should be used to handle the navigation: The first screen of application should always be at the bottom in the stack. The new screen should on the top of the stack while hitting the back.
- The Navigation up function never exits your app: The up button should only be used to navigate within your application and logically pop items off of the navigation stack. If you are at start destination, this means that your navigation stack should be empty and up button should not be shown.
- Up and Back should function identically in all the other cases: This should be true with the notable exception of situations where navigation stack is empty. Unlike the up button which should be hidden, the back button should close the application in these instances.
- Deep linking to a destination or navigating to the same destination should yield the same stack: In order to remain consistent with the principle that your app should have a fixed starting destination, deep linking result in the same navigation stack that a user would create during normal navigation of your app.
Components of Navigation
1. Navigation Graph: The Navigation Graph is a graph that shows a group of Navigation destinations and their connections. In this file, you can define the different destinations in the application and how they are connected. An application can have more than one Navigation Graph and these Navigation Graphs can be nested together
2. Destinations: A Navigation Destination can be a screen(Activity or Fragment). We can specify arguments, actions and deep link URLs for these destinations.
3. Host: The Navigation Host is a component that knows about all the destinations and actions in the Navigation Graph. It handles navigation of different destinations.
4. Actions: A Navigation action is a link that connects a destination with another. An action knows which destinations it is connected and what kind of information that will flow between them.
Implementation of Navigation Components in project
As we saw some basic requirement that we need before using navigation architecture in an Android application. We'll create an Android application with the help of Jetpack Navigation and the final output of app will look like below:
Let's start its blueprint with real code.
1. First of all, you should have Android Studio 3.2 for the Navigation Editor and adding the Navigation file. So, install or update Android studio if you are using below version.
2. Now go over to the experimental tab in the Settings screen and check Enable Navigation Editor and restart your Android Studio. This will enable the Navigation GUI.
3. Create a new Android Studio Project and add the following classpath inside the root build.gradle file:
now add the following dependency inside app build.gradle file:
We using ktx suffix in both dependencies for the kotlin. If you are using java then use dependencies without ktx. At the end, add the following plugin inside app’s build.gradle:
4. The first step to start using the Navigation Components is to create a Navigation Graph resource file. To create a Navigation Graph file, perform a right on app module, select the option New -> Android Resource File. This will open a template to create a new Android resource file. Fill the template by giving the name of your file and use the Resource Type drop-down to select the Navigation resource type.
When you are done, press ok and the Navigation Editor for this file will be opened as shown below:
you can switch it in design mode:
The Navigation editor shown above is divided into 3 different sections. From left to right:
- The leftmost section of the editor shows the list of all the destinations in the graph and where is the navigation graph hosted.
- In the middle section of the editor, You can see a visual representation of all the destinations in the graph and their connections. If you are using the tools namespace in your layouts, the data will be rendered here too and you can have a good view of your app and sample data.
- The rightmost section is the attributes section. This section content shows up only if you select a destination or an action. This section will show and allow the modification of the attributes of the selected item to be it an Action or a Destination.
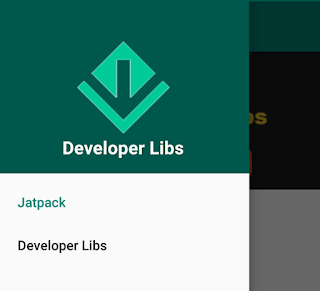
5. After that create main_activity.xml and menu_drawer.xml file. The menu_drawer.xml will display items of the left drawer of the application.
as always, we'll use main_activity.xml in MainActivity.kt
NavHostFragment will basically behave like a container to swap our fragments. The most of the code above looks familiar but there are three new tags.
- android:name="androidx.navigation.fragment.NavHostFragment" andapp:defaultNavHost="true" connects the system back button to the NavHostFragment
- app:navGraph="@navigation/navigation_host_board.xml" associates the NavHostFragment with a navigation graph. This navigation graph specifies all the destinations the user can navigate to in this NavHostFragment.
To attach the above graph, we have to call extension function setupWithNavController as shown in code snippet below.
6. Next, let's add two fragments to our project and name it as HostNavFragment.kt and InfoFragment.kt.
here, you can see a layout file of the above fragment. Basically, it is a container for all other screens. All screens of this project will push inside this fragment.
To display the bottom item of the app. We have created a bottom_navigation_menu.xml file and added it in the above file. It will display Jetpack, Navigation and More tab in this project.
The InfoFragment.kt will show a url in WebView when you will tap on left drawer option.
We using fragment_web_view.xml layout file to display url in many screens.
7. Now, we have created a required component for the navigation graph. So, let's add all fragments in the navigation_host_board.xml layout that we created above. After edit it, a file will look as below:
8. To manage tab switching, we have to create a new navigation graph for bottom bar tabs. So, Let's create Fragments for the bottom tabs. Like first one is:
the second is:
In this fragment, we'll display url that will pass from NavigationFragment.kt.
9. In the NavigationFragmnet.kt class, we going to explain action and argument in the Navigation Architecture. As explained above about Actions. With the help of action, we can move on another fragment or activity. An action is created with an id specified. You can choose the transition animations.
Passing Arguments
The navigation architecture component comes bundled with a way for you to pass arguments through bundles in a type-safe way. It accomplishes this through code generation. Let’s take a look at this in action as written above. Consider a fragment in our Navigation graph as below:
now sync the project and run it. If you facing any problem to implement it. Please check working source code from below link and you can quickly check interface and feature with the help of Android APK that is given here:
If you have followed the article carefully, you can see the app running very smoothly as shown in the above video. But if you are facing any problem or you have any quires, please feel free to ask it from below comment section and you can ask it on SLACK.


