If you have worked with native Android application development. Then you definitely know about the Relative Layout. The Relative Layout is a very flexible layout that used for custom layout designing. It gives us the flexibility to position a view based on the relative or sibling component’s position.
In Flutter, we can design a screen with the help of StatelessWidget and StateFulWidget. So, if you are thinking such kind of layout in Flutter Application. Then you can use Column, Row and Stack widgets to design your application screen in Flutter. Flutter layouts are usually built using a tree of these widgets. These widgets take constructor arguments that specify rules for how the children are laid out relative to the parent, and you can also influence the layout of individual children by wrapping them in Expanded, Flexible, Positioned, Align, or Center widgets that are explained here.
In this post, we going to use the above widgets to create a profile screen of a user. To create a profile screen in the Flutter, we'll create a tree of the widget. The final output of the screen will look like below:
Creating a new Project
1. Create a new project from File ⇒ New Flutter Project with your development IDE
2. After that open main.dart file and edit it. As we have set our theme and change debug banner property of Application. In this file, we have set our home.dart as the main widget of application.
main.dart


import 'package:flutter/material.dart';
import 'package:flutter_row_column_relative/home.dart';

void main() {
  runApp(new MyApp());
}

class MyApp extends StatelessWidget {
  @override
  Widget build(BuildContext context) {
    return new MaterialApp(
      title: 'Flutter Demo',
      theme: new ThemeData(
        brightness: Brightness.dark,
        primaryColorBrightness: Brightness.dark,
      ),
      home: new HomeScreen(),
      debugShowCheckedModeBanner: false,
    );
  }
}
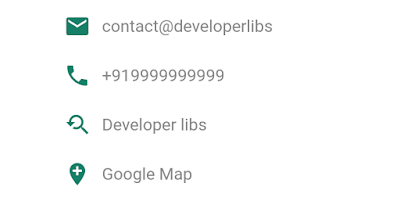
3. Now create custom_text.dart file. It is our modified text widget. With the help of this file, we create a text widget with left icons. It will display like below:

custom_text.dart


import 'package:flutter/cupertino.dart';
import 'package:flutter/material.dart';

class CustomText {
  final String label;
  final double fontSize;
  final String fontName;
  final int textColor;
  final int iconColor;
  final TextAlign textAlign;
  final int maxLines;
  final IconData icon;

  CustomText(
      {@required this.label,
      this.fontSize = 10.0,
      this.fontName,
      this.textColor = 0xFF000000,
      this.iconColor = 0xFF000000,
      this.textAlign = TextAlign.start,
      this.maxLines = 1,
        this.icon=Icons.broken_image
      });

  Widget text() {
    var text = new Text(
      label,
      textAlign: textAlign,
      overflow: TextOverflow.ellipsis,
      maxLines: maxLines,
      style: new TextStyle(
        color: Color(textColor),
        fontSize: fontSize,
        fontFamily: fontName,
      ),
    );

    return new Row(
      children: <Widget>[
        new Padding(
          padding: EdgeInsets.all(10.0),
          child: new Icon(icon,color: Color(iconColor),),
        ),
        text
      ],
    );
  }
}
4. Let's see the home widget of this sample and assemble widgets to make the profile screen. To make code snippet simple, we have created three others widgets headerWidget, statsWidget, and bodyWidget. The headerWidget() will display a circle pic and name, statsWidget() will display photos, followers and following tab stats and bodyWidget() will display other bottom information of the screen. As you can see the arrangement of the above widgets below:
home.dart build methid


 @override
  build(BuildContext context) {
    return new Material(
        type: MaterialType.transparency,
        child: new Stack(
          children: [
            new Column(
              children: <Widget>[
                headerWidget(),
                bodyWidget(),
              ],
            ),
            new Center(
              child: statsWidget(),
            ),
          ],
        ));
  }
Here, you can see the final assemble tree of widget for this screen.
home.dart


import 'package:flutter/material.dart';
import 'package:flutter_row_column_relative/custom_text.dart';

class HomeScreen extends StatefulWidget {
  @override
  _HomeScreenState createState() => new _HomeScreenState();
}

class _HomeScreenState extends State<HomeScreen> {

  Card statsWidget() {
    return new Card(
        elevation: 1.5,
        margin: EdgeInsets.only(bottom: 210.0, left: 20.0, right: 20.0),
        color: Colors.white,
        child: new Column(
          crossAxisAlignment: CrossAxisAlignment.stretch,
          mainAxisSize: MainAxisSize.min,
          verticalDirection: VerticalDirection.down,
          children: <Widget>[
            new Padding(
              padding: EdgeInsets.all(20.0),
              child: new Row(
                children: <Widget>[
                  new Expanded(
                    child: new Column(
                      crossAxisAlignment: CrossAxisAlignment.start,
                      children: <Widget>[
                        new Align(
                            alignment: Alignment.center,
                            child: new Text(
                              "Photos",
                              textAlign: TextAlign.center,
                              style: new TextStyle(
                                color: Colors.grey,
                                fontSize: 16.0,
                              ),
                            )),
                        new Align(
                            alignment: Alignment.center,
                            child: new Text(
                              "22k",
                              textAlign: TextAlign.center,
                              style: new TextStyle(
                                color: Color(0xff167F67),
                              ),
                            )),
                      ],
                    ),
                    flex: 1,
                  ),
                  new Expanded(
                    child: new Column(
                      crossAxisAlignment: CrossAxisAlignment.start,
                      children: <Widget>[
                        new Align(
                            alignment: Alignment.center,
                            child: new Text(
                              "Followers",
                              textAlign: TextAlign.center,
                              style: new TextStyle(
                                color: Colors.grey,
                                fontSize: 16.0,
                              ),
                            )),
                        new Align(
                            alignment: Alignment.center,
                            child: new Text(
                              "232k",
                              textAlign: TextAlign.center,
                              style: new TextStyle(
                                color: Color(0xff167F67),
                              ),
                            )),
                      ],
                    ),
                    flex: 1,
                  ),
                  new Expanded(
                    child: new Column(
                      crossAxisAlignment: CrossAxisAlignment.start,
                      children: <Widget>[
                        new Align(
                            alignment: Alignment.center,
                            child: new Text(
                              "Following",
                              textAlign: TextAlign.center,
                              style: new TextStyle(
                                  color: Colors.grey, fontSize: 16.0),
                            )),
                        new Align(
                            alignment: Alignment.center,
                            child: new Text(
                              "332k",
                              textAlign: TextAlign.center,
                              style: new TextStyle(
                                color: Color(0xff167F67),
                              ),
                            )),
                      ],
                    ),
                    flex: 1,
                  )
                ],
              ),
            )
          ],
        ));
  }

  @override
  build(BuildContext context) {
    return new Material(
        type: MaterialType.transparency,
        child: new Stack(
          children: [
            new Column(
              children: <Widget>[
                headerWidget(),
                bodyWidget(),
              ],
            ),
            new Center(
              child: statsWidget(),
            ),
          ],
        ));
  }

  Widget headerWidget() {
   var header= new Expanded(
      child: new Container(
        decoration: new BoxDecoration(
          color: const Color(0xff167F67),
        ),
        child: new Column(
          mainAxisAlignment: MainAxisAlignment.center,
          children: <Widget>[
            new Center(
              child: new Container(
                margin: EdgeInsets.only(bottom: 10.0),
                height: 80.0,
                width: 80.0,
                decoration: new BoxDecoration(
                  color: const Color(0xff167F67),
                  image: new DecorationImage(
                    image: new NetworkImage(
                        "https://blogger.googleusercontent.com/img/b/R29vZ2xl/AVvXsEgdQGmCiF9EESpWe8eLwC5quDlkoOIiiDyrT-cgJAwAkRH8uCePavgaLdwDYoKPv8Yltx-az_UZmz1ZYKZzWLW1juziA9bzvWo3f1D1rvajuB44zaSSHuVEkh0MxrH7L3k7kW_aVnJklaeT/s1600/logo.png"),
                    fit: BoxFit.cover,
                  ),
                  border:
                  Border.all(color: Colors.white, width: 2.0),
                  borderRadius: new BorderRadius.all(
                      const Radius.circular(40.0)),
                ),
              ),
            ),
            new Text(
              "Developer Libs",
              textAlign: TextAlign.center,
              style: new TextStyle(
                color: Color(0xffffffff),
              ),
            )
          ],
        ),
      ),
      flex: 1,
    );

   return header;
  }

 Widget bodyWidget() {
    var bodyWidget=new Expanded(
      child: new Container(
          decoration: new BoxDecoration(
            color: const Color(0xffffffff),
          ),
          child: new Padding(
            padding:
            EdgeInsets.only(left: 50.0, right: 50.0, top: 50.0),
            child: new Column(
              children: <Widget>[
                new CustomText(
                    label: "contact@developerlibs",
                    textColor: 0xff858585,
                    iconColor: 0xff167F67,
                    fontSize: 15.0,
                    icon: Icons.email)
                    .text(),
                new CustomText(
                    label: "+919999999999",
                    textColor: 0xff858585,
                    iconColor: 0xff167F67,
                    fontSize: 15.0,
                    icon: Icons.phone)
                    .text(),
                new CustomText(
                    label: "Developer libs",
                    textColor: 0xff858585,
                    iconColor: 0xff167F67,
                    fontSize: 15.0,
                    icon: Icons.youtube_searched_for)
                    .text(),
                new CustomText(
                    label: "Google Map",
                    textColor: 0xff858585,
                    iconColor: 0xff167F67,
                    fontSize: 15.0,
                    icon: Icons.add_location)
                    .text(),
              ],
            ),
          )),
      flex: 2,
    );
    return bodyWidget;

 }
}
If you have followed the article carefully, you can see the app running very smoothly as shown. But if you are facing any problem or you have any quires, please feel free to ask it from below comment section.


