To develop a mobile application, we always need a testing real device or Android Emulator device to test developed features. In this post, we going to share some tips to connect a device with a development IDE. Maybe this is very useful for those people facing device connectivity problem. So here, we have some tips that you can use to resolve it.
How can check connected device?
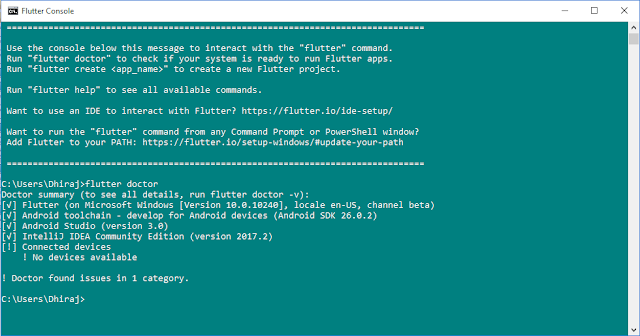
Flutter supports both iOS and Android device and simulators to develop the mobile application. In terminal, run flutter doctor the flutter devices command to verify that Flutter recognizes your connected Android device.
as you can see above, it's showing message device connectivity state.
#Tips - 1
First of all, check the official reference document(on mac system for Android), How you can setup Device/Simulator to run your application. After that simply connect a device with your development system or start Emulator. Then again run flutter doctor to check it.
#Tips - 2
Connect a real Android device?
To run and test the Flutter app on an Android device, we’ll need an Android device running Android 4.1 (API level 16) or higher.
Connect the Android emulator?
To run and test your Flutter app on the Android emulator. You can follow these steps:
#Tips - 4
Add Flutter to Windows Environment variable Path
1. Navigate in to Flutter SDK folder.
2. Go inside to bin folder and copy the directory path (in your case C:\Flutter\bin)
3. Go to “Control Panel > User Accounts > User Accounts > Change my environment variables”
4. Under “User variables” select path variable and click edit.
5. Put C:\Flutter\bin and apply.
Same as Flutter Environment, we have to set the Android SDK path if it is on custom location.
#Tips - 5
1. Navigate into the Android SDK folder.
2. Copy the directory path (in your case ..AndroidStudioSDK\sdk)
3. Go to “Control Panel > User Accounts > User Accounts > Change my environment variables”
4. Under “User variables” select path variable and click edit.
5. Put ..AndroidStudioSDK\sdk with ANDROID_HOME and apply.
The above tips, we have explained in our post Flutter - How to install flutter in android studio.
If you still facing device connectivity issue. Please feel free to ask in the comment section below.
How can check connected device?
Flutter supports both iOS and Android device and simulators to develop the mobile application. In terminal, run flutter doctor the flutter devices command to verify that Flutter recognizes your connected Android device.
as you can see above, it's showing message device connectivity state.
#Tips - 1
First of all, check the official reference document(on mac system for Android), How you can setup Device/Simulator to run your application. After that simply connect a device with your development system or start Emulator. Then again run flutter doctor to check it.
#Tips - 2
Connect a real Android device?
To run and test the Flutter app on an Android device, we’ll need an Android device running Android 4.1 (API level 16) or higher.
- Enable Developer options and USB debugging in your device setting.
- Connect the device with a USB cable, plug your phone into your computer. If prompted a connection message on your device, authorize your computer to access device.
- In the terminal, run the flutter devices command to verify that Flutter recognizes your connected Android device.
- Start your app by running the flutter run.
Connect the Android emulator?
To run and test your Flutter app on the Android emulator. You can follow these steps:
- Enable VM acceleration on your machine.
- Launch Android Studio>Tools>Android>AVD Manager and select Create Virtual Device.
- Choose a device definition and select Next.
- Select one or more system images for the Android versions you want to emulate, and select Next. An x86 or x86_64 image is recommended.
- Under Emulated Performance, select Hardware - GLES 2.0 to enable hardware acceleration.
- Verify the AVD configuration is correct, and select Finish.
For details on the above steps, see Managing AVDs.
- In Android Virtual Device Manager, click Run in the toolbar. The emulator starts up and displays the default canvas for your selected OS version and device.
- Start your app by running the flutter run. The connected device name is Android SDK built for, where the platform is the chip family, such as x86.
#Tips - 4
Add Flutter to Windows Environment variable Path
1. Navigate in to Flutter SDK folder.
2. Go inside to bin folder and copy the directory path (in your case C:\Flutter\bin)
3. Go to “Control Panel > User Accounts > User Accounts > Change my environment variables”
4. Under “User variables” select path variable and click edit.
5. Put C:\Flutter\bin and apply.
Same as Flutter Environment, we have to set the Android SDK path if it is on custom location.
#Tips - 5
1. Navigate into the Android SDK folder.
2. Copy the directory path (in your case ..AndroidStudioSDK\sdk)
3. Go to “Control Panel > User Accounts > User Accounts > Change my environment variables”
4. Under “User variables” select path variable and click edit.
5. Put ..AndroidStudioSDK\sdk with ANDROID_HOME and apply.
The above tips, we have explained in our post Flutter - How to install flutter in android studio.
If you still facing device connectivity issue. Please feel free to ask in the comment section below.


