


Redux is a unidirectional application architecture, originally made for JavaScript but now used in mobile applications development (such as React Native or Flutter). Redux makes easy to develop, maintain and test applications.
Redux was created by Dan Abramov around June 2015. It was inspired by Facebook’s Flux and functional programming language Elm. Redux got popular very quickly because of its simplicity, small size (only 2 KB) and great documentation.

Basically, you should know three things about Redux architecture.
1. Whole application state is kept only one place that is called store.
2. To change the application state you need to dispatch an action.
3. Changes are made with pure functions. It takes the previous state and an action and returns a new state.

As you can see above, a store which holds a State object that represents the state of the whole application. Every application event is represented as an action that gets dispatched to a Reducer function. This Reducer updates the store with a new State depending on what action it receives and whenever a new state is pushed through the store the View is recreated to reflect the changes.
In Redux most components are decoupled, making UI changes very easy to make. In addition, the only business logic sits in the Reducer functions. A Reducer is a function that takes an action and the current application state and it returns a new state object, therefore it is straightforward to test because we can write a unit test that sets up an initial State and checks that the Reducer returns the new and modified State.
What are the advantages of Redux?
In this post, I'll explain how you can start writing mobile apps with Flutter using the Redux architecture.
Redux in Flutter
If you going to implement redux in flutter then you have to explore two very useful packages.
redux: The redux package adds all the necessary components to use Redux in Dart like:
Store:- holds a State object that represents the state of the whole application.
Reducer:- update the store with a new state depending on what action it receives.
Middleware:- is a component that processes an action before it reaches the Reducer. It receives the current application state and the action that got dispatched. As you can see below.

flutter_redux: This is a Flutter-specific package which provides additional components on top of the redux library which are useful for implementing Redux in Flutter, such as:
StoreProvider:- The base Widget for the app that will be used to provide the Store to all the Widgets that need it.
StoreBuilder:- A Widget that receives the Store from the StoreProvider and StoreConnector.
StoreConnector:- It is very useful Widget that can be used instead of the StoreBuilder as you can convert the Store into a ViewModel to build the Widget tree and whenever the State in the Store is modified, the StoreConnector will get rebuilt.
Let's create a small Flutter application and implement Redux.
We going to create a small redux based flutter application that has create and delete task feature. It will show you a basic idea of redux. Let’s start it some important parts of the project.
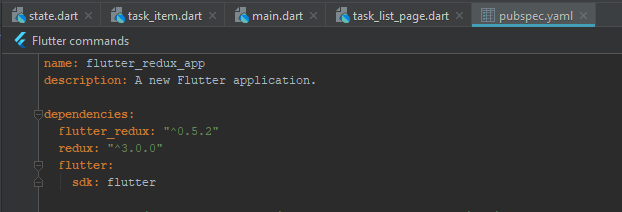
1. Add redux dependency in project pubspec.yaml.
2. Open main.dart file (which is our app’s entry point) defines the application Store object from an initial State, a Reducer function and the Middleware.
3. After that wraps the MaterialApp object with a StoreProvider that takes the Store and can pass it to its descendant Widgets that need one:
4. The AppState class contains the list of task items and a field to decide whether or not to display the TextField to add a new item:
5. In order to display the task list, we define a ViewModel class that contains a view-specific representation of the data we need to display, as well as the actions the user can do. This ViewModel gets created from the Store:
6. Now we can use the ViewModel class to display the task list. Notice that we wrap our Widgets inside a StoreConnector which allows us to create the ViewModel from the Store and build our UI using the ViewModel.
in the above code, we have to define event when the user presses the ‘Add’ button, we’ll dispatch an action of type.
7. Create task add and delete the widget.
which indicates we need to modify the application state so that we display the TextField that will let the user add a new task item.
8. The action class is Reducer that contains business login:
9. Create action.dart, here we can declare actions that app will perform.
Now run the project and you will see TextField after clicking on add button. Add some text.
As you can see, Redux is all about the state. You have a single app state, the state is read-only for the view, and to create new state you need to send action. After that reducer creates and emits a new application state.
This is a simple example but demonstrates the concepts. The full source code for this app can be found in Github.
To conclude, using this architecture in Flutter apps keeps all the concerns well-defined and separate from each other. I'd like to see if it'd scale well in a large project, as having one State for the whole app makes me think you'd end up composing this State from smaller State objects.
If you have any query feel free to ask it in the comment section below.
Redux was created by Dan Abramov around June 2015. It was inspired by Facebook’s Flux and functional programming language Elm. Redux got popular very quickly because of its simplicity, small size (only 2 KB) and great documentation.

Basically, you should know three things about Redux architecture.
1. Whole application state is kept only one place that is called store.
2. To change the application state you need to dispatch an action.
3. Changes are made with pure functions. It takes the previous state and an action and returns a new state.

As you can see above, a store which holds a State object that represents the state of the whole application. Every application event is represented as an action that gets dispatched to a Reducer function. This Reducer updates the store with a new State depending on what action it receives and whenever a new state is pushed through the store the View is recreated to reflect the changes.
In Redux most components are decoupled, making UI changes very easy to make. In addition, the only business logic sits in the Reducer functions. A Reducer is a function that takes an action and the current application state and it returns a new state object, therefore it is straightforward to test because we can write a unit test that sets up an initial State and checks that the Reducer returns the new and modified State.
What are the advantages of Redux?
- Easy to understand how the data flow works in the application.
- The use of "pure" reducer functions makes logic easier to test, and enables useful features like "time-travel debugging".
- Centralizing the state makes it easier to implement things like logging changes to the data, or persisting data between page refreshes.
In this post, I'll explain how you can start writing mobile apps with Flutter using the Redux architecture.
Redux in Flutter
If you going to implement redux in flutter then you have to explore two very useful packages.
redux: The redux package adds all the necessary components to use Redux in Dart like:
Store:- holds a State object that represents the state of the whole application.
Reducer:- update the store with a new state depending on what action it receives.
Middleware:- is a component that processes an action before it reaches the Reducer. It receives the current application state and the action that got dispatched. As you can see below.

flutter_redux: This is a Flutter-specific package which provides additional components on top of the redux library which are useful for implementing Redux in Flutter, such as:
StoreProvider:- The base Widget for the app that will be used to provide the Store to all the Widgets that need it.
StoreBuilder:- A Widget that receives the Store from the StoreProvider and StoreConnector.
StoreConnector:- It is very useful Widget that can be used instead of the StoreBuilder as you can convert the Store into a ViewModel to build the Widget tree and whenever the State in the Store is modified, the StoreConnector will get rebuilt.
Let's create a small Flutter application and implement Redux.
We going to create a small redux based flutter application that has create and delete task feature. It will show you a basic idea of redux. Let’s start it some important parts of the project.
1. Add redux dependency in project pubspec.yaml.

2. Open main.dart file (which is our app’s entry point) defines the application Store object from an initial State, a Reducer function and the Middleware.
3. After that wraps the MaterialApp object with a StoreProvider that takes the Store and can pass it to its descendant Widgets that need one:
4. The AppState class contains the list of task items and a field to decide whether or not to display the TextField to add a new item:
5. In order to display the task list, we define a ViewModel class that contains a view-specific representation of the data we need to display, as well as the actions the user can do. This ViewModel gets created from the Store:
6. Now we can use the ViewModel class to display the task list. Notice that we wrap our Widgets inside a StoreConnector which allows us to create the ViewModel from the Store and build our UI using the ViewModel.
in the above code, we have to define event when the user presses the ‘Add’ button, we’ll dispatch an action of type.
7. Create task add and delete the widget.
which indicates we need to modify the application state so that we display the TextField that will let the user add a new task item.
8. The action class is Reducer that contains business login:
9. Create action.dart, here we can declare actions that app will perform.
Now run the project and you will see TextField after clicking on add button. Add some text.
As you can see, Redux is all about the state. You have a single app state, the state is read-only for the view, and to create new state you need to send action. After that reducer creates and emits a new application state.
This is a simple example but demonstrates the concepts. The full source code for this app can be found in Github.
To conclude, using this architecture in Flutter apps keeps all the concerns well-defined and separate from each other. I'd like to see if it'd scale well in a large project, as having one State for the whole app makes me think you'd end up composing this State from smaller State objects.
If you have any query feel free to ask it in the comment section below.


