


If you have worked on mobile application development. You definitely know about splash screen. The splash screen is normally used to show the user some progress before the app loads completely. Some people use the splash screen just to showcase their app/company logo for a couple of seconds.
 Before start it, you should read Flutter - Introduction, and setup.
I assuming, you have basic knowledge of Flutter and Dart and you have IntelliJ IDE or Android Studio, Android SDK and Xcode configured.
In this tutorial, we are going to learn how to implement a splash screen with Flutter. Let's start it.
1. Create a new Flutter project and open main.dart file from lib package. You can rename it as i did (splash.dart)here.
2. Create assets folder on project root and add an image that will be displayed on the splash screen.
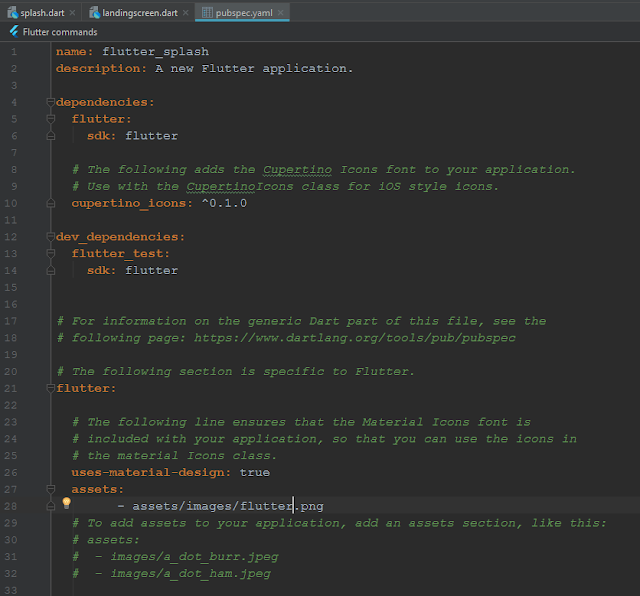
3. Open pubspec.ymal file and declare image path here.
4. As we know, in Flutter everything is a widget. So, we going to create the SplashScreen widget that extends StatefulWidget. Stateful widget is useful when the part of the user interface you are describing can change dynamically.
here, our motive is move to another screen after some time. To achieve it Flutter has given us Route and Navigator classes for managing multiple screens navigation.
Route: A Route is an abstraction for a “screen” or “page” of an app.
Navigator: Navigator is a widget that manages routes. It can push and pop routes to help a user move from screen to screen.
Mobile apps typically display full-screen elements called “screens” or “pages”. In Flutter, these elements are called routes and they’re managed by a Navigator widget. The navigator manages a stack of Route objects and provides methods for managing the stack, like Navigator.push and Navigator.pop.
5. Let's define the route of the splash screen. I have used a tag and another widget (LandingScreen) where we will navigate after some time.
6. After that, create SplashScreen State. This class extends to SplashScreen class. Where the current configuration of a [State] is hosted.
7. Create startTimer() with async and give some time, like i have given 5 sec.
8. Create navigationPage callback method that is declared above.
9. Update initState() method and call startTime() method.
initState(): The framework will call this method exactly once for each [State] object it creates. If you override this, make sure your method starts with a call to super.initState().
10. At the end, create the user interface of a splash screen. As you can see, i have added an image in the center of the widget with its path.
Now, before running this project, verify all classes and resources.
1. Resource:- assets>image>flutter.png.
2. Dart files:- splash and landing screen.

3. Declare the image path in pubspec.yaml file.
4. Final splash.dart file.
5. Another widget (landingscreen.dart), where the app will navigate.
Now, run it and you will see action after 5 sec.


I assuming, you have basic knowledge of Flutter and Dart and you have IntelliJ IDE or Android Studio, Android SDK and Xcode configured.
In this tutorial, we are going to learn how to implement a splash screen with Flutter. Let's start it.
1. Create a new Flutter project and open main.dart file from lib package. You can rename it as i did (splash.dart)here.
2. Create assets folder on project root and add an image that will be displayed on the splash screen.
3. Open pubspec.ymal file and declare image path here.
4. As we know, in Flutter everything is a widget. So, we going to create the SplashScreen widget that extends StatefulWidget. Stateful widget is useful when the part of the user interface you are describing can change dynamically.
here, our motive is move to another screen after some time. To achieve it Flutter has given us Route and Navigator classes for managing multiple screens navigation.
Route: A Route is an abstraction for a “screen” or “page” of an app.
Navigator: Navigator is a widget that manages routes. It can push and pop routes to help a user move from screen to screen.
Mobile apps typically display full-screen elements called “screens” or “pages”. In Flutter, these elements are called routes and they’re managed by a Navigator widget. The navigator manages a stack of Route objects and provides methods for managing the stack, like Navigator.push and Navigator.pop.
5. Let's define the route of the splash screen. I have used a tag and another widget (LandingScreen) where we will navigate after some time.
6. After that, create SplashScreen State. This class extends to SplashScreen class. Where the current configuration of a [State] is hosted.
7. Create startTimer() with async and give some time, like i have given 5 sec.
8. Create navigationPage callback method that is declared above.
9. Update initState() method and call startTime() method.
initState(): The framework will call this method exactly once for each [State] object it creates. If you override this, make sure your method starts with a call to super.initState().
10. At the end, create the user interface of a splash screen. As you can see, i have added an image in the center of the widget with its path.
Now, before running this project, verify all classes and resources.
1. Resource:- assets>image>flutter.png.
2. Dart files:- splash and landing screen.

3. Declare the image path in pubspec.yaml file.

4. Final splash.dart file.
5. Another widget (landingscreen.dart), where the app will navigate.
Now, run it and you will see action after 5 sec.

I hope it will work, but if still, you have any doubt or not work. Please feel free to clarify that in the comment section below. Your comments and suggestions are welcome.


