Thursday, July 4, 2019

Flutter - Facebook login and authentication example

Today, almost every application provides login with Facebook because it having the biggest social media network in the world. It creates a wide range of users base for your application.
 
Flutter create facebook label.
The Facebook SDK provides a convenient and secure way for users to log in to an app without go through a sign-up process. Facebook SDK takes care of user’s privacy as well, when people log into your app they can grant permissions to your app. After that, you can retrieve information and perform some actions for your application.

In this post, we're going to explain Facebook login and get auth in a Flutter Application. We'll use flutter_facebook_login plugin that is not an official plugin of Facebook. This plugin using native SDK of Facebook for Android and iOS. Before going to use the Facebook login feature in a Flutter application. It’s necessary to perform some prerequisite tasks. You must have an active Facebook account.


Create a Facebook developer account

To integrate Facebook login, we need to register yourself as a developer in the Facebook developer site to allow Facebook to authenticate all API requests that are coming from our app. So,  go to the Facebook developer page and register yourself as a developer.


Creating a Project.
1. Create a new project from File ⇒ New Flutter Project with your development IDE and name it flutter_facebook_auth. Before start, Facebook login development. Let's do some important task to use Facebook API's in the Flutter application. We have to register our application on the Facebook developer for Android and iOS.

Android Platform Setup:- To register our application for Android. We have to generate App Signature or Hash key. We can generate it with two ways.
  1. Using keytool.
    • You can generate your application signature (keyhash) using keytool that comes with java. To execute it we have to install OpenSSL on your pc. You can download OpenSSL from here and set it in your system environment path.
    • After that, open your command prompt (CMD) and run the following command to generate your keyhash. While generating hashkey it will ask the password. So, you can enter a password android. If it doesn’t ask for password your keystore path is incorrect.
      Generating Hash key with keytool
      Command:-
      keytool -exportcert -alias androiddebugkey -keystore "<path-to-users-directory>\.android\debug.keystore" | openssl sha1 -binary | openssl base64
      Example:- check the following command how i generated hashkey on my pc.
      keytool -exportcert -alias androiddebugkey -keystore "C:\Users\dev\.android\debug.keystore" | openssl sha1 -binary | openssl base64

  2.  Using Hash key gerentor code: We can generate Facebook Hash key by using the following code that we have explained here. Just put that code in \flutter_facebook_auth\flutter_facebook_auth\android\app\src\main\java\facebookauth\devlibs\com\flutter_facebook_auth\MainActivity.java class:
    MainActivity.java.
    public class MainActivity extends FlutterActivity { @Override protected void onCreate(Bundle savedInstanceState) { super.onCreate(savedInstanceState); GeneratedPluginRegistrant.registerWith(this); generateKeyHash(); } public void generateKeyHash() { try { PackageInfo info = getPackageManager().getPackageInfo( getPackageName(), PackageManager.GET_SIGNATURES); for (Signature signature : info.signatures) { MessageDigest md = MessageDigest.getInstance("SHA"); md.update(signature.toByteArray()); Log.d(">>>>>KeyHash:", Base64.encodeToString(md.digest(), Base64.DEFAULT)); } } catch (PackageManager.NameNotFoundException e) { Log.i(">>>>>>",e.toString()); } catch (NoSuchAlgorithmException e) { Log.i(">>>>",e.toString()); } } }

      Make sure in the above code you provided your application’s package name. After that execute your app and you will get your keyhash in your logcat:


Flutter create facebook app hash key


2.
Registering Application on Facebook for Android:
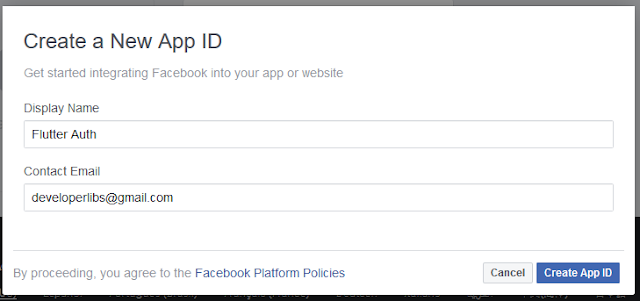
  • After generating your app signature successfully, register your facebook application by going to create new facebook application and fill out all the information.

Flutter create facebook app

  • In the next screen, you are able to see your Application ID. Create a note of it, because we'll use it later in this tutorial.

Flutter facebook id

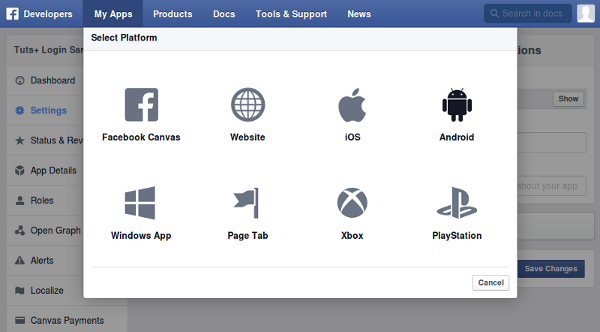
  • The next steps are to add the Android platform, so click on Add platform button to add it. 


Flutter facebook platform package setup


  • In the next form, enter the package name of your app and the name of your Activity and paste the string into the Key Hashes field as shown below.

Flutter facebook package setup

  • Add the facebook_app_id and fb_login_protocol_scheme in strings.xml file in your Android app as we have added below. If the strings.xml file doesn’t exist create a new one under: android > app > src > main > res > values:
    string.xml
    <?xml version="1.0" encoding="utf-8"?> <resources> <string name="app_name">Facebook Auth.</string> <!-- Replace "000000000000" with your Facebook App ID here. --> <string name="facebook_app_id">869067826825173</string> <!-- Replace "000000000000" with your Facebook App ID here. **NOTE**: The scheme needs to start with `fb` and then your ID. --> <string name="fb_login_protocol_scheme">fb869067826825173</string> </resources>
    .
  • Then you'll just have to copy-paste the following to your Android Manifest:
    AndroidManifest.xml
    <uses-permission android:name="android.permission.INTERNET"/>
    <meta-data android:name="com.facebook.sdk.ApplicationId" android:value="@string/facebook_app_id"/> <activity android:name="com.facebook.FacebookActivity" android:configChanges= "keyboard|keyboardHidden|screenLayout|screenSize|orientation" android:label="@string/app_name" /> <activity android:name="com.facebook.CustomTabActivity" android:exported="true"> <intent-filter> <action android:name="android.intent.action.VIEW" /> <category android:name="android.intent.category.DEFAULT" /> <category android:name="android.intent.category.BROWSABLE" /> <data android:scheme="@string/fb_login_protocol_scheme" /> </intent-filter> </activity>


3. Now configure your Flutter Application for iOS.


iOS Platform Setup:-  To enable iOS platform, click on the Settings option in the left menu, and in the main area click on the +Add Platform button. 
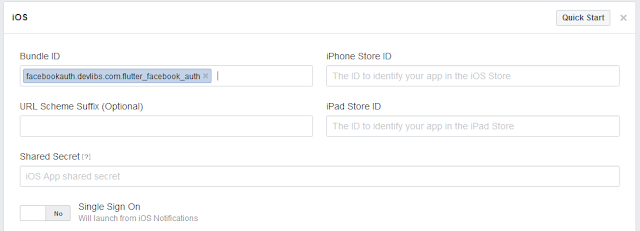
  • In the new window, select the iOS platform. A new panel will appear on the dashboard titled iOS. In the Bundle ID field, we have to enter the project’s Bundle Identifier to be authorized iOS app. In the Xcode, click on the project target on the Project Navigator pane and under the General tab, you will see the Bundle Identifier field.
  • Now return to the Facebook dashboard and paste or type the Bundle Identifier in the Bundle ID field. After that, click on the Save Changes button. 

ios bundle id facebook developer

  • After that, we have to modify our .plist to use Facebook API.   Add a new key named FacebookAppID, and as its value paste the App ID value that we have copied from the Facebook dashboard, at the top of it. Similarly, add the FacebookDisplayName key, and in its value paste the Display Name which you can also copy from the dashboard.
    Info.plist
    <key>CFBundleURLTypes</key> <array> <dict> <key>CFBundleURLSchemes</key> <array> <!-- Replace "000000000000" with your Facebook App ID here. **NOTE**: The scheme needs to start with `fb` and then your ID. --> <string>fb869067826825173</string> </array> </dict> </array> <key>FacebookAppID</key> <!-- Replace "000000000000" with your Facebook App ID here. --> <string>869067826825173</string> <key>FacebookDisplayName</key> <!-- Replace "YOUR_APP_NAME" with your Facebook App name. --> <string>Facebook Auth</string> <key>LSApplicationQueriesSchemes</key> <array> <string>fbapi</string> <string>fb-messenger-share-api</string> <string>fbauth2</string> <string>fbshareextension</string> </array>


4.
Add the flutter_facebook_login dependency in your pubspec.yaml file. Once you do that, you need to run flutter packages get. 
5. To call Facebook login interface, we have to create an instance of Facebook login with the help of FacebookLogin() method.

Facebook login code snippet
import 'package:flutter_facebook_login/flutter_facebook_login.dart'; final facebookLogin = FacebookLogin(); final result = await facebookLogin.logInWithReadPermissions(['email']); switch (result.status) { case FacebookLoginStatus.loggedIn: _sendTokenToServer(result.accessToken.token); _showLoggedInUI(); break; case FacebookLoginStatus.cancelledByUser: _showCancelledMessage(); break; case FacebookLoginStatus.error: _showErrorOnUI(result.errorMessage); break; }
 once we hit login API. It'll be written a response for success and Cancel login. If we get status FacebookLoginStatus.loggedIn then we can get user profile info by using auth and following code snippet:

getting login user info
var graphResponse = await http.get( 'https://graph.facebook.com/v2.12/me?fields=name,
first_name,last_name,email,picture.height(200)&
access_token=${facebookLoginResult.accessToken.token}'); var profile = json.decode(graphResponse.body);

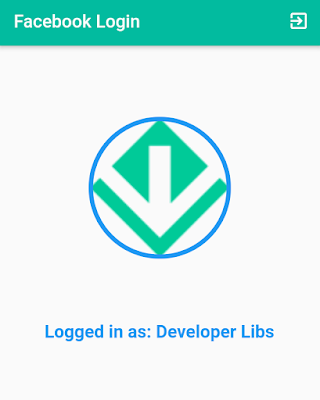
as we can see, in the above url we are using Facebook graph API to get user info. By using these info we have display following widget for this example:
Flutter Facebook login and Auth user profile


here, you can see complete code snippet of this example:


main.dart
import 'dart:convert'; import 'package:flutter/material.dart'; import 'package:flutter_facebook_auth/progress_hud.dart'; import 'package:flutter_facebook_login/flutter_facebook_login.dart'; import 'package:http/http.dart' as http; void main() { runApp(LoginPage()); } class LoginPage extends StatefulWidget { @override _LoginPageState createState() => _LoginPageState(); } class _LoginPageState extends State<LoginPage> { bool isLoggedIn = false; bool isLoading = false; var profileData; var facebookLogin = FacebookLogin(); void onLoginStatusChanged(bool isLoggedIn, {profileData}) { setState(() { isLoading = false; this.isLoggedIn = isLoggedIn; this.profileData = profileData; }); } @override Widget build(BuildContext context) { return MaterialApp( debugShowCheckedModeBanner: false, theme: new ThemeData( primaryColor: const Color(0xFF02BB9F), primaryColorDark: const Color(0xFF167F67), accentColor: const Color(0xFF02BB9F), ), home: Scaffold( appBar: AppBar( title: Text( "Facebook Login", style: TextStyle(color: Colors.white), ), actions: <Widget>[ IconButton( icon: Icon( Icons.exit_to_app, color: Colors.white, ), onPressed: () => facebookLogin.isLoggedIn .then((isLoggedIn) => isLoggedIn ? _logout() : {}), ), ], ), body: Container( child: Center( child: isLoggedIn ? _displayUserData(profileData) : ProgressHUD( child: _displayLoginButton(), inAsyncCall: isLoading), ), ), ), ); } void initiateFacebookLogin() async { setState(() { isLoading = true; }); var facebookLoginResult = await facebookLogin.logInWithReadPermissions(['email']); switch (facebookLoginResult.status) { case FacebookLoginStatus.error: onLoginStatusChanged(false); break; case FacebookLoginStatus.cancelledByUser: onLoginStatusChanged(false); break; case FacebookLoginStatus.loggedIn: var graphResponse = await http.get( 'https://graph.facebook.com/v2.12/me?fields=name,first_name,last_name,email,picture.height(200)&access_token=${facebookLoginResult.accessToken.token}'); var profile = json.decode(graphResponse.body); print(profile.toString()); onLoginStatusChanged(true, profileData: profile); break; } } _displayUserData(profileData) { return Column( children: <Widget>[ Center( child: Container( margin: EdgeInsets.only(top: 80.0,bottom: 70.0), height: 160.0, width: 160.0, decoration: BoxDecoration( image: DecorationImage( image: NetworkImage( profileData['picture']['data']['url'],), fit: BoxFit.cover, ), border: Border.all( color: Colors.blue, width: 5.0), borderRadius: BorderRadius.all( const Radius.circular(80.0)), ), ), ), Text( "Logged in as: ${profileData['name']}", style: TextStyle( color: Colors.blue, fontSize: 20.0, fontWeight: FontWeight.bold), ), ], ); } _displayLoginButton() { return RaisedButton( child: Text( "Login with Facebook", style: TextStyle(color: Colors.white), ), color: Colors.blue, onPressed: () => initiateFacebookLogin(), ); } _logout() async { await facebookLogin.logOut(); onLoginStatusChanged(false); print("Logged out"); } }


Flutter Facebook login source code.               Flutter Facebook login Andorid apk


If you have followed the article carefully, you can see the app running very smoothly as shown in the above video. But if you are facing any problem or you have any quires, please feel free to ask it from comment section.


                                                               The Complete Flutter App Development Course

Share:

Get it on Google Play

React Native - Start Development with Typescript

React Native is a popular framework for building mobile apps for both Android and iOS. It allows developers to write JavaScript code that ca...