


User authentication is a powerful feature of any application. Once an app identifies the individual users who are using the app. Then you can customize your app’s content that feels as though it was designed with a specific user in mind.
 Twitter one of the option that we can use for user authentication in applications. The Twitter API's provide login ability to the application to users. The user can easily login to the app using their twitter account which avoids filling a long sign-up form. With the help of social networks, it's much quicker and easier way of getting users signed into your app using an account they’ve already created with an external authentication provider, such as Facebook or Twitter.
We have written a post for the Facebook login feature for Flutter application: Facebook login and authentication example.
In this post, we are going to implement Twitter integration in our Flutter application. Here, you'll learn

Register Twitter app to get Consumer Key & Consumer Secret.
In order to implement the Twitter login feature in Flutter application, you need a Twitter consumer key and consumer secret which are used to make Twitter API calls. So, register a new twitter application and get the keys with the help of following steps:
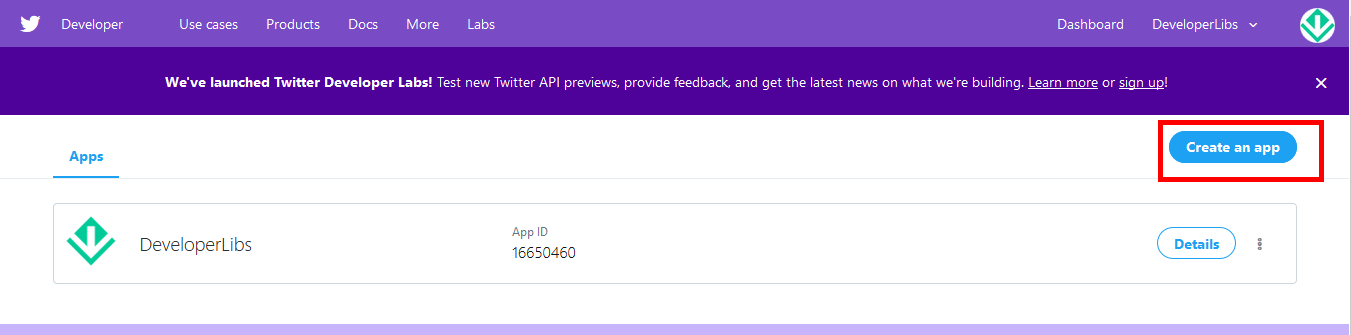
1. Go to the Twitter developer page and register a new application.
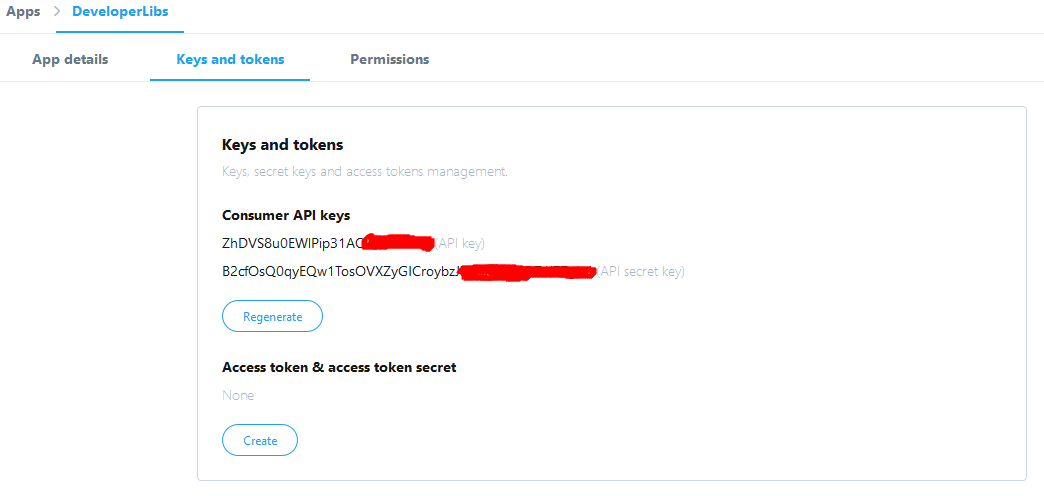
2. Copy Consumer Key & Consumer Secret key from the Keys and token tab after application register as shown below:
 3. Create a new Flutter project from File ⇒ New Flutter Project with your development IDE.
4. After that add the Twitter plugin flutter_twitter_login as a dependency in the pubspec.yaml file. Once you do that, you need to run flutter packages to get this plugin.
5. To access the Twitter auth, we have to create an instance of twitterLogin with the help of key and secret of consumer
6. To Twitter login, we have to call twitterLogin.authorize() method that'll return user detail with auth if its success.
here, we have complete code snippet of Twitter login example for Flutter application:
If you have followed the article carefully, you can login into the app and it's showing user name. But if you are facing any problem or you have any quires, please feel free to ask it from the comment section.

We have written a post for the Facebook login feature for Flutter application: Facebook login and authentication example.
In this post, we are going to implement Twitter integration in our Flutter application. Here, you'll learn
- Setup a new Application on Twitter Developer consol.
- The user can log-in and get their auth and name.

Register Twitter app to get Consumer Key & Consumer Secret.
In order to implement the Twitter login feature in Flutter application, you need a Twitter consumer key and consumer secret which are used to make Twitter API calls. So, register a new twitter application and get the keys with the help of following steps:1. Go to the Twitter developer page and register a new application.
- Fill application name, description, and website.
- Give some dummy URL in the callback URL field to make the app as a browser app.
- If you leave it as blank it will act as a Desktop app that won’t work in the mobile device.
2. Copy Consumer Key & Consumer Secret key from the Keys and token tab after application register as shown below:
4. After that add the Twitter plugin flutter_twitter_login as a dependency in the pubspec.yaml file. Once you do that, you need to run flutter packages to get this plugin.
5. To access the Twitter auth, we have to create an instance of twitterLogin with the help of key and secret of consumer
 static final TwitterLogin twitterLogin = TwitterLogin(
     consumerKey: '-------consumerKey',
    consumerSecret: '----consumerSecret',
  );
6. To Twitter login, we have to call twitterLogin.authorize() method that'll return user detail with auth if its success.
void _login() async {
    final TwitterLoginResult result = await twitterLogin.authorize();
    String Message;

    switch (result.status) {
      case TwitterLoginStatus.loggedIn:
        Message = 'Logged in! username: ${result.session.username}';
        break;
      case TwitterLoginStatus.cancelledByUser:
        Message = 'Login cancelled by user.';
        break;
      case TwitterLoginStatus.error:
        Message = 'Login error: ${result.errorMessage}';
        break;
    }
here, we have complete code snippet of Twitter login example for Flutter application:
import 'package:flutter/material.dart';
import 'package:flutter_twitter_login/flutter_twitter_login.dart';

void main() {
  runApp(MaterialApp(
    debugShowCheckedModeBanner: false,
    home: TwitterLoginScreen(),
  ));
}

class TwitterLoginScreen extends StatefulWidget {
  @override
  _TwitterLoginScreenState createState() => _TwitterLoginScreenState();
}

class _TwitterLoginScreenState extends State<TwitterLoginScreen> {
  static final TwitterLogin twitterLogin = TwitterLogin(
    consumerKey: '-------consumerKey',
    consumerSecret: '----consumerSecret',
  );

  String _title="";

  void _login() async {
    final TwitterLoginResult result = await twitterLogin.authorize();
    String Message;

    switch (result.status) {
      case TwitterLoginStatus.loggedIn:
        Message = 'Logged in! username: ${result.session.username}';
        break;
      case TwitterLoginStatus.cancelledByUser:
        Message = 'Login cancelled by user.';
        break;
      case TwitterLoginStatus.error:
        Message = 'Login error: ${result.errorMessage}';
        break;
    }

    setState(() {
      _title = Message;
    });
  }

  void _logout() async {
    await twitterLogin.logOut();

    setState(() {
      _title = 'Logged out.';
    });
  }

  @override
  Widget build(BuildContext context) {
    return MaterialApp(
      home: Scaffold(
        appBar: AppBar(
          backgroundColor: const Color(0xFF167F67),
          title: Text('Twitter login sample'),
        ),
        body: Center(
          child: Column(
            mainAxisAlignment: MainAxisAlignment.center,
            children: <Widget>[
              Text(_title),
              _title.isEmpty
                  ? RaisedButton(
                      child: Text('Log in'),
                      onPressed: _login,
                    )
                  : SizedBox(
                      width: 0.0,
                    ),
              _title.isNotEmpty?  RaisedButton(
                child: Text('Log out'),
                onPressed: _logout,
              ):SizedBox(width: 0.0,),
            ],
          ),
        ),
      ),
    );
  }
}
If you have followed the article carefully, you can login into the app and it's showing user name. But if you are facing any problem or you have any quires, please feel free to ask it from the comment section.


