User-friendly interface and good color combination of the app components make a large user base for any application. The gradient is a combination of two or more colors and tints of the same color that creates great user interfaces for application. You can use gradients to create color blends, add volume to vector objects, add a light and shadow effect to the app components.
In this post, we'll learn how to draw gradients in Flutter widgets. There are many widgets where gradients could be used to create beautiful screens. For example, you can use gradients to design screen background, button, text, and shapes across Flutter app screens. Apart from them, you can create smooth transitions from one to another gradient.
The BoxDecoration provides a gradient property, which gives us the ability to use the gradient widget.
1. Linear Gradient.
2. Redial Gradient.
3. Sweep Gradient.
In this post, we’ve learned how to create a linear gradient, a radial gradient, and a sweep gradient in Flutter. We’ve also learned how to assign different properties to change the behavior of gradients in order to make them look different. So, this is just some small tasks that we implemented here. I hope, with the help of the above example you can create a fancy UI of your Flutter Application.
In this post, we'll learn how to draw gradients in Flutter widgets. There are many widgets where gradients could be used to create beautiful screens. For example, you can use gradients to design screen background, button, text, and shapes across Flutter app screens. Apart from them, you can create smooth transitions from one to another gradient.
BoxDecoration Widget
To create a gradient in a Flutter widgets, we need to use the decoration property of Container widget, and then assign a BoxDecoration widget:body: Container(
decoration: BoxDecoration(
),
child: Center(
child: Text('www.developerlibs.com',
style: TextStyle(
fontSize: 35
),
),
),
),
The BoxDecoration provides a gradient property, which gives us the ability to use the gradient widget.
Gradient Types
We can create three types of gradients by using BoxDecoration widgets in Flutter:1. Linear Gradient.
2. Redial Gradient.
3. Sweep Gradient.
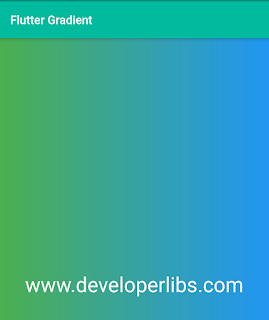
- Linear Gradient: The LinearGradient widget can blend colors from one point to another in a straight line. Inside of LinearGradient widget, we have to use the property of colors to add a list of colors:
 body: Container(
decoration: BoxDecoration(
gradient: LinearGradient(
colors: [Colors.green, Colors.blue])
),
child: Center(
child: Text('www.developerlibs.com',
style: TextStyle(
fontSize: 35,
color: Colors.white,
),
),
),
),
LinearGradient properties
-
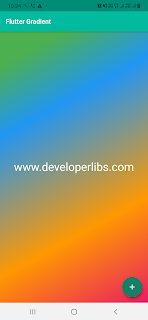
The begin and end properties provide us the ability to change the direction of a gradient. We can change where the gradient starts and stops. As you can see, we’ve added the properties of begin and end with values of Alignment.topLeft and Alignment.bottomRight.
body: Container(
  decoration: BoxDecoration(
    gradient: LinearGradient(
      begin: Alignment.topLeft,
      end: Alignment.bottomRight,
      colors: [Colors.green, Colors.blue])
  ),
  child: Center(
    child: Text('www.developerlibs.com',
      style: TextStyle(
        fontSize: 35,
        color: Colors.white,
      ),
    ),
  ),
),
Stop properties
With the help of the stops property, we can determine the fractions of the gradient. To achieve it, we have to assign a list of values from 0.0 to 1.0. This value pushes the green part of the gradient closer to the bottom right of the screen.
body: Container(
  decoration: BoxDecoration(
    gradient: LinearGradient(
      begin: Alignment.topLeft,
      end: Alignment.bottomRight,
      stops: [0.1, 0.3, 0.7, 1],
      colors: [Colors.green, Colors.blue,
   Colors.orange, Colors.pink])
  ),
  child: Center(
    child: Text('ww.developerlibs.com',
      style: TextStyle(
        fontSize: 35,
        color: Colors.white,
      ),
    ),
  ),
),
As you can see, the fraction of the gradient has been pushed further down the bottom right of the screen. If you increase the value of the stops property, the fraction would be pushed further down and so on. You can increase the number of colors as per requirements.
-
The begin and end properties provide us the ability to change the direction of a gradient. We can change where the gradient starts and stops. As you can see, we’ve added the properties of begin and end with values of Alignment.topLeft and Alignment.bottomRight.
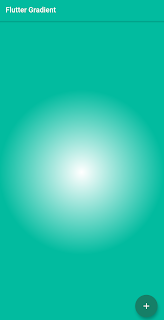
- Radial Gradient: It blends colors from one point to another point in a circular pattern. The Radial Gradient also has colors and stops properties but it also has some other properties, such as radius, focal and tileMode.
body: Container(
          decoration: BoxDecoration(
              gradient: RadialGradient(
                  colors: [Colors.white, const Color(0xFF02BB9F)]
              ),),

      ),
),
As we can see radial gradient is working in circle-shaped. Let’s now try and change the appearance of the radial gradient by assigning its properties:Stop properties
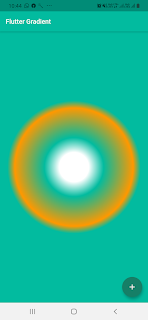
Let's start it by adding some more colors as well as the stops property:
body: Container(
          decoration: BoxDecoration(
              gradient: RadialGradient(
                  colors: [Colors.white, const Color(0xFF02BB9F),
      Colors.orange,const Color(0xFF02BB9F)],
                  stops: [0.2, 0.4, 0.8,0.9]
              ),),

      ),
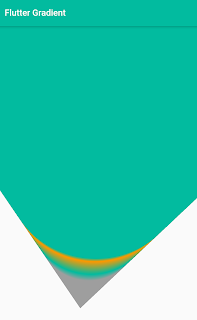
now, we got a gradient with multiple colors.
Center properties
It can change the position of the gradient on the Application screen. As you can see, we have assign value 0.1 left and 0.3 top direction of the gradient:body: Container( decoration: BoxDecoration( gradient: RadialGradient( colors: [Colors.white, const Color(0xFF02BB9F), Colors.orange,const Color(0xFF02BB9F)], stops: [0.2, 0.4, 0.8,0.9] center: Alignment(0.1, 0.3), ),), ),
we’ve added the center property to the gradient, which should shift it upwards and to the left. We can assign different values to the center property to placed anywhere.Focal properties
The Radial gradient provides focal property to change the focal point of the gradient. It starts center color:
body: Container(
          decoration: BoxDecoration(
              gradient: RadialGradient(
                  colors: [Colors.white, const Color(0xFF02BB9F),
   Colors.orange,const Color(0xFF02BB9F)],
                 stops: [0.2, 0.4, 0.8,0.9]
   center: Alignment(0.1, 0.3),
   focal: Alignment(-0.1, 0.2),
              ),),

      ),
we’ve now changed the focal point of the radial gradient.
FocalRadius properties
With the help of focalRadius, we can change the size of our focal point.body: Container( decoration: BoxDecoration( gradient: RadialGradient( colors: [Colors.grey, const Color(0xFF02BB9F), Colors.orange, const Color(0xFF02BB9F)], stops: [0.2, 0.4, 0.8,0.9], center: Alignment(0.0, -0.30), focal: Alignment(-0.1, 0.2), focalRadius: 0.2, ),), ),
-
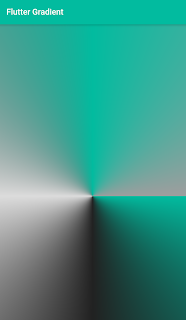
Sweep Gradient: It can create a graduated blend of color stops within a shape in an ordered or random sequence. The Sweep Gradients have similar properties as the Linear and Radial gradient. The Sweep Gradients provides some extra properties startAngle and endAngle. Let’s implement a sweep gradient some color and stops properties:
body: Container(
          decoration: BoxDecoration(
             gradient:  SweepGradient(
            colors: [ Color(0xFF02BB9F), Colors.black87,
   Colors.black12,  Color(0xFF02BB9F), Colors.grey],
            stops: [0.0, 0.25, 0.5, 0.75, 1],
          ),),

      ),
With sweep gradients, we can actually create pretty cool effects with the startAngle and endAngle properties. Let’s experiment a little bit with startAngle and endAngle properties:body: Container( decoration: BoxDecoration( gradient: SweepGradient( colors: [ Color(0xFF02BB9F), Colors.black87, Colors.black12, Color(0xFF02BB9F), Color(0xFF02BB9F)], stops: [0.0, 0.25, 0.5, 0.75, 1], startAngle: 0.5, endAngle: 1 ),), ),
As you can see, we’ve created a rainbow effect on the screen. This is just one of the many awesome examples that we can do with gradients in Flutter.
How To Create Gradient App Bar With Flutter
As we can see, Flutter provides widgets to create gradients in the Flutter Applications. But we can't use these widgets directly in the appBar of Flutter. In the appBar, we have flexibleSpace properties that help us to create a gradient appBar. We can assign a Container widget to give a gradient layout using linear or any other gradient method to flexibleSpace. As you can see below:Scaffold( appBar: AppBar( title: Center(child: Text(widget.title,style: TextStyle(color: Colors.white),)), flexibleSpace: Container( decoration: new BoxDecoration( gradient: new LinearGradient( colors: [ const Color(0xFF02BB9F), const Color(0xFF00CCFF), ], begin: const FractionalOffset(0.0, 0.0), end: const FractionalOffset(1.0, 0.0), stops: [0.0, 1.0], tileMode: TileMode.clamp), ), ), ), body: ....., );
How To Create Gradient Animation in Flutter
Flutter provides many ways to create gradient animation. For simplicity, we have created a simple example with the help of the AnimationController and Animation class. We generate colors and values to the 8 layers of animation. As you can see, it creating 8 layer radial gradient animation:import 'package:flutter/material.dart'; void main() => runApp(MyApp()); class MyApp extends StatelessWidget { @override Widget build(BuildContext context) { return MaterialApp( title: 'Flutter Demo', debugShowCheckedModeBanner: false, theme: new ThemeData( primaryColor: const Color(0xFF02BB9F), primaryColorDark: const Color(0xFF167F67), accentColor: const Color(0xFF167F67), ), home: MyHomePage(title: 'Flutter Gradient'), ); } } class MyHomePage extends StatefulWidget { MyHomePage({Key key, this.title}) : super(key: key); final String title; @override _MyHomePageState createState() => _MyHomePageState(); } class _MyHomePageState extends State<MyHomePage> with SingleTickerProviderStateMixin { List<Color> _colors = List<Color>.generate( 8, (index) => index.isOdd ? const Color(0xFF02BB9F) :const Color(0xFF167F67)); List<double> _stops = List<double>.generate(8, (index) => index * 0.2 - 0.4); Animation<double> animation; AnimationController controller; @override void initState() { super.initState(); controller = AnimationController(vsync: this, duration: Duration(milliseconds: 1000)); animation = Tween<double>(begin: .0, end: .4).animate(controller) ..addListener(() { setState(() {}); }) ..addStatusListener((status) { if (status == AnimationStatus.completed) { controller.reset(); controller.forward(); } else if (status == AnimationStatus.dismissed) { controller.forward(); } }); controller.forward(); } @override Widget build(BuildContext context) { return MaterialApp( home: Container( decoration: BoxDecoration( gradient: RadialGradient( colors: _colors, stops: _stops.map((s) => s + animation.value).toList(), )), ), ); } }
In this post, we’ve learned how to create a linear gradient, a radial gradient, and a sweep gradient in Flutter. We’ve also learned how to assign different properties to change the behavior of gradients in order to make them look different. So, this is just some small tasks that we implemented here. I hope, with the help of the above example you can create a fancy UI of your Flutter Application.


