Friday, April 5, 2019

Flutter - Google map widget plugin example.

When I was started working with Flutter framework. I found lots of third-party plugins to create application screen. The google map plugin was one of them that is still under construction. By using this plugin, we have written the following post.

Flutter - Google map plugin.
Flutter - How can draw route on google map between markers.

If you have read and worked on them. You will see, it has some limitations to work on UI design of google map.

Flutter team has rolled out their own google map widget. This is a widget that is very helpful to design inline google map screen in the application. We can perform all the actions that we do with a normal widget. This plugin is also under construction and they breaking the changes in this widget.


In this post, we going to play with google map widget and we'll look all aspect of this Plugin. Here’s what we’re going to build:


Creating a new Project
1. Create a new project from File ⇒ New Flutter Project with your development IDE.
2. Now,  add the Google Maps Flutter plugin as a dependency in the pubspec.yaml file. Once you do that, you need to run flutter packages get.
google_maps_flutter: ^0.5.0
3. In the next step, we have to manage the Google API key for both Android and iOS. We have explained steps to get API key here if you don't have it. Once you get it, put it in the respected location that's explained below.
  • Android: You have to put it in Flutter Android package in the application manifest (android/app/src/main/AndroidManifest.xml) and add necessary location permission, as follows:
    <manifest ...
      <application ...
        <meta-data android:name="com.google.android.geo.API_KEY"
    android:value="YOUR ANDROID API KEY HERE"/>
    <uses-permission android:name="android.permission.INTERNET"/>
    <uses-permission android:name="android.permission.ACCESS_FINE_LOCATION"/>
    <uses-permission android:name="android.permission.ACCESS_COARSE_LOCATION"/>
  • iOS: You have to put it in Flutter iOS package in the application delegate (ios/Runner/AppDelegate.m), as follow:
    #include "AppDelegate.h"
    #include "GeneratedPluginRegistrant.h"
    // Add the GoogleMaps import.
    #import "GoogleMaps/GoogleMaps.h"
    @implementation AppDelegate
    - (BOOL)application:(UIApplication *)application
        didFinishLaunchingWithOptions:(NSDictionary *)launchOptions {
      // Add the following line with your API key.
      [GMSServices provideAPIKey:@"YOUR IOS API KEY HERE"];
      [GeneratedPluginRegistrant registerWithRegistry:self];
      return [super application:application didFinishLaunchingWithOptions:launchOptions];
    }
    @end
  • In the iOS package, you have to add a setting to the app’s Info.plist file (ios/Runner/Info.plist). We have to add a boolean property with the key io.flutter.embedded_views_preview and the value true.
    • <key>io.flutter.embedded_views_preview</key>
      <true/>
  • Now add a NSLocationWhenInUseUsageDescription key to your Info.plist file. This will automatically prompt the user for permissions when the map tries to turn ON location.
4. Now, before the move to another aspect of google map widget. Let's see some parameter of google map widget that is necessary to understand.
  • onMapCreated: method will be called on map creation and provide an instance of MapController that we can use to perform various action of google map.
  • initialCameraPosition: required parameter that sets the starting camera position. The camera position describes which part of the world you want the map to point
We have to assign a default latitude and longitude value in initialCameraPosition parameter for the initial camera position.  Now, open main.dart file and add google map widget. as we have done:
main.dart
import 'dart:async'; import 'package:flutter/material.dart'; import 'package:google_maps_flutter/google_maps_flutter.dart'; void main() => runApp(MyApp()); class MyApp extends StatefulWidget { @override _MyAppState createState() => _MyAppState(); } class _MyAppState extends State<MyApp> { static const LatLng _center = const LatLng(28.6921164, 76.8111507); @override Widget build(BuildContext context) { return MaterialApp( debugShowCheckedModeBanner: false, theme: new ThemeData( primaryColor: const Color(0xFF02BB9F), primaryColorDark: const Color(0xFF167F67), accentColor: const Color(0xFF02BB9F), ), home: Scaffold( appBar: AppBar( title: Text( 'Google map widget', style: TextStyle(color: Colors.white), ), ), body: Stack( children: <Widget>[ GoogleMap( initialCameraPosition: CameraPosition( target: _center, zoom: 11.0, ), ), ], ), ), ); } }
if you run your app at this point, it will look like this: 


as you see, we just written few line code to implement google map in Flutter Application. So, let’s see how to customize, control the map, add markers etc.

6. It’s important to remember that the google map widget is just a Flutter widget. So, we can treat it like any other widget. This includes placing another widget on top of it. By placing the google map widget inside of a Stack widget. You can layer other Flutter widgets on top of the map widget. like, we going to add google map type and add marker button.
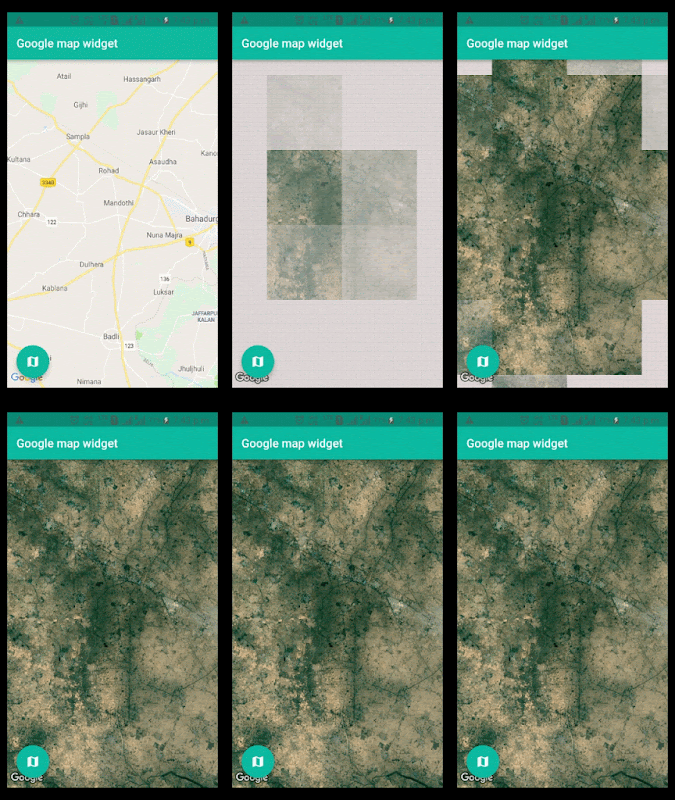
  • Changing google map type: We can set the google map type using the mapType parameter. This can be set to satellite, hybrid, normal or terrain.
      Padding(
                  padding: const EdgeInsets.all(16.0),
                  child: Align(
                    alignment: Alignment.bottomLeft,
                    child: new FloatingActionButton(
                      onPressed: _onMapTypeButtonPressed,
                      child: new Icon(
                        Icons.map,
                        color: Colors.white,
                      ),
                    ),
                  ),
                ),
    as we know, google map is also a widget. When we press on this button, the map type will change as shown below. 
  •  
    the _onMapTypeButtonPressed  method will change google map type.
     void _onMapTypeButtonPressed() {
        setState(() {
          _currentMapType = _currentMapType == MapType.normal
              ? MapType.satellite
              : MapType.normal;
        });
      }
  • Showing user location: The user’s location can be shown on the map by making myLocationEnabled parameter true. Before performing this option, kindly check Android and iOS necessary permissions and GPS of the device must be ON.
    

  • Enabling/Disabling Gestures: We have some other param that provides the very interesting feature of google map that may be enabled or disable specific types of gestures like tilt, zoom, etc.
    rotateGesturesEnabled: false,
    scrollGesturesEnabled: false,
    tiltGesturesEnabled: false,
    
      This code snippet disables the three gestures mentioned.

7. Now, we going to add one more button that'll display a marker on google when we press and call _onAddMarkerButtonPressed. So, place a FloatingActionButton inside the Align widget.
 Padding(
              padding: const EdgeInsets.all(16.0),
              child: Align(
                alignment: Alignment.bottomCenter,
                child: new FloatingActionButton(
                  onPressed: _onAddMarkerButtonPressed,
                  child: new Icon(
                    Icons.edit_location,
                    color: Colors.white,
                  ),
                ),
              ),
to add a marker on google map, it providing us markers an array type param
  void _onAddMarkerButtonPressed() {
    InfoWindow infoWindow =
    InfoWindow(title: "Location" + markers.length.toString());
    Marker marker = Marker(
      markerId: MarkerId(markers.length.toString()),
      infoWindow: infoWindow,
      position: centerPosition,
      icon: BitmapDescriptor.defaultMarkerWithHue(BitmapDescriptor.hueBlue),
    );
    setState(() {
      markers.add(marker);
    });
  }

    • We can add information to markers using the infoWindowText parameter.
    • We can change the image being used for the marker using the icon parameter.
      icon: BitmapDescriptor.fromAsset('images/flutter.png',),
    Here, you can see complete code snippet of this example.


    main.dart
    import 'dart:async'; import 'package:flutter/material.dart'; import 'package:google_maps_flutter/google_maps_flutter.dart'; void main() => runApp(MyApp()); class MyApp extends StatefulWidget { @override _MyAppState createState() => _MyAppState(); } class _MyAppState extends State<MyApp> { Completer<GoogleMapController> _controller = Completer(); static const LatLng _center = const LatLng(45.521563, -122.677433); Set<Marker> markers = Set(); MapType _currentMapType = MapType.normal; LatLng centerPosition; void _onMapCreated(GoogleMapController controller) { _controller.complete(controller); } void _onMapTypeButtonPressed() { setState(() { _currentMapType = _currentMapType == MapType.normal ? MapType.satellite : MapType.normal; print("dddd" + _currentMapType.toString()); }); } void _onAddMarkerButtonPressed() { InfoWindow infoWindow = InfoWindow(title: "Location" + markers.length.toString()); Marker marker = Marker( markerId: MarkerId(markers.length.toString()), infoWindow: infoWindow, position: centerPosition, icon: BitmapDescriptor.defaultMarkerWithHue(BitmapDescriptor.hueBlue), ); setState(() { markers.add(marker); }); } @override Widget build(BuildContext context) { return MaterialApp( debugShowCheckedModeBanner: false, theme: new ThemeData( primaryColor: const Color(0xFF02BB9F), primaryColorDark: const Color(0xFF167F67), accentColor: const Color(0xFF02BB9F), ), home: Scaffold( appBar: AppBar( title: Text( 'Google map widget', style: TextStyle(color: Colors.white), ), ), body: Stack( children: <Widget>[ GoogleMap( onMapCreated: _onMapCreated, mapType: _currentMapType, myLocationEnabled: true, markers: markers, onCameraMove: _onCameraMove, initialCameraPosition: CameraPosition( target: _center, zoom: 11.0, ), ), Padding( padding: const EdgeInsets.all(16.0), child: Align( alignment: Alignment.bottomLeft, child: new FloatingActionButton( onPressed: _onMapTypeButtonPressed, child: new Icon( Icons.map, color: Colors.white, ), ), ), ), Padding( padding: const EdgeInsets.all(16.0), child: Align( alignment: Alignment.bottomCenter, child: new FloatingActionButton( onPressed: _onAddMarkerButtonPressed, child: new Icon( Icons.edit_location, color: Colors.white, ), ), ), ), ], ), ), ); } void _onCameraMove(CameraPosition position) { centerPosition = position.target; } }

    If you have followed the article carefully, you can see the app running very smoothly as shown in the above video. But if you are facing any problem, please feel free to ask from comments.

    Share:

    Get it on Google Play

    React Native - Start Development with Typescript

    React Native is a popular framework for building mobile apps for both Android and iOS. It allows developers to write JavaScript code that ca...