In the mobile application, if you creating a feature that providing multiple options like user registration form screen where we always ask gender and hobby of the user. So, in that case, we always need a radio and checkbox widget in the application.
A Radio button used in the radio group that provides more than one radio button. The user can choose only one option at a time. A radio button has two states which are either checked or unchecked. Once a radio button is checked, it cannot be marked as unchecked by the user.
The check box is a different type of two-state button that either checked or unchecked. It is generally used in a place where user can select more than one choices from a given list of options. For example: hobby of the user or activate/deactivate the specific state.
How can use radio button in flutter
The Flutter provides us RadioListTile widget to implement radio button. The RadioListTile widget takes 4 parameters namely title, value,
groupValue and onChanged where title display label of radio button, value takes the position of particular radio button.
  RadioListTile<AppEnum>(
            title: Text(item.optionB),
            value: AppEnum.optionB,
            groupValue: _character,
            onChanged: (AppEnum value) {
              setState(() {
                _character = value;
              });
            },
          ),
In our use case, we have 4 radio buttons in
a column. The value for each will be optionA, optionB, optionC, optionD respectively. The groupValue represents value for
entire radio button group for each question and onChanged is the
callback that is called everytime state of the radio button changes that
allows to change the visual representation of radio button.
enum AppEnum { optionA, optionB, optionC, optionD, NON }
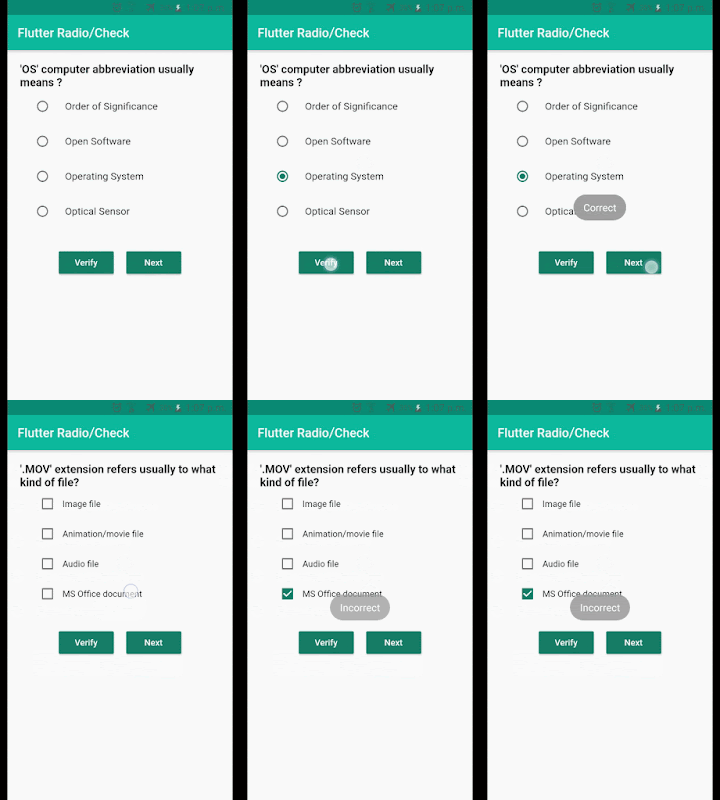
As you can see above enum, we have NON. It handle state of none of the radio buttons will be selected by default. The user will start the quiz by selecting fresh options. With above implementation, I was able to achieve proper radio buttons display as shown below.
How can use checkbox in flutter
The Flutter provides us Checkbox widget to implement checkbox. The checkbox widget takes 2 parameters namely value and onChanged. The onChanged is the
callback that is called every time state of the checkbox changes that
allows to change the visual representation of checkbox. To display the title of checkbox, we have to use another widget. Such as, we have used Expended and Text widget to display title of checkbox. You can use following widget in any Flutter project to implement checkbox.
import 'package:flutter/material.dart';

class CheckBoxWidget extends StatelessWidget {

  const CheckBoxWidget({
    this.label,
    this.padding,
    this.value,
    this.onChanged,
  });

  final String label;
  final EdgeInsets padding;
  final bool value;
  final Function onChanged;

  @override
  Widget build(BuildContext context) {
    return InkWell(
      onTap: () {
        onChanged(!value);
      },
      child: Padding(
        padding: padding,
        child: Row(
          children: <Widget>[
            Checkbox(
              value: value,
              onChanged: (bool newValue) {
                onChanged(newValue);
              },
            ),
            Expanded(child: Text(label)),
          ],
        ),
      ),
    );
  }
}
In this article, we going to create a simple quiz Flutter application to explain the implementation of radio and checkbox widget and their selection. As you can see below, each question is followed by 4 options. So its clear that we need to use Row and Column widgets to place every question and answer set. We create a static questions and their answers in a list. The final output of app will look like below:
Creating a new project
1. Create a new Flutter project from File ⇒ New Flutter Project with your development IDE.2. Add the plugin fluttertoast and carousel_slider as a dependency in the pubspec.yaml file. Once you do that, you need to run flutter packages.
3. Now start editing main.dart class as you can see, we have implemented our theme and create list of static questions and answers.
import 'package:carousel_slider/carousel_slider.dart';                                                    main.dart
import 'package:flutter/material.dart';
import 'package:flutterquiz/question.dart';
import 'package:flutterquiz/question_widget.dart';

final List<Question> questions = [
  Question(
      "'OS' computer abbreviation usually means ?",
      "Order of Significance",
      "Open Software",
      "Operating System",
      "Optical Sensor",
      "Operating System",
      1),
  Question(
      "'.MOV' extension refers usually to what kind of file?",
      "Image file",
      "Animation/movie file",
      "Audio file",
      "MS Office document",
      "Animation/movie file",
      2),
  Question(
      "Who developed Yahoo?",
      "Dennis Ritchie & Ken Thompson",
      "David Filo & Jerry Yang",
      "Vint Cerf & Robert Kahn",
      "Steve Case & Jeff Bezos",
      "Dennis Ritchie & Ken Thompson",
      2),
  Question("What does AM mean?", "Angelo marconi", "Anno median",
      "Amplitude modulation", "Amperes", "Amplitude modulation", 1),
  Question(
      "Where is the headquarters of Intel located?",
      "Redmond, Washington",
      "Tucson, Arizona",
      "Santa Clara, California",
      "Richmond, Virginia",
      "Santa Clara, California",
      1)
];


void main() {
  runApp(MyApp());
}

class MyApp extends StatelessWidget {
  // This widget is the root of your application.
  @override
  Widget build(BuildContext context) {
    return MaterialApp(
      debugShowCheckedModeBanner: false,
      theme: ThemeData(
        primaryColor: const Color(0xFF02BB9F),
        primaryColorDark: const Color(0xFF167F67),
        accentColor: const Color(0xFF167F67),
      ),
      home: MyHomePage(title: 'Flutter Radio/Check'),
    );
  }
}

class MyHomePage extends StatefulWidget {
  MyHomePage({Key key, this.title}) : super(key: key);

  final String title;

  @override
  _MyHomePageState createState() => _MyHomePageState();
}

class _MyHomePageState extends State<MyHomePage> {

  CarouselController buttonCarouselController = CarouselController();

  @override
  Widget build(BuildContext context) {
    final double height = MediaQuery.of(context).size.height;
    return Scaffold(
      appBar: AppBar(
        title: Text(
          widget.title,
          style: TextStyle(color: Colors.white),
        ),
      ),
      body: CarouselSlider(
        carouselController: buttonCarouselController,
        options: CarouselOptions(
          height: height - 100,
          viewportFraction: 1.0,
          enlargeCenterPage: false,
          reverse: false
          // autoPlay: false,
        ),
        items: questions
            .map((item) => Container(
                  child: Center(child: QuestionWidget(item,buttonCarouselController)),
                ))
            .toList(),
      ),
    );
  }
}
To display next question on one screen. We have used CarouselSlider widget where we passing a question at a time to display detail of a question.
4. Now create a model class question.dart to keep detail of a question. The following class can contain question title, all option, it's type(Radio/Check) and correct answer.
class Question {                                                                                                                  question.dart

  String question;

  String optionA;
  String optionB;
  String optionC;
  String optionD;

  int type;

  String ans;

  Question(this.question, this.optionA, this.optionB, this.optionC,
      this.optionD, this.ans, this.type);
}
5. After that, create another class question_widget.dart to display a complete detail of a question. In this class, we have created method getRadioWidget to display radio options and getCheckBoxWidget method to display checkbox options.
import 'package:carousel_slider/carousel_controller.dart';                                              question_widget.dart
import 'package:flutter/cupertino.dart';
import 'package:flutter/material.dart';
import 'package:flutterquiz/checkbox_widget.dart';
import 'package:flutterquiz/app_enum.dart';
import 'package:flutterquiz/question.dart';
import 'package:fluttertoast/fluttertoast.dart';

class QuestionWidget extends StatefulWidget {
  Question question;
  CarouselController buttonCarouselController;

  QuestionWidget(
    this.question,
    this.buttonCarouselController, {
    Key key,
  }) : super(key: key);

  @override
  _QuestionWidgetState createState() =>
      _QuestionWidgetState(question, buttonCarouselController);
}

class _QuestionWidgetState extends State<QuestionWidget> {
  _QuestionWidgetState(this.item, this.buttonCarouselController);

  CarouselController buttonCarouselController;

  Question item;

  AppEnum _character = AppEnum.NON;

  bool _isSelectedA = false;
  bool _isSelectedB = false;
  bool _isSelectedC = false;
  bool _isSelectedD = false;

  int radio = 1;
  int check = 2;

  @override
  Widget build(BuildContext context) {
    return Padding(
        padding: const EdgeInsets.all(20.0),
        child: Column(children: <Widget>[
          item.type == check ? getCheckBoxWidget(item) : getRadioWidget(item),
          SizedBox(
            height: 30.0,
          ),
          actionButton(),
        ]));
  }

  onVerifyClick() {
    var msg = "";

    if (item.type == radio) {
      if (_character == AppEnum.optionA && item.optionA == item.ans ||
          _character == AppEnum.optionB && item.optionB == item.ans ||
          _character == AppEnum.optionC && item.optionC == item.ans ||
          _character == AppEnum.optionD && item.optionD == item.ans) {
        msg = "Correct";
      } else {
        msg = "Incorrect";
      }
    } else {
      if (_isSelectedA && item.optionA == item.ans ||
          _isSelectedB && item.optionB == item.ans ||
          _isSelectedC && item.optionC == item.ans ||
          _isSelectedD && item.optionD == item.ans) {
        msg = "Correct";
      } else {
        msg = "Incorrect";
      }
    }

    Fluttertoast.showToast(
        msg: msg,
        toastLength: Toast.LENGTH_SHORT,
        gravity: ToastGravity.CENTER,
        timeInSecForIosWeb: 1,
        backgroundColor: Colors.grey,
        textColor: Colors.white,
        fontSize: 16.0);
  }

  Widget getRadioWidget(Question item) {
    return Column(
        mainAxisAlignment: MainAxisAlignment.center,
        children: <Widget>[
          Align(
            alignment: Alignment.centerLeft,
            child: Text(
              item.question,
              textAlign: TextAlign.left,
              style: TextStyle(
                fontWeight: FontWeight.bold,
                fontSize: 18.0,
              ),
            ),
          ),
          RadioListTile<AppEnum>(
            title: Text(item.optionA),
            value: AppEnum.optionA,
            groupValue: _character,
            onChanged: (AppEnum value) {
              setState(() {
                _character = value;
              });
            },
          ),
          RadioListTile<AppEnum>(
            title: Text(item.optionB),
            value: AppEnum.optionB,
            groupValue: _character,
            onChanged: (AppEnum value) {
              setState(() {
                _character = value;
              });
            },
          ),
          RadioListTile<AppEnum>(
            title: Text(item.optionC),
            value: AppEnum.optionC,
            groupValue: _character,
            onChanged: (AppEnum value) {
              setState(() {
                _character = value;
              });
            },
          ),
          RadioListTile<AppEnum>(
            title: Text(item.optionD),
            value: AppEnum.optionD,
            groupValue: _character,
            onChanged: (AppEnum value) {
              setState(() {
                _character = value;
              });
            },
          ),
        ]);
  }

  Widget getCheckBoxWidget(Question item) {
    return Column(
        mainAxisAlignment: MainAxisAlignment.center,
        children: <Widget>[
          Align(
            alignment: Alignment.centerLeft,
            child: Text(
              item.question,
              textAlign: TextAlign.left,
              style: TextStyle(
                fontWeight: FontWeight.bold,
                fontSize: 18.0,
              ),
            ),
          ),
          CheckBoxWidget(
            label: item.optionA,
            padding: const EdgeInsets.symmetric(horizontal: 20.0),
            value: _isSelectedA,
            onChanged: (bool newValue) {
              setState(() {
                _isSelectedA = newValue;
              });
            },
          ),
          CheckBoxWidget(
            label: item.optionB,
            padding: const EdgeInsets.symmetric(horizontal: 20.0),
            value: _isSelectedB,
            onChanged: (bool newValue) {
              setState(() {
                _isSelectedB = newValue;
              });
            },
          ),
          CheckBoxWidget(
            label: item.optionC,
            padding: const EdgeInsets.symmetric(horizontal: 20.0),
            value: _isSelectedC,
            onChanged: (bool newValue) {
              setState(() {
                _isSelectedC = newValue;
              });
            },
          ),
          CheckBoxWidget(
            label: item.optionD,
            padding: const EdgeInsets.symmetric(horizontal: 20.0),
            value: _isSelectedD,
            onChanged: (bool newValue) {
              setState(() {
                _isSelectedD = newValue;
              });
            },
          ),
        ]);
  }

  Widget actionButton() {
    return Row(
      mainAxisAlignment: MainAxisAlignment.center,
      children: <Widget>[
        RaisedButton(
          color: const Color(0xFF167F67),
          child: Text(
            "Verify",
            style: TextStyle(color: Colors.white),
          ),
          onPressed: () => onVerifyClick(),
        ),
        SizedBox(
          width: 20.0,
        ),
        RaisedButton(
          color: const Color(0xFF167F67),
          child: Text(
            "Next",
            style: TextStyle(color: Colors.white),
          ),
          onPressed: () => onNextClick(),
        ),
      ],
    );
  }

  onNextClick() {
    buttonCarouselController.nextPage(
        duration: Duration(milliseconds: 300), curve: Curves.linear);
  }
}
If you have followed the above post carefully. You can see, your Flutter quiz application running as shown above. But if you are facing any problem to implement radio and checkbox or you have any quires, please feel free to ask it from comment section below.


