Sometimes, we have to upload an image on the server to complete application features like feed and user profile pic. The multipart is a simple option to upload images in the multipart request.
The Dio library also gives an option to send the multipart HTTP requests. You must use Dio
library to upload multiple file if creating a big application. The Dio client is a powerful Http client for Dart or Flutter application which supports Interceptors, Request Cancellation, Form Data, File downloading, Global configuration, Connection Timeout, etc that is explained here: Flutter - Dio client to create Http Request
library to upload multiple file if creating a big application. The Dio client is a powerful Http client for Dart or Flutter application which supports Interceptors, Request Cancellation, Form Data, File downloading, Global configuration, Connection Timeout, etc that is explained here: Flutter - Dio client to create Http Request
In this post, we're going to explain and create a Flutter application to upload images/files in the multipart request on your application server with the help of HTTP. As per the scope of this example, we'll only cover how to upload an image/file on the server that we'll pick from the mobile gallery.
What is Multipart?
Multipart requests can send a single object(image/file) in various parts, each part is separated by a boundary and has some portion of the object’s data. Each part also has its own headers like Content-Type, Content-Deposition. Usually, the body of a POST request is made of textual key-value pairs. With a multipart POST request, you can also include files with binary content (images, various documents, etc.), in addition to the regular text values.
Multi-Part Requests with Flutter
We have to import HTTP to create a multipart request in Dart or Flutter application. So, if you going to create a multipart request, import it at the top of our main.dart or any other class where you want to create request:import 'package:http/http.dart' as http;
This allows us to create a multipart POST request using:
var req = http.MultipartRequest('POST', Uri.parse(url));
It can be constructed in a few ways:
- The default MultipartFile(key, stream, length) constructor that we can use if you need to create the file from a Stream of bytes of which we know the length of the file.
- The MultipartFile.fromBytes(key, bytes) factory method, which attaches a file obtained from a List of bytes.
- The MultipartFile.fromString(key, string) factory method, which attaches a text file that contains the string passed.
- The MultipartFile.fromPath(key, path) factory method, which attaches the file found at the given path.
Here, you can see some examples that you can use if you have a file and a path. You can create a multipart POST request and attach that file to the request:
- Using the default constructor to write a mutlipart request function:
Future uploadmultipleimage(String filename, String severUrl) async {
  var request = http.MultipartRequest('POST', Uri.parse(severUrl));
  request.files.add(
    http.MultipartFile(
      'picturePath',
      File(filename).readAsBytes().asStream(),
      File(filename).lengthSync(),
      filename: filename.split("/").last
    )
  );
  var res = await request.send();
}
- Using MultipartFile.fromBytes(), you can write a multipart reqyest function:
Future uploadmultipleimage(String filename, String severUrl) async {
  var request = http.MultipartRequest('POST', Uri.parse(severUrl));
  request.files.add(
    http.MultipartFile.fromBytes(
      'picture',
      File(filename).readAsBytesSync(),
      filename: filename.split("/").last
    )
  );
  var res = await request.send();
}
- Using MultipartFile.fromPath(), you can write a mutlipart request function:
Future uploadmultipleimage(String filename, String severUrl) async {
  var request = http.MultipartRequest('POST', Uri.parse(severUrl));
  request.files.add(
    await http.MultipartFile.fromPath(
      'picture',
      filename
    )
  );
  var res = await request.send();
}
Regular Text Fields in multipart request
You can add regular text fields with a multipart post requests:
var request = http.MultipartRequest('POST', Uri.parse(url));
request.fields['key'] = 'value';
This request object has a member map called fields for textual values and a list called files to which you can add multipart files.Creating a new project
Let's create a Flutter application that allow the user to pick an image from the mobile gallery and then upload the image to the server. We're not explaining back-end part to accept image/file here. It's up to you, how you will manage it. Here, we're going to explain front end part only.
1. Create a new project from File ⇒ New Flutter Project with your development IDE.
2. Now, add the plugin image_picker and http as a dependency in the pubspec.yaml file. Once you do that, you need to run flutter packages.
3. We have created a class theme.dart that we'll use to design home screen background. So, put the following file in the project directory.
2. Now, add the plugin image_picker and http as a dependency in the pubspec.yaml file. Once you do that, you need to run flutter packages.
3. We have created a class theme.dart that we'll use to design home screen background. So, put the following file in the project directory.
import 'package:flutter/material.dart';
import 'package:fluttermultipart/upload_page.dart';

void main() => runApp(MyApp());

class MyApp extends StatelessWidget {
  @override
  Widget build(BuildContext context) {
    return MaterialApp(
      debugShowCheckedModeBanner: false,
      title: 'Flutter Multipart upload',
      theme: new ThemeData(
        primaryColor: const Color(0xFF02BB9F),
        primaryColorDark: const Color(0xFF167F67),
        accentColor: const Color(0xFF167F67),
      ),
      home: UploadPage(),
    );
  }
}
4. In order to upload images, we first need a back-end URL. In this demo, we have used https://www.developerlibs.com/upload. You can replace you back-end server url.
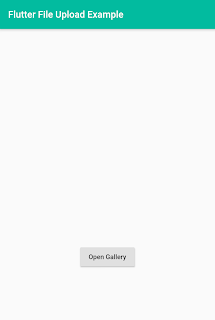
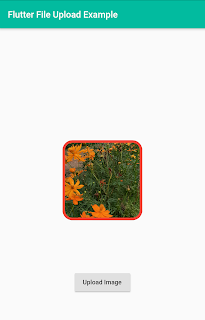
import 'dart:io';The button open gallery will open mobile gallery to pick a image. After that, you can select button an image in the Futter application as shown above. When user will tap on Upload Image bt it will call uploadImage() method to start uploading.
import 'package:flutter/material.dart';
import 'package:http/http.dart' as http;
import 'package:image_picker/image_picker.dart';
class UploadPage extends StatefulWidget {
UploadPage({Key key, this.url}) : super(key: key);
final String url;
@override
_UploadPageState createState() => _UploadPageState();
}
class _UploadPageState extends State<UploadPage> {
File file;
var serverReceiverPath = "https://www.developerlibs.com/upload";
Future<String> uploadImage(filename) async {
var request = http.MultipartRequest('POST', Uri.parse(serverReceiverPath));
request.files.add(await http.MultipartFile.fromPath('picture', filename));
var res = await request.send();
return res.reasonPhrase;
}
@override
Widget build(BuildContext context) {
return Scaffold(
appBar: AppBar(
title: Text(
'Flutter File Upload Example',
style: TextStyle(color: Colors.white),
),
),
body: Center(
child: Column(
mainAxisAlignment: MainAxisAlignment.center,
children: <Widget>[
file != null
? Container(
height: 160.0,
width: 160.0,
decoration: BoxDecoration(
color: const Color(0xff7c94b6),
image: DecorationImage(
image: ExactAssetImage(file.path),
fit: BoxFit.cover,
),
border: Border.all(color: Colors.red, width: 5.0),
borderRadius:
BorderRadius.all(const Radius.circular(20.0)),
),
)
: SizedBox(
width: 0.0,
),
SizedBox(
height: 100.0,
),
file != null
? RaisedButton(
child: Text("Upload Image"),
onPressed: () async {
var res = await uploadImage(file.path);
setState(() {
print(res);
});
},
)
: SizedBox(
width: 50.0,
),
file == null
? RaisedButton(
child: Text("Open Gallery"),
onPressed: () async {
file = await ImagePicker.pickImage(
source: ImageSource.gallery);
setState(() {});
},
)
: SizedBox(
width: 0.0,
)
],
),
),
);
}
}
If you have followed the above post carefully, you can upload image/file on your back-end server. But if you are facing any problem or you have any quires, please feel free to ask it from comment section below.


